
Hello and welcome! This tutorial will give you an easy guide of configuring a wireless network in Packet Tracer using a wireless router. We’ll go through wireless LAN configuration, wireless security and configuring the wireless router for internet connectivity. Briefly, here are the configurations we’ll perform on the wireless router:
- Wireless LAN administration.
- Wireless LAN network setup.
- Securing a wireless network with WPA and WEP security features.
- Setting up internet connectivity on the wireless router.
In our network set up, we have two laptops and a PC which should connect to a LAN provided by one wireless router.The PC is is used by the network Admin and connects to the LAN via an Ethernet port of wireless router.The laptops should connect to the same LAN by wireless means, and for this reason we’ll install wireless adapters on them. Still, we’ll need to connect the LAN to the internet via an ISP router.
Let’s now do all that step by step.
Wireless LAN configuration
First get into Cisco Packet Tracer and in the physical mode, pick a wireless router and two laptops,a PC, a generic server and a 2800-series router(or just any other router other than wireless).
Now connect the PC to the Ethernet 1 of the wireless router.
For the laptops, replace the already-installed wired LAN module with a wireless adapter module (WMP 300N) .
Make sure that you first power off each laptop before you make any replacement then restore the power back after replacement. That’s easy to do!
Once you have the wireless modules in place, you’ll see the wireless connections come up between the laptops and the wireless router as shown below.

Next, we’re going to do some settings on the wireless router to create a LAN then connect it to the internet.
To do any configuration on the wireless router, we’ll use its GUI(Graphical User Interface) which we can access either by:
- Clicking the Wireless Router icon then GUI tab, or
- Using a browser in a PC or laptop in the LAN.
Let’s use the PC to access the router GUI.
We’ll access the router from the PC or the laptops using the router’s LAN interface.The LAN interface is simply the default gateway of the LAN.
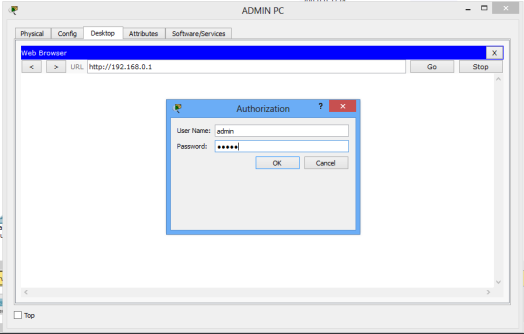
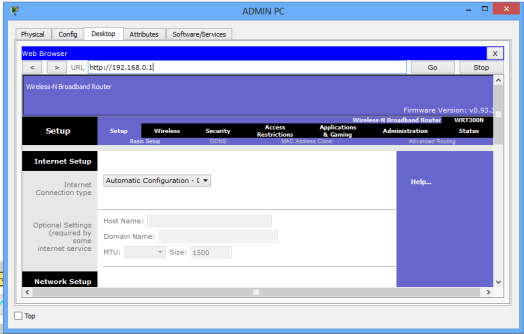
So now, on the ADMIN PC browser, type the IP address of the LAN interface of the wireless router.(192.168.0.1 by default ), then hit Go.
A login prompt appears. Provide the username (admin) and password (admin) to be allowed into the GUI of the router.You can always change these settings later.
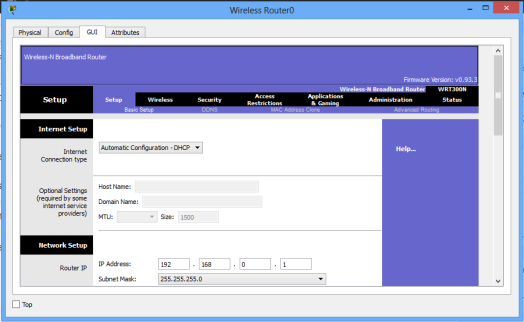
You should now be in the GUI of the router, whichever approach you chose to access it. Just examine it closely for a moment. On it, you can see several tabs like Setup, Wireless, Security, Access Restrictions, Application & Gaming, Administration and WRT 300N status.
For this tutorial we’ll focus on setup, wireless and administration tabs. Notice that once you click on one major tab, other ‘sub-tabs’ will appear.
Wireless Router Administration
We’ll begin with Administration in the GUI. Here we’ll simply change the router’s username and password.
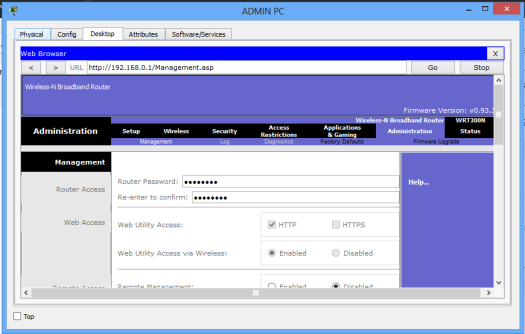
On the browser of Admin PC, type the IP address of the LAN interface of the wireless router(192.168.0.1, by default). Hit Go to access the GUI of the router. Provide the default username(admin) and password(admin). Click OK. You’re now on the GUI of the router. See it on the figure below.
Click on the Administration tab and set a new password for administrative access. Scroll down and Save settings. You will be prompted for a username and the new password you just set.Type them and click OK. Wait a bit. A new screen appears confirming settings are successful. You can click on continue to continue with configurations.
To test for the new password entered, close the browser of Admin PC and try to to access the GUI again using the browser. You’ll now provide the new password you’ve just set.
The admin username and password are important, as only a network admin(or a user with admin rights) is able to log into the router and manage its settings.
Let’s now move on to another setup.
LAN Setup and Internet Setup
To configure addresses for the LAN and internet connectivity, we’ll use Setup tab.
Network Setup
Network setup means LAN setup. Already, we have a PC and three laptops in the LAN.We’ll assign the them IP addresses either statically or dynamically (using a DHCP pool set up in the wireless router).
The default LAN network address given here is 192.168.0.0 with a subnet mask of 255.255.255.0 .The first address in this network (192.168.0.1 by default) has been assigned to the LAN interface of the router. It has just been named IP address. Obviously, all the PCs in the LAN will use the LAN interface as their default interface(to communicate to hosts in outside networks).
Now, in the router’s network settings, you may choose to enable DHCP to dynamically assign IP addresses to the PCs. On the other hand, if you choose to disable DHCP, then obviously, you’ll have to configure static IP addresses on the PCs.
When you choose to enable DHCP, set the start address for the LAN pool, maximum hosts to be allowed in your LAN and the DNS server for the LAN. The PCs will receive addresses automatically from the pool.
Now, going the DHCP way:
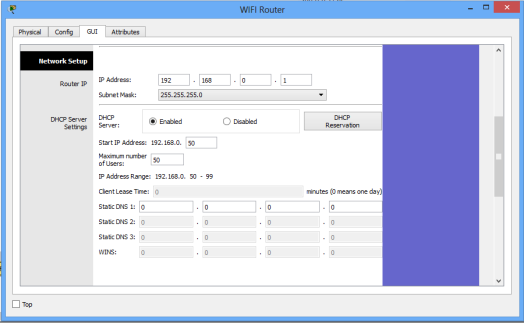
- Ensure DHCP is checked.
- Leave the IP address as 192.168.0.1 (This is the default LAN gateway address).
- Set a start address of 192.168.0.50 and set maximum users to 100 (or any number of users you want)
- You can leave the DNS server entry as it is (0.0.0.0) or specify the address of a DNS server of your choice.
- Scroll down and Save settings.
See the set up window below.
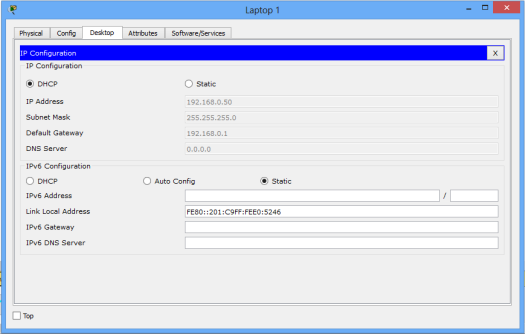
Moving on, let’s enable DHCP on each PC for dynamic configuration. Go to the IP configuration tab for each PC and enable DHCP. Each PC should automatically obtain an IP address from the router.
As an example, here is the IP configuration for Laptop1:
Now let’s test our wireless LAN.
Ping PC2 from PC1. Ping should succeed.
Try also to ping the LAN interface of the router from one of the PCs ,say, PC1 . It should be successful.
That was pretty easy! Let’s now move on and add wireless security for the wireless LAN access.
Adding security for wireless LAN access
The LAN network we have just setup has no wireless security features enabled. If this a was a production network, this would mean an obvious security threat since this makes the network accessible to unauthorized users. So let’s implement some level of wireless security to our LAN.
Access the GUI of wireless router (either by clicking on Router icon or from Admin PC browser), then click on Wireless tab. Under the Basic Wireless Settings sub tab, change the default wireless SSID to any name of your choice. I have named mine ‘myLAN‘. After this, don’t forget to Save settings.
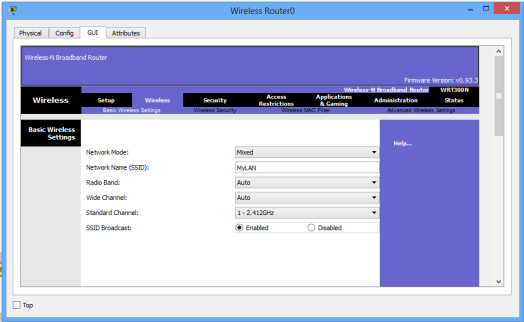
The acronym SSID stands for Service Set Identifier, and its the name of your wireless network(wireless LAN).
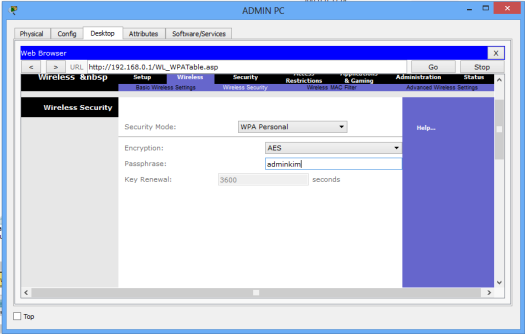
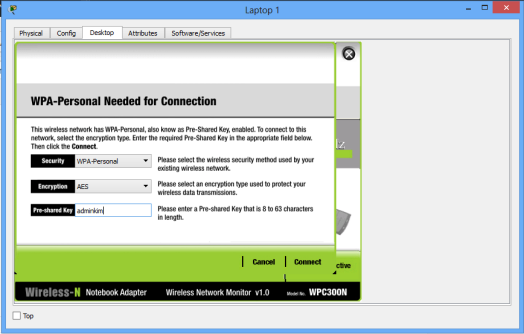
Still, in the Wireless tab, under the Wireless security sub tab, change security mode to WPA personal , then set passphrase field to a password of your choice. Scroll down and Save settings
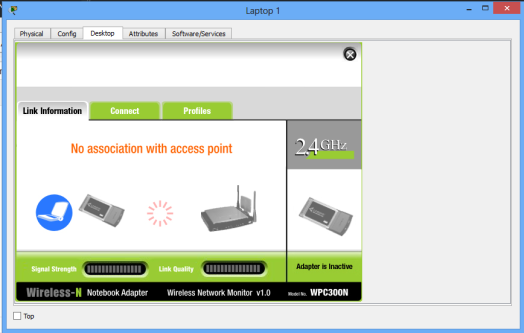
The LAN network is now secured for wireless access. To test whether its really protected, click Laptop1->Desktop->Wireless.
A new window appears that shows the now secured wireless network. Click connect. You can now see the name of the wireless network( myWIFI , in my case) and its signal strength. Site features listed include WPA1 PSK security feature.
Again, click connect, then provide the security pre-shared key for the WiFi that you set, then connect. Laptop 1 is now connected to the WiFi network. You can see at the bottom right of the screen that the wireless network adapter on the laptop is active.Repeat this process for the Laptop2.
Now, you can change the wireless security mode to any other from the available options. You may choose WEP security feature for our wireless network, for example. For WEP, provide a 40-bit (10 hexadecimal digits e.g. A123B456C789) or 64 -bit key(16 hex characters). WEP and WPA configurations look almost alike.
That’s all for wireless security configuration.
Lastly, let’s see how to set up internet configurations on the wireless Router so that the PC and laptops in the LAN can access the internet. So move on to the next section.
Internet Setup
For this part, we’ll configure the internet interface on the router so as to connect our LAN to the internet. Note that for different routers (from different vendors), the internet interface may be named differently; in some routers, for example, the interface may have the name ‘WAN interface‘, suitably because its the interface that allows devices in our LAN to access the internet.
Here, we’ll connect the internet interface to an ISP router which then connects to an internet server (example.com, as an example).
So now, access the Internet Setup tab on the GUI of the wireless router (either by clicking on its icon or from admin PC browser). Actually, in a real life router configuration, you’ll use a PC browser. In this case you should remember the username name and the new password you set.
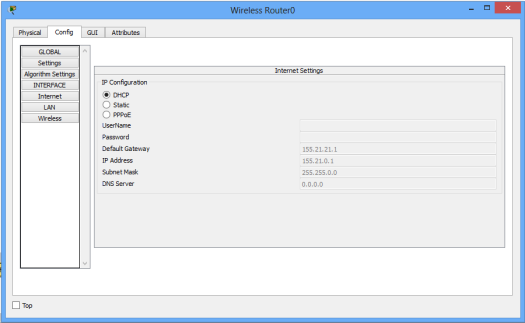
To Set internet connectivity , we’ll need to set a static IP address on the interface or set interface as a DHCP client so that it will be assigned an address dynamically by the ISP router. Alternatively, you may use PPPoE to provide WAN connectivity to the internet.
Now, if you choose to configure a static IP address for the internet interface, you can specify also the default gateway and a DNS server of your choice.
And, if you’d rather like to have the internet interface address configured by DHCP, you’ll then set the internet interface as a DHCP client. A DHCP server will be configured on another device, such as the ISP router (in our topology here!).
Otherwise, if you choose PPPoE for internet connectivity, then set up the username and password for PPPoE authentication. The internet interface will then become a PPPoE client and will negotiate for connection with a PPPoE server running on an ISP device so as to achieve internet connectivity.Usually the username and password will be provided by your ISP.
For now, we’ll set the internet interface to act as a DHCP client (with the DHCP server configured on the ISP router)
So then :
First configure IP addresses and a DHCP server on ISP router.
ISP_ROUTER(config)#int fa0/0
ISP_ROUTER(config-if)#ip add 155.21.21.1 255.255.0.0
ISP_ROUTER(config-if)#no shut
ISP_ROUTER(config-if)#
ISP_ROUTER(config-if)#int fa0/1
ISP_ROUTER(config-if)#ip add 200.0.0.1 255.255.255.0
ISP_ROUTER(config-if)#no shut

ISP_ROUTER(config-if)#exit

ISP_ROUTER(config)#ip dhcp pool mypool
ISP_ROUTER(dhcp-config)#net 155.21.0.0 255.255.0.0
ISP_ROUTER(dhcp-config)#default-router 155.21.21.1
ISP_ROUTER(dhcp-config)#dns-server 0.0.0.0
Now make the internet interface a DHCP client by enabling DHCP on it.
To verify DHCP configuration,click on the wireless router icon, then go to Config tab. Pick DHCP. The interface is now configured with an IP address from the pool set in the ISP router.
Next,we have to configure static or dynamic routes in the ISP router for the devices in the wireless LAN to gain access the internet server:
Here is a static route:
ISP_ROUTER(config)#ip route 192.168.0.0
                    255.255.255.0 fa0/0
Lastly, assign an IP address to the internet server (if you hadn’t done so), then try to reach the server from a host in the LAN.
For example, you can ping the server from Laptop1. Ping should succeed.
That’s all for this tutorial, and I hope you found the tutorial helpful. I also strongly believe that if you’ve gotten everything presented in here,then you have more than a foundation to create your own wireless network using a wireless router, e.g, home WiFi. It’s my believe!
Cheers!
See also:
- How to configure DHCP server in Packet Tracer.
- Configuring DHCPv6 (both stateless and stateful) in Packet Tracer.
- DNS server configuration in Packet Tracer
- IP helper-address configuration in Packet Tracer

I got this web site from my pal who informed me concerning this web
page and now this time I am browsing this website
and reading very informative content at this place.
LikeLike
Thanks designed for sharing such a good idea, paragraph is nice, thats why i have read it entirely
LikeLike
i m kapla boy
LikeLiked by 1 person
This is a very nice one and gives in-depth information. I am really happy with the quality and presentation of the article. I’d really like to appreciate the efforts you get with writing this post. Thanks for sharing.
CCNA course in pune
LikeLike