Sponge Filters: The Easiest Fish Tank Filter Ever
Sponge filters are one of the most popular filters used in fish stores, fish rooms, and breeding tanks because they’re so reliable and easy to use. But beginners often have many questions on how they work, how to set one up, and how to keep them clean. Check out our step-by-step instructions to help you get started with your first sponge filter.

Sponge filter setup diagram
What is a Sponge Filter?
This most basic of all filters requires at least three components: a sponge filter (which sits inside the tank), air pump (which sits outside the tank), and airline tubing to connect them. The air pump pushes air through the airline tubing into the hollow cavity inside the sponge filter. Bubbles rise from the inside of the sponge, thus drawing water through the sponge walls. This water suction process mechanically collects debris from the aquarium and gives beneficial bacteria place to grow.
Sponge filters are a long-time favorite of both beginner and veteran fish keepers since they’re cheap, easy to clean, and hard to break since they have very few mechanical parts. Because of the constant bubbling, it provides good water circulation and surface agitation, white being gentle enough to avoid sucking up fish fry, shrimp, and other slow-moving creatures. Plus, during power outages, the beneficial bacteria on the sponge stays in the oxygenated tank water (which gives it a longer chance of surviving), and you can use our rechargeable air pump with built-in battery backup that turns on automatically during power outages.
Which Sponge Filter is the Best?
Sponge filters are a pretty basic piece of equipment, so there’s not a lot of difference between brands. However, after a decade of using tons of sponge filters, we made our own with all the improvements and features that we’ve always wanted. The sponge is made with a coarse foam of 20 ppi medium porosity to easily collect particulate from the water without clogging up too quickly. The surface area is ideal for shrimp and fish to graze on and clean. Plus, the coarse sponge doesn’t trap as much air, allowing it to get nice water flow and sink immediately. (Fine sponges often have problems with floating, which can cause lack of oxygen in your aquarium and potentially loss of life.)
To optimize the sponge filter’s performance, we’ve included an air collar that produces smaller bubbles to lessen noise and create more continuous current. For greater water circulation, we included the Easy Flow accessory that curves the uplift tube so that water flows out of the sponge filter horizontally across the water surface and around the aquarium. Also, we purposely designed the base and lift tube with a green color to blend in with planted tanks and easily hide green algae growth, whereas the foam sponge is black to best conceal fish waste and detritus that gets sucked in.
Another advantage of the Aquarium Co-Op sponge filters is that they can be customized in different configurations. You can stack multiple sponge filters on top of each other and run them off a single air pump line. Then, if you ever need to set up a hospital tank, simply remove one sponge from the stack and it's already seeded with beneficial bacterial to help the quarantined fish. You can also run the sponge filter with the Aquarium Co-Op power head, which fits perfectly into one of the short, wide uplift tube pieces. This method also increases the water circulation and filters out particles from the water more quickly.
Do I Need an Air Stone for Sponge Filters?
Some hobbyists like to add an air stone to the inside of their sponge filter, but it can sometimes slip off over time or allow bubbles to come out of the side of the sponge. Instead, the Aquarium Co-Op sponge filter (and Easy Flow sponge filter upgrade kit) comes with an air collar, which replaces the air stone and diffuses the air from your air pump into smaller bubbles in the water. The air collar helps to lessen the bubbling noise and make the filtration more efficient. It creates a steady stream of tiny bubbles (instead of large, intermittent bubbles) that produces constant lift in the sponge filter – much like a continuously running escalator (versus an elevator that starts and stops all the time).
How to Set Up a Sponge Filter
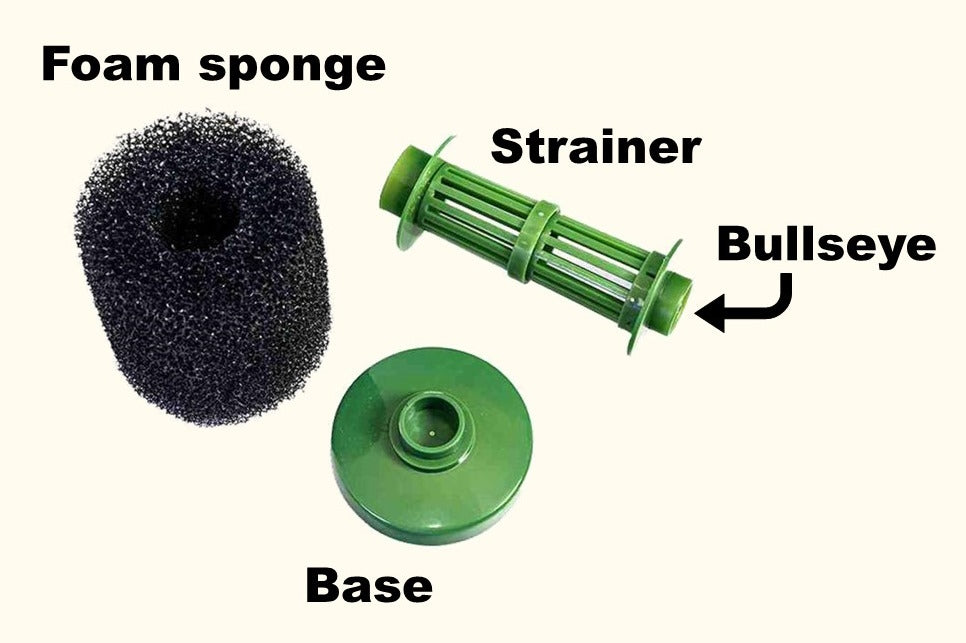
Sponge filter components
- To assemble the sponge filter, snap together the two strainer pieces together. (The bottom strainer has an extra connector on the bottom that looks like an upside-down top hat.)
- Attach the weighted base to the bottom of the strainer.

- Slide the sponge over the strainer column, and then snap the bullseye onto the top of the strainer.

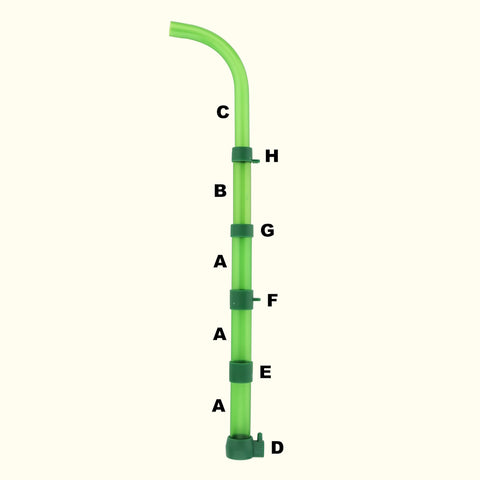
- Lay out the remaining pieces of the sponge filter (or Easy Flow kit if you purchased it separately). You should have five translucent green tubes:
— 3 short and wide tubes (part A)
— 1 tall and skinny tube (part B)
— 1 curved tube (part C)
You should also have five solid green connectors:
— 1 air collar with a small nipple for connecting airline tubing (part D)
— 1 wide connector with no airline tubing holder (part E)
— 1 wide connector with an airline tubing holder (part F)
— 1 small connector with no airline tubing holder (part G)
— 1 small connector with an airline tubing holder (part H)
Note: Each connector has a rounded opening and a flat-edged opening. The rounded opening should be facing upward, while the flat opening is facing downward toward the sponge filter.

- Attach the air collar (part D) to the green plastic bullseye on the bullseye on the top of the sponge filter. Then attach one of the short and wide Easy Flow tubes (part A) to the air collar.
- Attach the wide connector with no airline tubing holder (part E) and then one of the short and wide tubes (part A).
- Attach the wide connector with an airline tubing holder (part F) and then one of the short and wide tubes (part A).
- Attach the small connector with no airline tubing holder (part G) and then the tall and skinny tube (part B). Note: the part B tube will slide inside of the part A tube if you want to shorten the height.
- Attach the small connector with an airline tubing holder (part H) and then the curved tube (part C). The shorter end of the curved piece has an angled kink in the tube, while the longer end is straight. Insert the longer, straight end of the curved piece into the connector. Make sure the kink in the tube sits above the top of the small connector (part H). If you push the curved piece too far down, air bubbles will escape from the connector.
Easy Flow uplift tube components
- Line the airline tubing holders so they all face the same side of the tubes, right above the nipple of the air collar (part D). Then rotate the straight end of the curved piece so that it faces away from the airline tubing holders.
- Connect one end of the airline tubing to the side of the air collar (part D), and connect the other end of the airline tubing to an air pump. (If the air pump is located in a position lower than the top of the fish tank, use a check valve in the middle of the airline tubing to prevent flooding.)
- Snap the airline tubing to the airline tubing holders on the side of the Easy Flow connectors to keep it in place.

- Place the sponge filter into the aquarium and squeeze out any bubbles from the foam if it’s floating. To minimize bubbles and maximize flow, the curved outlet piece of the Easy Flow accessory should be slightly above the water line.
- Place the air pump in its final location outside of the tank, and then cut the airline tubing roll (attached to the sponge filter) to the proper length so that it’s long enough to reach the air pump. Connect the newly cut end of the airline tubing to the air pump.
- If the air pump is located below the top of the aquarium, you need to add a check valve to prevent water from flowing into the airline tubing whenever the air pump is turned off or the power is out. Cut the airline tubing (between the sponge filter and air pump) a few inches outside of the aquarium, and then attach the check valve in between so that the end of the check valve with the flapper (looks like a colored or horizontal bar usually) is facing the air pump. (If you install it backwards, no air will flow when you turn on the air pump, so just flip it around.)

- Create a drip loop with the power cable of the air pump (to ensure moisture will not make contact with the plug), and then plug in the air pump. Within a few seconds, you should see bubbles coming from your sponge filter.
How to Adjust the Sponge Filter Height
- To shorten the Easy Flow accessory, remove the short and wide tube (part A) that is closest to the sponge filter and the wide connector with no airline tubing holder (part E) just above it. Then reconnect the rest of the Easy Flow parts to the air collar (part D).
- To shorten it even more, repeat Step 1. Remove the short and wide tube (part A) that is closest to the sponge filter and the wide connector with an airline tubing holder (part F) just above it. Then reconnect the rest of the Easy Flow parts to the air collar (part D).
- To reach the minimum possible height, push the tall and skinny tube (part B) downward so that it slides inside the tube closest to the sponge filter (part A). The two small connectors (parts G and F) should be touching each other.

- If you need to shorten the uplift tube even more to fit a small tank that is less than 10 inches deep, consider cutting the tubes to reach the desired height using a hacksaw or PVC pipe cutter. (See video below for more details.)
- For aquariums that are taller than 22 inches, you can increase the height by stacking 2 or more sponge filters together. (See the video below for more details.)
View the following tutorial to see a video demonstration of how to put together the Aquarium Co-Op sponge filter and adjust the uplift tube height:
How to Clean a Sponge Filter
Yes, a sponge filter helps to clean your aquarium, but it’s essentially like a trash can that collects waste and needs to be emptied out every once in a while. We recommend cleaning your sponge filter once a month or whenever you see a decrease in bubbles (which is caused by the foam getting clogged up with detritus).
- When taking the sponge filter apart, disconnect the bullseye from the strainer (i.e., take off the whole top part of the filter) so you can easily remove the foam part for cleaning.
- Use a plastic bag to scoop the foam out of the water so that the detritus won’t spread and make a big mess in the aquarium.
- Squeeze and wring out the foam several times in old tank water.
- Reassemble the sponge filter and put it back in the tank.
- If there are lots of particles floating in the water, just wait an hour or so for the sponge filter to clean it up.
Sponge filters are easy to use, budget-friendly, and very reliable compared to other filter types. If you haven’t tried one yet, check out our line of sponge filters and let us know what you think!