How to Tie a Noose: The Macabre Art of a Hangman’s Knot
We need to talk about the hangman’s noose knot.
So, you want to learn how to tie a noose? This is also known as a hangman’s knot. In this article we will go over exactly how to tie a noose and what it can and can’t be used for. Before we talk about how to tie the hangman’s noose knot, however…

Hold on, hear me out.
You should message us so we can chat. You are pretty cool and should take a second to appreciate that about yourself.
Please, if you are thinking about doing anything final at least consider talking to us and think about it before you do anything.
First of all, through my research on this topic, I found that on YouTube you receive a prompt if you use this search term. If you search how to tie a noose in YouTube, they will give you a pop up at the top of your page or app that says if you are thinking about suicide talk to someone. It gives you a button to press so you can talk to the suicide hotline. That seems obvious, but I never would have thought I would actually see something like that. It is so unique and different from anything else I have ever seen on the social media platform. This is why I would consider this information as macabre, odd, weird, scary, or any other way that you would describe such a topic as this.
What are the many different uses for a hangman’s noose knot?
Now that we are all on the same page, we can move forward with the article together and learn how to tie a noose knot. This sure is a macabre art if there ever was one. The obvious history of this type of knot lends itself to a dark past and use in the eyes of the general public. The average person will always correlate the hangman’s knot or noose with, well, hanging people. That is why one of its names is the hangman’s knot after all.
This knot has many uses other than the most prominently famous use in its past. It is strikingly similar to the scaffold knot and even the poacher’s knot. It can actually be used for many things in hunting, climbing, camping, and other activities like these. Actually, there are even different variations to the noose knot itself. We will find out all about it in this article. So, without further a due, let’s start learning about the noose knot aka the hangman’s knot.

The more “turns” that you add to your knot the more secure the knot itself is for whatever you are using it for. If it is an important use for safety reasons, you are not going to want to use a one turn knot. You will be better off using a 3-turn knot or even more, like the noose knot. With so many turns, you can be assured that it will hold up to whatever you put it up to better than the lesser turn knots. they will tighten down more with heavier and bigger loads on the knot. If you have an incredibly heavy load on the knot, it may tighten down to the point where you have to cut it free.
A lot of tree climbers and loggers use this noose knot specifically in order to better help them in their job. They call the use for this a “throw” and it is imperative that a knot be used that can be released if they become stuck. The noose knot lends itself greatly to this key aspect by its ease of allowing the user to pull the slack and “spill” the rest of the knot out if they to. Spilling is when you pull the knot through and release its configuration to the point where you get your straight piece of rope back the way it was initially before performing the knot tie.
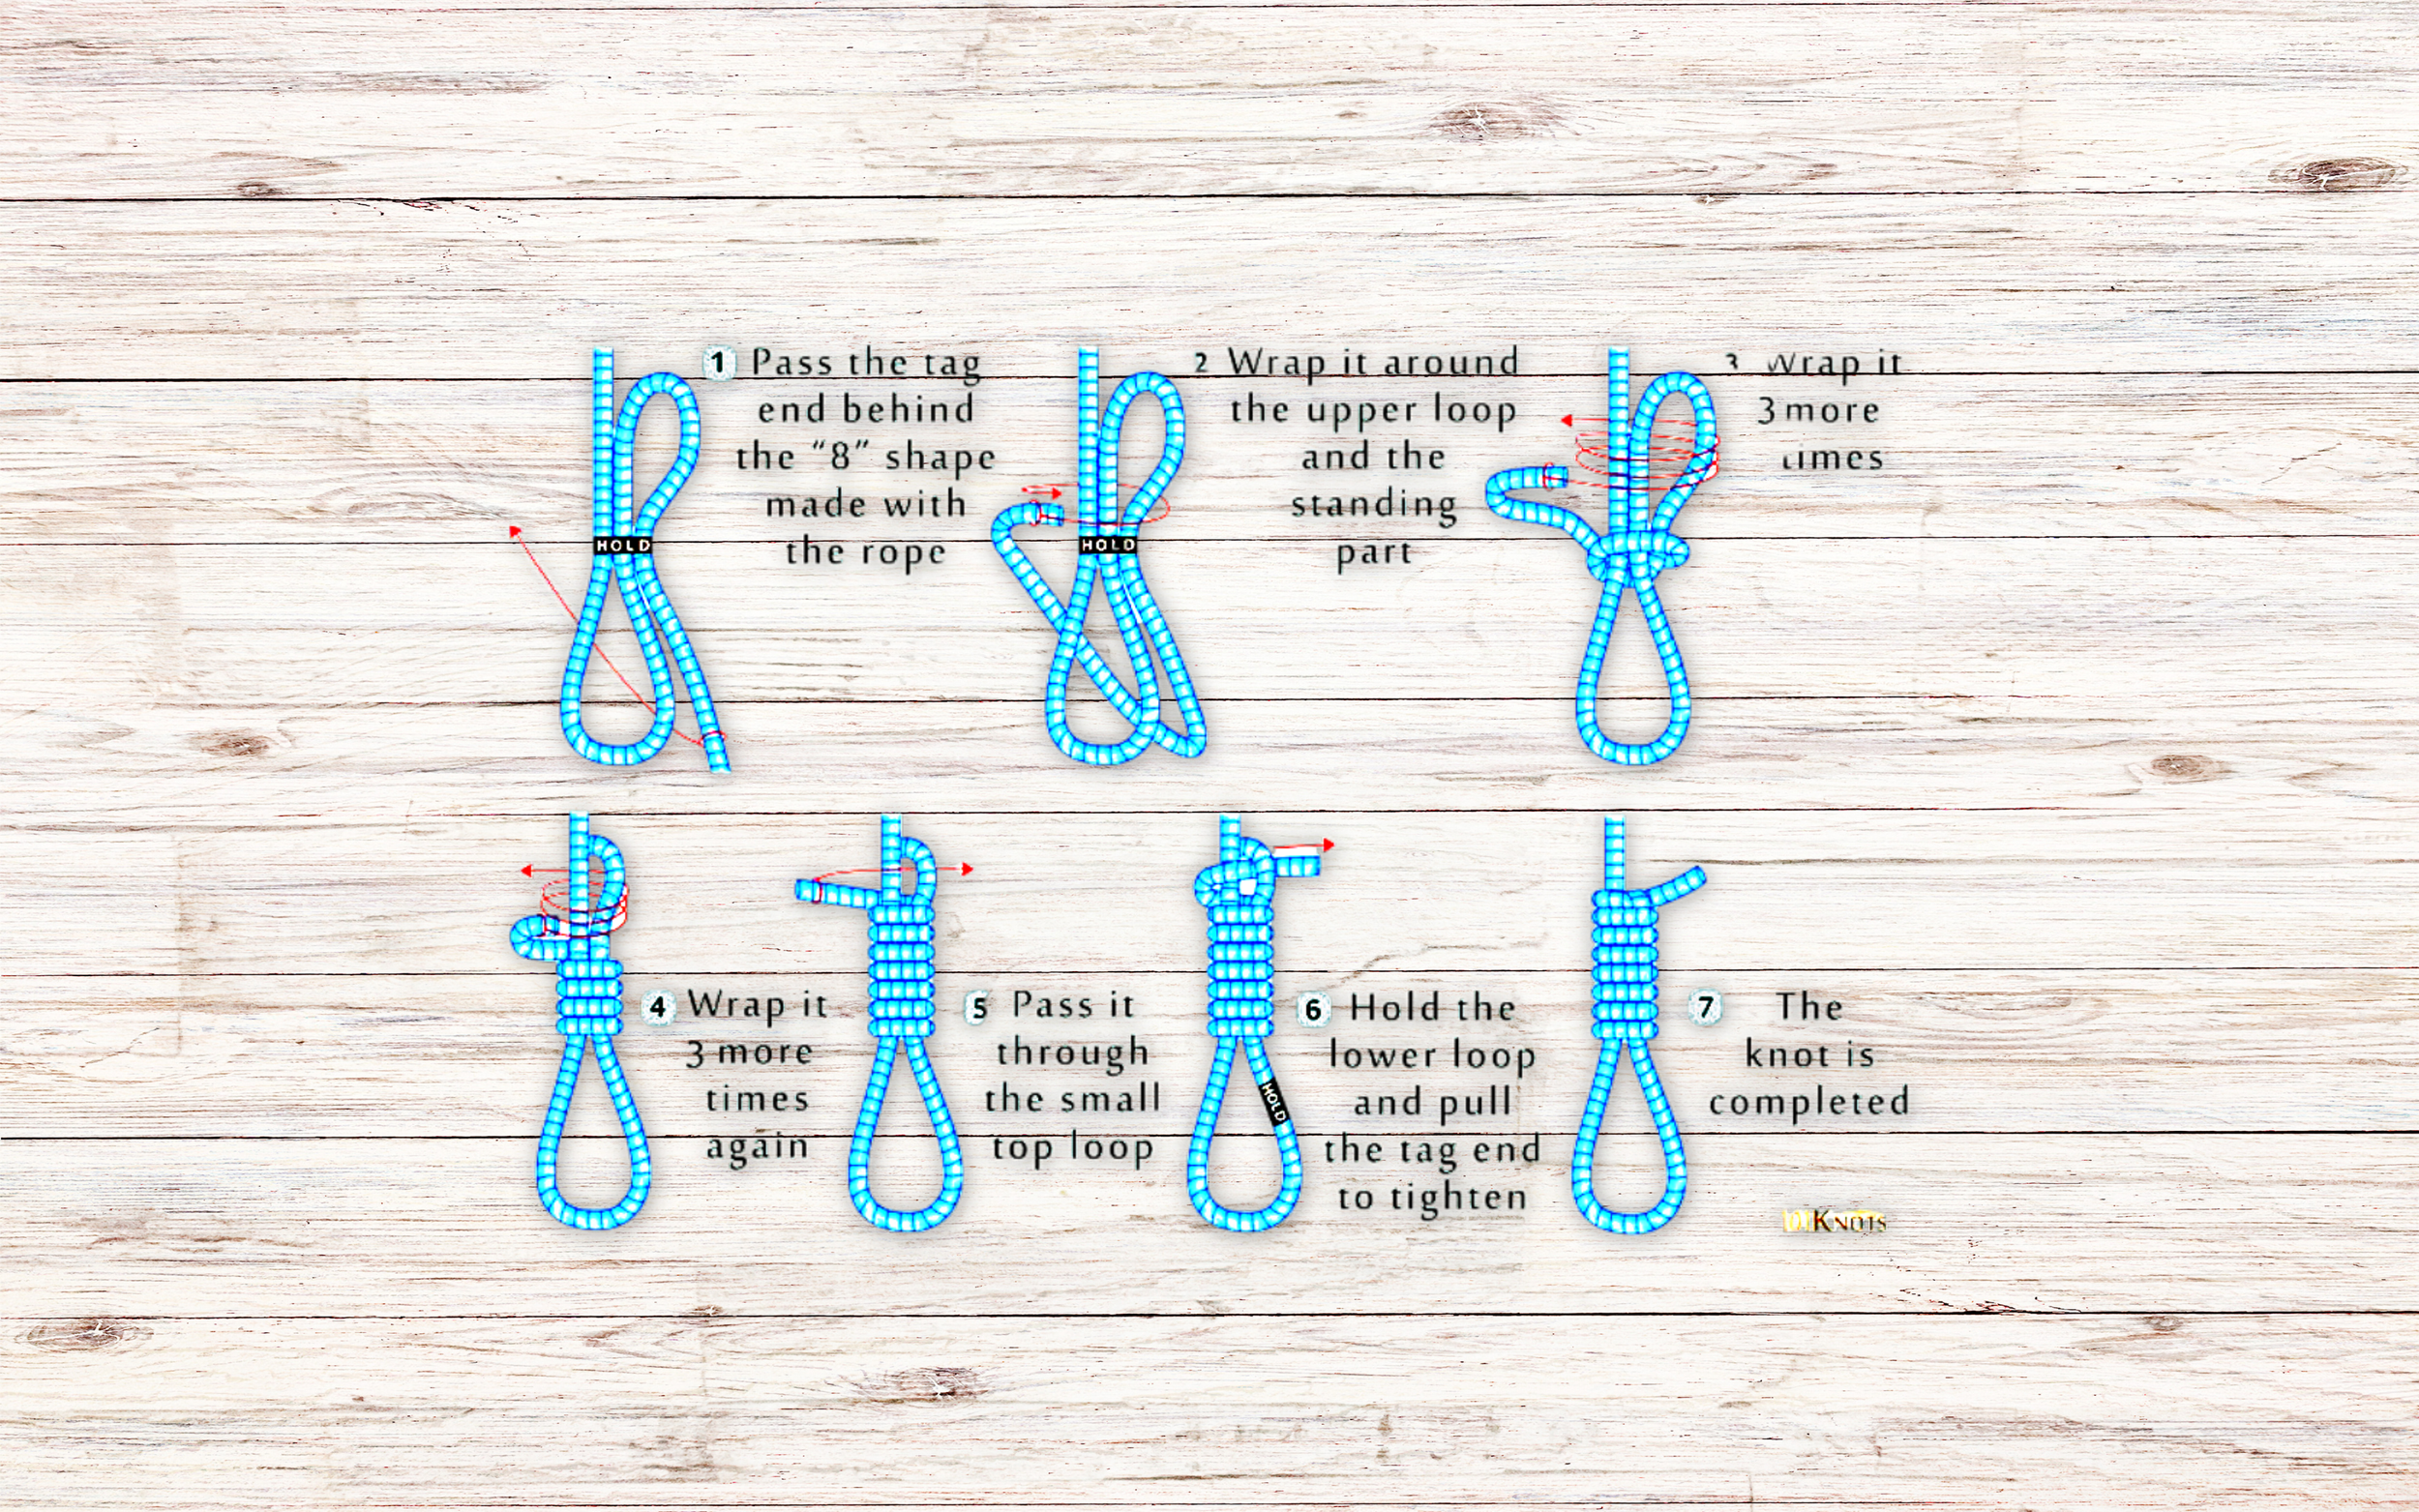
Step-by-step how to tie a noose knot:
The hangman’s noose is essentially a multiple turn scaffold knot. So, it is a type of scaffold knot at the end of the day.
Make a large U shape with your single piece of rope. Doubling it over itself.
Double the rope back in the other direction, making 2 U’s total now. One in one direction, and one pointing in the other direction. In this step, the rope should resemble the letter S.
Put the end of the rope underneath all other sections of the rope (the S shape of the rope).
Wrap the end of the rope that you just put under the S portion around it once. This is what is called a “turn”.
Continue making turns and making sure each one is tight and secure. Make at least 6 more turns for a total of 7 turns. You can make more, but make sure to always end on an odd total number.
With the little bit of left-over rope at the end of this process, take it and pass it through the nearest loop that you now have.
Now, pull the end loop in order to tighten the newest loop down over the loose end of the rope.
Now that your hangman’s noose knot is tightened and secure it is finished and useable.
Check out this video of a step-by-step guide on how to tie a noose.
This knot is incredibly good at absorbing shock and pulling and is very sturdy. Using this type of knot on your climbing equipment including your clips, hooks, and carabiners is a great idea in order to make sure everything is safe and secure. Making sure your equipment is secured to your ropes is crucial in order to ensure your safety during such an innately dangerous activity. Make sure you take your time to learn the knot that you are using and be safe.
Other Similar Knots
The scaffold knot has 3 total turns, and the poachers knot has 2 total turns. They are made in an incredibly similar fashion, but the hangman’s noose has many more total turns than the aforementioned knots. These types of knots are incredibly easy to untie and remove if you want to and are using them on your carabiner for climbing purposes. You simply open the carabiner and slip the knot over the opening. Once the knot is off of the carabiner, you just pull the knots loose end, and it comes apart. The great part about this type of knot, however, is the fact that it is so secure and tightens around your equipment while in use. This means that it is one of the safest knots for an activity like this.
What is the history of the hangman’s noose knot?
Well, yes, the history of this knot does revolve around being used in the gallows for execution reasons for many years. At least in pop culture this is the major use for this specific knot. You’ve learned many different other uses for this knot within this article, however. Plenty of uses are in an injury prevention state of mind, but much of the history with this knot is based in the exact opposite light.

The Hangman’s Noose
This is where the article gets a little bit more macabre and odder. I’m guessing this is what a lot of you came here for, so enjoy the history of this knot.
The gallows had a tall platform in which the person to be executed would stand. There would be a rope with a noose knot hoisted overhead, and a break away door beneath their feet or a stool for them to step up onto. The rope would then be looped around their neck and tightened. The stepping stool would then be removed, or the breakaway door would be released, which would send the person falling downwards due to gravity. This would most often result in what was termed as the “hangman’s fracture”, and the persons neck would be broken. The C2 and C3 vertebrae are separated from each other and thus the spinal cord is disconnected in the process as well. This often results in instantaneous death, but not always. Some statistics place the hangman’s fracture at around 15% of occurrences, with other forms of resulting death taking prominence. There are simply too many variables to control for, and this means that it was not the most efficient way of execution.
So, if the rope was too short the height wouldn’t provide enough momentum needed to break the persons neck and provide a quick death. In this case, the execution would take a very long time, and the method of actual execution would be strangulation. On the other hand, if the rope length was too long the person on the receiving end of the execution would often be decapitated. On the worst side of this spectrum there have been many accounts of the person being hung having too much rope to the point of landing on the ground. This means that the person was able to land on the ground, breaking their ankles and/or legs, and then had to be brought back up to retry their execution in a more lasting manner. How horrible it would be to have this happen, because it is essentially the same as being tortured at this point.
With too short of a rope the death could take up to 5 minutes on average, and thus it was also common for the executioners to leave the person hanging for up to an hour to ensure the comletion of the execution.
There were different locations in which the executioners often used to place the knot on the individual being hung. There was the location in which the knot was placed behind the head called the “Occipital Knot” and one to the side of the head next to the ear called the “Subaural Knot”. These both often resulted in either decapitation or strangulation and did not often cause the desired results. The best placement to put the knot on the neck when using the hangman’s noose knot was just under the chin. This caused instant death much more often than the other placements of the net. This is due to the position of the knot itself forcing the head backwards rapidly and resulting in a great compressive force in the neck. This caused the needed fracture between the C2 and C3 vertebres in order to separate the spinal cord and cause a more instant death for the individual being hung.
I would LOVE to see you back here soon so we can learn some more weird stuff together! I hope your day gets better than it already was, and that you find happiness and success in all of your life’s goals.
Thank you for taking the time out of your day to read this article! : )