Key concepts
Physics
Adhesion
Van der Waals forces
Wetting
Introduction
You might have heard of the Apollo 13 lunar mission or seen the movie about the amazing survival of the spacecraft’s crew after an explosion crippled the ship on its journey to the moon. What you might not know is that duct tape helped save the astronauts’ lives! After the main ship was disabled by an explosion, NASA had to figure out a way to keep the three crew members alive in a tiny lunar lander that was only meant to hold two people. They instructed the astronauts to build lifesaving air filters using cardboard, plastic bags spacesuit parts and—you guessed it—duct tape! In this activity we’re going to explore how duct tape works—and what can make it stop working.
Background
Household glues, such as Elmer’s and superglues, are liquid when you apply them, then they go through a chemical change as they harden to glue things together. Tape works completely differently—there are no chemical reactions. The stickiness of duct tape (and most other strong household tapes) are in large part the result of two physical properties, known as wetting and van der Waals forces.
On supporting science journalism
If you're enjoying this article, consider supporting our award-winning journalism by subscribing. By purchasing a subscription you are helping to ensure the future of impactful stories about the discoveries and ideas shaping our world today.
Wetting is a word that we use to describe how effectively an adhesive can penetrate (or sink into) the material to which it is applied. Imagine a drop of water on a paper towel and a drop of water on a piece of wax paper. Water dropped on the towel will sink into and penetrate it. Water dropped on the wax paper will form a water droplet on its surface but will not penetrate. Materials that are good at wetting can penetrate into the pores of the materials they’re applied to much like the water into the paper towel. The adhesive on your duct tape is good at wetting. When you push a piece of tape down onto a piece of paper, for example, you help the molecules on the sticky side of the tape penetrate into the paper’s surface.
Once the adhesive molecules have penetrated the surface of the paper (or other surface), van der Waals forces come into play. These are weak attractions between molecules that normally might not be attracted to one another. Because of the careful arrangement of these molecules in the tape, the tape molecules are able to form physical bonds with the paper molecules. The tape molecules also cohere (stick to one another)—as a result, the tape can hold together and stick to a huge variety of surfaces.
Materials
Roll of duct tape (at least five linear feet)
One half cup of water
Freezer
Glass dish
Small baking tray or plate (at least 12 inches across)
About one linear foot of wax paper
Paper
Ruler or measuring tape
Scissors
Small sandwich bag
Two large paper clips
About 15 nickels (You can substitute another coin such as dimes or quarters, as long as you have 10 of them.)
Timer or clock
Pen or pencil
Spoon
Partner
Preparation
Cut one 12-inch piece of tape. Carefully place this piece sticky side up on your tray or plate.
Put this tray in the freezer, and set your timer for 25 minutes (or note the time on your clock).
Use a paper clip to carefully poke a hole through a top corner of your sandwich bag. Make your hole at least one inch from the edge of the bag. Loop your paper clip through the hole (you might have to bend it slightly) so that the bag hangs from the paper clip.
On your paper, make a table with four columns and five rows. Across the top row write labels for the columns: “duct tape treatment/condition” in the first box; “number of nickels” in the second box; “length of hanging tape” in the third; and “stickiness of tape” in the fourth. In the “duct tape treatment/condition” column write “glass pan” in the box[row?] below, “wax paper” in the next box[row?], “wet” in the following one and “frozen” in the final box[row?]. You will fill in the remaining boxes as you do the activity.
Use your scissors to cut a 12-inch strip of tape.
Gently stick the end of this tape to a countertop or other sturdy object on which you have permission to use duct tape. Allow it to hang free without touching anything. This is your tape control—you will use this to compare the stickiness of the other tape you will use in this activity.
Procedure
Use your scissors to cut another 12-inch strip of tape.
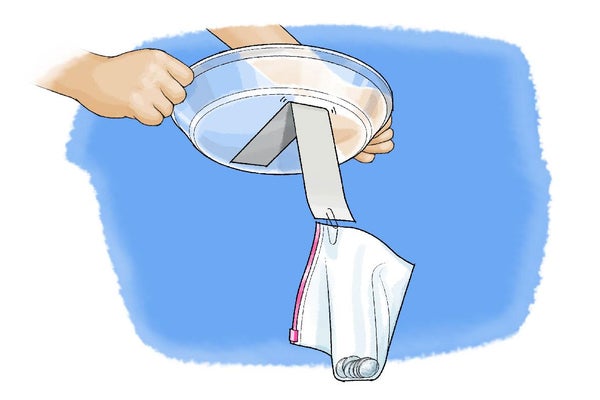
Stick six inches of the tape to the bottom of your glass pan. Press it down firmly using your hand. Allow the other six inches to hang below the dish (like a tail!).
Have your partner hold the dish so that the tape can hang free.
Use your scissors or the extra paper clip to poke a small hole through the hanging end of the tape (approximately one inch from the end) of the tape.
Insert your paper clip that is attached to the bag through the hole, so that both clip and bag hang from the end of the tape.
While your partner holds the glass dish steady, slowly add nickels to the bag, pausing to observe any changes after adding each coin. What happens to the tape as you add nickels? Do you see any changes?
If the tape pulls off the glass dish before you run out of nickels, record the number of nickels that the tape held in the first column of the "glass pan" row in your table. If you are able to put all 15 nickels in the bag and the tape holds, record the number 15.
Use your ruler to measure the tape hanging from the dish. Note the tape’s length in the “length of tape” column for the control row in your table. Notice whether the tape’s length has changed since you started. Did the weight of the coins pull more of the tape free, making the tail longer?
Gently pull the tape off the glass plate. As you pull the tape, feel the sticky side. Compare this to the hanging half of the tape, which never touched the pan. Does one half feel more or less sticky than the other? Does it look different?
Compare the stickiness of the used tape to that hanging from the table. Does it feel more or less sticky?
Rate the stickiness of the used tape on a scale of 1 to 10. Use your control tape as a comparison. If that is a 10, how sticky is the used tape?
Dispose of your used tape.
Use your scissors to cut another 12-inch strip of tape.
Repeat the above steps but this time attach the tape to your wax paper. When your partner holds the wax paper, have them brace it against a book or your glass pan, so that it doesn’t sag with the weight of the coins.
If the tape doesn’t come off the wax paper as you pull it, write “could not remove” in the “stickiness of tape” column.
After you have recorded your results in each column of the wax paper row you can dispose of your used tape.
Use your scissors to cut another 12-inch strip of tape.
Before attaching the tape, carefully place it sticky side up on a counter or tabletop. Place your ruler next to the tape.
Use your spoon to drop several spoonfuls of water onto half the length of the tape. Make sure that half of the tape is thoroughly wet.
Repeat the testing steps, attaching the wet half of the tape to your glass pan. If the tape doesn’t stick, write “0” in the “number of nickels” column and “did not stick” in the “length of tape” column.
Compare the stickiness of the wet half of your tape to the control tape. Rate the stickiness of the wet tape on a scale of 1 to 10 in the “stickiness of tape” column, in the “wet” row. Does the wet tape feel different? In what way? Does it look different? How would you explain the differences you observe?
After you have recorded your results in each column of the wet row, dispose of your used tape.
Remove the plate with your tape on it from the freezer (after it has been there at least 25 minutes)
Repeat the testing steps attaching the frozen tape to the glass pan. If the tape doesn’t stick, write “0” in the “number of nickels” column and “did not stick” in the “length of tape” column.
Review your table. In which condition was the tape able to hold the highest number of nickels? The lowest? Which condition had the highest rating for tape stickiness? Which condition had the lowest?
Extra: Repeat the activity, sticking the tape to a nonstick pan. Be sure to ask for permission first! Add a row to your table to record the results.
Extra: Test other types of tape. Are some more sensitive to water or temperature than others? Do some hold better than others?
Observations and results
During this activity, you should have found the stickiness of your tape depended on two general factors: the condition of the tape and the surface where you were attaching it. Although the tape probably stuck firmly to the glass pan, when the tape was wet or frozen, it was significantly less sticky compared with your control tape. In addition, when you stuck the tape to wax paper, it probably did not stick as well as it did to the glass pan.
So let’s start with the conditions of the tape itself: Why doesn’t tape work when it’s wet? Tape loses its stickiness when the adhesive molecules in the tape become wet. When this happens, the water acts as a barrier to wetting (so the adhesive molecules can’t sink into the glass pan) and also prevents the physical bonds from forming between the tape and pan—the water acts like a wall between them, and they can’t join together!
Freezing the tape also decreased its adhesive wetting capacity. Again, imagine a few drops of liquid water dropped onto a paper towel, this time compared with an ice cube dropped onto a paper towel. The liquid water will penetrate the towel much more quickly and effectively than the ice cube will. Similarly the adhesive molecules in the tape, when frozen, cannot penetrate other surfaces as well, so the tape can’t get a firm “grip” on the things on which you want it to stick.
In the case of wax paper the tape didn’t stick as well as it did to the glass pan, but this time it was because of the wax paper. Think about the water drop on the paper towel compared with the drop on the wax paper. Just as the water drop can’t penetrate the wax paper, neither can the tape! Wax paper blocks most materials from wetting, which makes it great at repelling water, food and, in this case, tape.
Clean up
Throw away any used materials that cannot be reused. You can remove any residue left by the tape using olive oil or an olive oil–soaked paper towel. Allow the oil to saturate the residue for at least 15 minutes, then scrub it off using a sponge.
More to explore:
Need Help Getting Out of a Sticky Situation?, from Science Buddies
Strength of Glues, from Science Buddies
Stretch It! How Does Temperature Affect a Rubber Band?, from Scientific American
Science Activities for All Ages!, from Science Buddies
This activity brought to you in partnership with Science Buddies
