By clicking on the
Add link under the
Avatars section of the control panel, you can import images that have already been uploaded onto a web server into vBulletin. After clicking the
Add link, the following forms will appear:
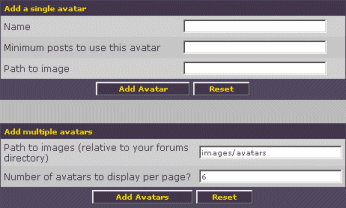
If you would like to import a single image from either a local of remote web server into vBulletin, fill in and submit the first form. This form accepts the following three fields:
- Name - type in a name for the avatar.
- Minimum posts to use this avatar - type in the minimum number of posts that a user must have accumulated to use this avatar in this box (or leave empty to offer this avatar to all users).
- Path To Image - this can either be an URL of an image (e.g. https://www.vbulletin.com/images/v_logo.gif) or a path on your web server (e.g. "/www/sites/htdocs.old/images/logo.gif").
If you would prefer to add multiple avatars to your vBulletin installation at once, you can use the second form on this page (
Add multiple avatars). This form accepts the following two fields:
- Path to images - the path to the directory where the avatar images are uploaded (relative to your vBulletin forums directory on the server).
- Number of avatars to display per page? - once you click on the button at the end of the form, vBulletin will allow you to select which avatars to import into the system. You can adjust the number of avatars that are previewed on each page with this option.
On the next page, you'll be able to select which images to import into vBulletin:
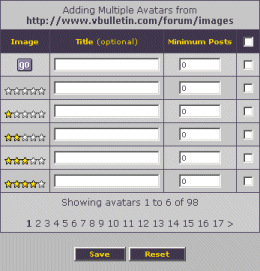
Tick the check box next to each image you wish to import into vBulletin. You can also type in a title for each of the images as well (although this is optional). After ticking all the images you wish to import, click the "Save" button at the end of the page. If there are more images in the directory that you haven't yet viewed or selected, they will now been shown. You can repeat the ticking and saving process until you have imported all the avatars that you wish to offer your users.