Operating Instructions Blu-ray Disc Player DMP-BD35 - Panasonic
Operating Instructions Blu-ray Disc Player DMP-BD35 - Panasonic
Operating Instructions Blu-ray Disc Player DMP-BD35 - Panasonic

You also want an ePaper? Increase the reach of your titles
YUMPU automatically turns print PDFs into web optimized ePapers that Google loves.
The illustration shows the image of <strong>DMP</strong>-BD55.<br />
Dear customer<br />
<strong>Operating</strong> <strong>Instructions</strong><br />
<strong>Blu</strong>-<strong>ray</strong> <strong>Disc</strong> <strong>Player</strong><br />
Model No. <strong>DMP</strong>-BD55<br />
<strong>DMP</strong>-<strong>BD35</strong><br />
Thank you for purchasing this product.<br />
For optimum performance and safety, please read these instructions carefully.<br />
Before connecting, operating or adjusting this product, please read the instructions completely. Please keep this manual for future reference.<br />
Region management information<br />
BD-Video<br />
This unit plays BD-Video marked with labels containing the region code A.<br />
DVD-Video<br />
This unit plays DVD-Video marked with labels containing the region number “1” or “ALL”.<br />
As an ENERGY STAR Partner,<br />
<strong>Panasonic</strong> has determined that<br />
this product meets the ENERGY STAR<br />
guidelines for energy efficiency.<br />
For Canada only: The word “Participant” is used in place of the word<br />
“Partner”.<br />
La referencia rápida en español se puede encontrar en la página 45.<br />
P PC PP<br />
®<br />
®<br />
Example:<br />
Example:<br />
1<br />
If you have any questions contact<br />
[[U.S.A.]:1-800-211-PANA(7262)<br />
[Canada]:1-800-561-5505<br />
ALL<br />
[[U.S.A.]:The warranty can be found on page 42.<br />
[Canada]:The warranty can be found on page 43.<br />
1<br />
2<br />
4<br />
RQT9243-1P or RQT9350-P
2<br />
RQT9243 or RQT9350<br />
Getting started<br />
IMPORTANT SAFETY INSTRUCTIONS<br />
Read these operating instructions carefully before using the unit.<br />
Follow the safety instructions on the unit and the applicable<br />
safety instructions listed below. Keep these operating<br />
instructions handy for future reference.<br />
1) Read these instructions.<br />
2) Keep these instructions.<br />
3) Heed all warnings.<br />
4) Follow all instructions.<br />
5) Do not use this apparatus near water.<br />
6) Clean only with dry cloth.<br />
7) Do not block any ventilation openings. Install in accordance<br />
with the manufacturer’s instructions.<br />
8) Do not install near any heat sources such as radiators, heat<br />
registers, stoves, or other apparatus (including amplifiers)<br />
that produce heat.<br />
9) Do not defeat the safety purpose of the polarized or<br />
grounding-type plug. A polarized plug has two blades with<br />
one wider than the other. A grounding-type plug has two<br />
blades and a third grounding prong. The wide blade or the<br />
third prong are provided for your safety. If the provided plug<br />
does not fit into your outlet, consult an electrician for<br />
replacement of the obsolete outlet.<br />
10) Protect the power cord from being walked on or pinched<br />
particularly at plugs, convenience receptacles, and the point<br />
where they exit from the apparatus.<br />
11) Only use attachments/accessories specified by the<br />
manufacturer.<br />
12) Use only with the cart, stand, tripod, bracket, or<br />
table specified by the manufacturer, or sold with<br />
the apparatus. When a cart is used, use<br />
caution when moving the cart/apparatus<br />
combination to avoid injury from tip-over.<br />
13) Unplug this apparatus during lightning storms<br />
or when unused for long periods of time.<br />
14) Refer all servicing to qualified service personnel. Servicing is<br />
required when the apparatus has been damaged in any way,<br />
such as power-supply cord or plug is damaged, liquid has<br />
been spilled or objects have fallen into the apparatus, the<br />
apparatus has been exposed to rain or moisture, does not<br />
operate normally, or has been dropped.<br />
WARNING:<br />
TO REDUCE THE RISK OF FIRE, ELECTRIC SHOCK OR<br />
PRODUCT DAMAGE,<br />
≥DO NOT EXPOSE THIS APPARATUS TO RAIN,<br />
MOISTURE, DRIPPING OR SPLASHING AND THAT NO<br />
OBJECTS FILLED WITH LIQUIDS, SUCH AS VASES,<br />
SHALL BE PLACED ON THE APPARATUS.<br />
≥USE ONLY THE RECOMMENDED ACCESSORIES.<br />
≥DO NOT REMOVE THE COVER (OR BACK); THERE<br />
ARE NO USER SERVICEABLE PARTS INSIDE. REFER<br />
SERVICING TO QUALIFIED SERVICE PERSONNEL.<br />
CAUTION!<br />
DO NOT INSTALL OR PLACE THIS UNIT IN A<br />
BOOKCASE, BUILT-IN CABINET OR IN ANOTHER<br />
CONFINED SPACE. ENSURE THE UNIT IS WELL<br />
VENTILATED. TO PREVENT RISK OF ELECTRIC SHOCK<br />
OR FIRE HAZARD DUE TO OVERHEATING, ENSURE<br />
THAT CURTAINS AND ANY OTHER MATERIALS DO NOT<br />
OBSTRUCT THE VENTILATION VENTS.<br />
CAUTION!<br />
THIS PRODUCT UTILIZES A LASER.<br />
USE OF CONTROLS OR ADJUSTMENTS OR<br />
PERFORMANCE OF PROCEDURES OTHER THAN<br />
THOSE SPECIFIED HEREIN MAY RESULT IN<br />
HAZARDOUS RADIATION EXPOSURE.<br />
DO NOT OPEN COVERS AND DO NOT REPAIR<br />
YOURSELF. REFER SERVICING TO QUALIFIED<br />
PERSONNEL.<br />
CAUTION<br />
Danger of explosion if battery is incorrectly replaced.<br />
Replace only with the same or equivalent type<br />
recommended by the manufacturer. Dispose of used<br />
batteries according to the manufacturer’s instructions.<br />
The socket outlet shall be installed near the equipment and<br />
easily accessible. The mains plug of the power supply cord<br />
shall remain readily operable.<br />
To completely disconnect this apparatus from the AC Mains,<br />
disconnect the power supply cord plug from AC receptacle.<br />
THE FOLLOWING APPLIES ONLY IN THE U.S.A.<br />
FCC Note:<br />
This equipment has been tested and found to comply with the limits<br />
for a Class B digital device, pursuant to Part 15 of the FCC Rules.<br />
These limits are designed to provide reasonable protection against<br />
harmful interference in a residential installation. This equipment<br />
generates, uses, and can radiate radio frequency energy and, if not<br />
installed and used in accordance with the instructions, may cause<br />
harmful interference to radio communications. However, there is no<br />
guarantee that interference will not occur in a particular installation.<br />
If this equipment does cause harmful interference to radio or<br />
television reception, which can be determined by turning the<br />
equipment off and on, the user is encouraged to try to correct the<br />
interference by one or more of the following measures:<br />
≥Reorient or relocate the receiving antenna.<br />
≥Increase the separation between the equipment and receiver.<br />
≥Connect the equipment into an outlet on a circuit different from<br />
that to which the receiver is connected.<br />
≥Consult the dealer or an experienced radio/TV technician for help.<br />
FCC Caution: To assure continued compliance, follow the<br />
attached installation instructions and use only shielded<br />
interface cables when connecting to peripheral devices.<br />
Any changes or modifications not expressly approved by the party<br />
responsible for compliance could void the user’s authority to<br />
operate this equipment.<br />
This device complies with Part 15 of the FCC Rules. Operation is<br />
subject to the following two conditions: (1) This device may not<br />
cause harmful interference, and (2) this device must accept any<br />
interference received, including interference that may cause<br />
undesired operation.<br />
Responsible Party:<br />
<strong>Panasonic</strong> Corporation of North America<br />
One <strong>Panasonic</strong> Way<br />
Secaucus, NJ 07094<br />
Support Contact:<br />
<strong>Panasonic</strong> Consumer Electronics Company<br />
Telephone No.: 1-800-211-PANA (7262)<br />
(RQT9243)<br />
(RQT9350)<br />
CAUTION<br />
RISK OF ELECTRIC SHOCK<br />
DO NOT OPEN<br />
CAUTION: TO REDUCE THE RISK OF ELECTRIC<br />
SHOCK, DO NOT REMOVE SCREWS.<br />
NO USER-SERVICEABLE PARTS<br />
INSIDE.<br />
REFER SERVICING TO QUALIFIED<br />
SERVICE PERSONNEL.<br />
The lightning flash with arrowhead symbol, within<br />
an equilateral triangle, is intended to alert the user<br />
to the presence of uninsulated “dangerous<br />
voltage” within the product’s enclosure that may be<br />
of sufficient magnitude to constitute a risk of<br />
electric shock to persons.<br />
The exclamation point within an equilateral triangle<br />
is intended to alert the user to the presence of<br />
important operating and maintenance (servicing)<br />
instructions in the literature accompanying the<br />
appliance.<br />
(Inside of product)<br />
(Inside of product)
Unit and media care<br />
<strong>Disc</strong> and card handling<br />
Clean discs<br />
DO DO NOT<br />
Wipe with a damp cloth and then wipe dry.<br />
<strong>Disc</strong> and card handling precautions<br />
≥Handle discs by the edges to avoid inadvertent scratches or fingerprints on the disc.<br />
≥Do not attach labels or stickers to discs (This may cause disc warping, rendering it unusable).<br />
≥Do not write on the label side with a ball-point pen or other writing instrument.<br />
≥Do not use record cleaning sp<strong>ray</strong>s, benzine, thinner, static electricity prevention liquids or any other solvent.<br />
≥Do not use scratch-proof protectors or covers.<br />
≥Clean any dust, water, or foreign matter from the terminals on the rear side of the card.<br />
≥Do not use the following discs:<br />
–<strong>Disc</strong>s with exposed adhesive from removed stickers or labels (rented discs etc).<br />
–<strong>Disc</strong>s that are badly warped or cracked.<br />
–Irregularly shaped discs, such as heart shapes.<br />
Maintenance<br />
Clean this unit with a soft, dry cloth<br />
≥Never use alcohol, paint thinner or benzine to clean this unit.<br />
≥Before using chemically treated cloth, carefully read the instructions that came with the cloth.<br />
Observe the following points to ensure continued listening and viewing pleasure.<br />
Dust and dirt may adhere to the unit’s lens over time, making it impossible to play discs.<br />
Use the lens cleaner (not included) about once every year, depending on frequency of use and the operating environment. Carefully read the lens<br />
cleaner’s instructions before use.<br />
Lens cleaner: RP-CL720PP<br />
≥ This lens cleaner is sold as specific for DIGA, but can be used<br />
without problem on this unit as well.<br />
To dispose or transfer this unit<br />
This unit may record information of your operating procedures. If you discard this unit either by disposal or transfer, then follow the procedures to<br />
return all the settings to the factory presets to delete the recorded information. (� 38, “To return to the factory preset”)<br />
≥When BD-Video is played back, the operation history may be recorded in the memory of this unit. The recorded contents differ depending on the<br />
disc.<br />
Getting started<br />
3<br />
RQT9243 or RQT9350
4<br />
RQT9243 or RQT9350<br />
Table of contents<br />
Getting started<br />
IMPORTANT SAFETY<br />
INSTRUCTIONS ................................2<br />
Unit and media care ............................3<br />
Accessory information........................5<br />
<strong>Disc</strong> and card information ..................6<br />
Audio and video information..............8<br />
Connections.......................................10<br />
Broadband network connection.......14<br />
Firmware updates..............................14<br />
Remote control and unit reference<br />
guide................................................15<br />
Setting ................................................16<br />
Network settings................................17<br />
Playback<br />
Basic play<br />
(Playing video contents)................19<br />
Enjoying the advanced functions on<br />
BD-Video discs ..............................21<br />
Chapter playback ..............................22<br />
Playing still pictures .........................22<br />
Playing DivX videos .........................24<br />
Playing music ...................................25<br />
Linked operations with the TV<br />
(VIERA LinkTM “HDAVI ControlTM ”).... 26<br />
Settings<br />
Changing settings with the<br />
on-screen menu ............................. 28<br />
Changing the unit’s settings............ 30<br />
Reference<br />
About MP3/JPEG/DivX files.............. 35<br />
Messages ........................................... 36<br />
Troubleshooting guide ..................... 38<br />
Specifications.................................... 41<br />
Limited Warranty<br />
(ONLY FOR U.S.A. ) ....................... 42<br />
Limited Warranty<br />
(ONLY FOR CANADA) ................... 43<br />
Product Service................................. 44<br />
Licenses............................................. 44<br />
Referencia rápida en español<br />
(Spanish Quick Reference) ........... 45<br />
Glossary............................................. 46<br />
Index....................................Back cover<br />
About descriptions in these operating instructions<br />
≥ These operating instructions are applicable to models <strong>DMP</strong>-BD55 and <strong>DMP</strong>-<strong>BD35</strong>. Unless otherwise indicated, illustrations in<br />
these operating instructions are of <strong>DMP</strong>-BD55.<br />
[BD55] : indicates features applicable to <strong>DMP</strong>-BD55 only.<br />
[<strong>BD35</strong>] : indicates features applicable to <strong>DMP</strong>-<strong>BD35</strong> only.
Accessory information<br />
Please check and identify the supplied accessories. Use numbers indicated in parentheses when asking for<br />
replacement parts.<br />
(Product numbers correct as of August 2008. These may be subject to change.)<br />
Only for U.S.A.: To order accessories, refer to “Accessory Purchases” on page 42.<br />
Only for Canada: To order accessories, call the dealer from whom you have made your purchase.<br />
∏ ∏ ∏ ∏<br />
1 Remote control<br />
(N2QAYB000184)<br />
[BD55]:<br />
[<strong>BD35</strong>]: (ONLY FOR CANADA)<br />
The enclosed Canadian French label sheet corresponds to the English display on the front and back side of the unit.<br />
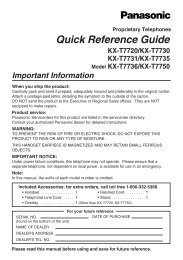
Using the remote control<br />
1 Audio/Video<br />
cable<br />
(K2KA6BA00004)<br />
Batteries<br />
Insert so the poles (i and j) match those in the remote control.<br />
When closing the lid, insert it from the j (minus) side.<br />
≥Do not use rechargeable type batteries.<br />
≥Do not mix old and new batteries.<br />
≥Do not use different types at the same time.<br />
≥Do not heat or expose to flame.<br />
≥Do not leave the battery(ies) in an automobile exposed to direct<br />
sunlight for a long period of time with doors and windows closed.<br />
≥Do not take apart or short circuit.<br />
≥Do not attempt to recharge alkaline or manganese batteries.<br />
≥Do not use batteries if the covering has been peeled off.<br />
Mishandling of batteries can cause electrolyte leakage which can<br />
damage items the fluid contacts and may cause a fire.<br />
Remove batteries if the remote control is not going to be used for a<br />
long period of time. Store in a cool, dark place.<br />
2 Batteries<br />
for remote control<br />
(ONLY FOR U.S.A. )<br />
Product Registration Card<br />
Please complete and return the included product registration card, or register via the Internet at:<br />
http://www.prodreg.com/panasonic/<br />
�<br />
R6/LR6, AA<br />
�<br />
Use<br />
1 AC power supply cord<br />
(K2CB2CB00022)<br />
≥For use with this unit only.<br />
Do not use it with other equipment.<br />
Also, do not use cords from other<br />
equipment with this unit.<br />
Remote control signal sensor<br />
30˚<br />
20˚<br />
20˚<br />
30˚<br />
7 m (23 feet) directly in front<br />
of the unit<br />
If you cannot operate the unit or other equipment using the remote<br />
control after changing the batteries, please re-enter the codes<br />
(� 16, 33).<br />
CAUTION<br />
Do not place objects in front of the unit. The disc t<strong>ray</strong> may collide with<br />
objects when it is opened, and this may cause injury.<br />
Getting started<br />
Reference Settings Playback<br />
5<br />
RQT9243 or RQT9350
6<br />
RQT9243 or RQT9350<br />
<strong>Disc</strong> and card information<br />
Commercially sold discs<br />
This chart shows the different type of retail/commercial discs you can use, and also includes the industry-standard logos that should appear on the<br />
discs and/or packaging.<br />
Type of media Logo Features Indicated as<br />
BD-Video<br />
User recorded media<br />
This chart shows the different type of discs recorded with other devices that you can use.<br />
This format supports High Definition video and audio content<br />
including:<br />
≥BD-Live (BD-ROM version 2 Profile 2). This format provides<br />
interactive features when this player is connected to the<br />
Internet via a broadband connection.<br />
≥BONUSVIEW allows virtual packages or picture-in-picture<br />
functions to be viewed.<br />
DVD-Video This format supports high quality video and audio playback. [DVD-V]<br />
CD<br />
Finalized<br />
Compact <strong>Disc</strong>s (CD’s) that contain audio and music<br />
≥Operation and sound quality of CDs that do not conform to<br />
CD-DA specifications (copy control CDs, etc.) cannot be<br />
guaranteed.<br />
≥The digital audio content side of a Dual<strong>Disc</strong> does not meet<br />
the technical specifications of the Compact <strong>Disc</strong> Digital Audio<br />
(CD-DA) format so play may not be possible.<br />
This mark means you must finalize the disc with the DVD recorder, etc. before playback. For details about finalizing, refer to the<br />
operating instructions for your equipment.<br />
Type of media Logo Formats Indicated as<br />
BD-RE<br />
≥Version 3 of the BD-RE Recording Format<br />
≥JPEG format<br />
[BD-V]<br />
[CD]<br />
[BD-V]<br />
[JPEG]<br />
BD-R ≥Version 2 of the BD-R Recording Format [BD-V]<br />
DVD-RAM<br />
DVD-R/RW<br />
Finalized<br />
DVD-R DL<br />
Finalized<br />
rR/rRW/rR DL<br />
Finalized<br />
CD-R/RW<br />
Finalized<br />
—<br />
—<br />
≥Version 1.1 of the DVD Video Recording Format<br />
≥JPEG format<br />
≥AVCHD format<br />
≥DVD-Video Format<br />
≥Version 1.1 of the DVD Video Recording Format<br />
≥AVCHD format<br />
≥[BD55]: DivX format (DVD-RW is not supported)<br />
≥DVD-Video Format<br />
≥Version 1.2 of the DVD Video Recording Format<br />
≥AVCHD format<br />
≥[BD55]: DivX format<br />
≥+VR (+R/+RW Video Recording) Format<br />
≥AVCHD format<br />
≥CD-DA format<br />
≥MP3 format<br />
≥JPEG format<br />
≥[BD55]: DivX format<br />
[DVD-VR]<br />
[JPEG]<br />
[AVCHD]<br />
[DVD-V]<br />
[DVD-VR]<br />
[AVCHD]<br />
[DivX]<br />
[DVD-V]<br />
[DVD-VR]<br />
[AVCHD]<br />
[DivX]<br />
[DVD-V]<br />
[AVCHD]<br />
[CD]<br />
[MP3]<br />
[JPEG]<br />
[DivX]<br />
≥It may not be possible to play the above discs in some cases due to the type of discs, the condition of the recording, the recording method and<br />
how the files were created.<br />
≥When a disc recorded in the AVCHD format is being played, the video may be paused for a few seconds at portions spliced, due to deletion or<br />
editing.
SD cards<br />
This chart shows the different type of cards recorded with other devices that you can use.<br />
Type of media Logo Formats Indicated as<br />
SD Memory Card* (from 8 MB to 2 GB)<br />
SDHC Memory Card (from 4 GB to 32 GB)<br />
* Includes miniSD Card and microSD Card<br />
≥Please confirm the latest information on the following website.<br />
http://panasonic.co.jp/pavc/global/cs<br />
(This site is in English only.)<br />
≥When using cards from 4GB to 32GB, only SD cards using the SDHC logo can be used.<br />
≥This unit is compatible with SD Memory Cards that meet SD Card Specifications FAT12 and FAT16 formats, as well as SDHC Memory Cards in<br />
FAT32 format.<br />
≥The card types mentioned above will be referred to as “SD card” in these operating instructions.<br />
≥MiniSD Cards and microSD Cards can be used, but must be used with an adaptor card. These are usually supplied with such cards,<br />
or otherwise customer provided.<br />
≥[BD-V]: To play the virtual package (� 21), it is recommended that you use a card that supports SD Speed Class Rating Class 2 and<br />
ADAPTER<br />
has 1 GB or more free space.<br />
≥Useable memory is slightly less than the card capacity.<br />
≥If the SD card you are attempting to use was formatted on a PC, it is possible that the card may not work properly.<br />
≥We recommend using a <strong>Panasonic</strong> SD card.<br />
≥Keep the Memory Card out of reach of children to prevent swallowing.<br />
≥When a card recorded in the AVCHD format is being played, the video may momentarily pause, especially where one recording ends<br />
and the next one begins. This is normal and does not indicate a problem.<br />
≥To protect the card’s contents, move the record prevention tab (on the SD card) to “LOCK”.<br />
<strong>Disc</strong>s that cannot be played in this unit<br />
≥BD-RE discs (with cartridge)<br />
≥2.6 GB and 5.2 GB DVD-RAM<br />
≥DVD-RAM that cannot be removed from cartridge<br />
≥3.95 GB and 4.7 GB DVD-R (Authoring)<br />
≥Version 1.0 DVD-RW<br />
≥+R 8cm (3z), DVD-ROM, CD-ROM, CDV, SACD, Photo CD, MV-<strong>Disc</strong><br />
and PD<br />
≥DVD-Audio<br />
Structure of folders that can be played in this unit<br />
—<br />
≥JPEG format<br />
≥AVCHD format<br />
≥Video CD and SVCD<br />
≥WMA discs<br />
≥[<strong>BD35</strong>]: DivX discs<br />
≥PAL <strong>Disc</strong>s<br />
≥HD DVD<br />
≥BD-Video discs recorded at a rate of 50 fields/sec<br />
≥Any other disc that is not specifically supported<br />
[JPEG]<br />
[AVCHD]<br />
You can play files on this unit by structure of folders as shown below. However depending on the method of writing data (writing<br />
software), play may not be in the order you numbered the folders.<br />
≥Folder structure created on a DVD-RAM, BD-RE or an SD card is not displayed.<br />
Folder which can be displayed with this unit<br />
¢¢¢: Numbers<br />
XXX: Letters<br />
*1 ¢¢¢: from 001 to 999<br />
*2 ¢¢¢: from 100 to 999<br />
XXX: up to 5 figures<br />
*3 ¢¢¢¢: from 0001 to 9999<br />
Structure of MP3 folders in CD-R/CD-RW<br />
Prefix the file names with 3-digit numbers in the order you want to play them.<br />
Structure of DivX folders in CD-R/CD-RW/DVD-R/DVD-RW/DVD-R DL [BD55]<br />
Files inside a folder are displayed in the order they were updated or taken.<br />
Structures of still picture (JPEG) folders<br />
in CD-R/CD-RW<br />
Files inside a folder are displayed in the order they were updated or taken.<br />
in BD-RE/DVD-RAM<br />
≥When the highest level folders are “DCIM” folders, they are displayed as a priority in the “Select Folder” screen.<br />
in SD card<br />
≥When the highest level folders are “DCIM” folders, they are displayed as a priority in the “Select Folder” screen.<br />
CD-R/CD-RW (MP3) DivX [BD55] CD-R/CD-RW (JPEG) BD-RE/DVD-RAM (JPEG) SD Card (JPEG)<br />
Root<br />
001XXXX.mp3<br />
002XXXX.mp3<br />
001 Folder A<br />
003XXXX.mp3<br />
004XXXX.mp3<br />
005XXXX.mp3<br />
e.g.,<br />
Folder B<br />
006XXXX.mp3<br />
007XXXX.mp3<br />
008XXXX.mp3<br />
009XXXX.mp3<br />
Folder C<br />
010XXXX.mp3<br />
011XXXX.mp3<br />
012XXXX.mp3<br />
Root<br />
P0000001.divx<br />
P0000002.divx<br />
Folder A<br />
e.g.,<br />
P0000003.divx<br />
P0000004.divx<br />
P0000005.divx<br />
Folder B<br />
P0000006.divx<br />
P0000007.divx<br />
P0000008.divx<br />
P0000009.divx<br />
Folder C<br />
P0000010.divx<br />
P0000011.divx<br />
P0000012.divx<br />
Root e.g.,<br />
P0000001.jpg<br />
P0000002.jpg<br />
Folder A<br />
P0000003.jpg<br />
P0000004.jpg<br />
P0000005.jpg<br />
Folder B<br />
P0000006.jpg<br />
P0000007.jpg<br />
P0000008.jpg<br />
P0000009.jpg<br />
Folder C<br />
P0000010.jpg<br />
P0000011.jpg<br />
P0000012.jpg<br />
Root e.g.,<br />
P0000001.jpg<br />
P0000002.jpg<br />
JPEG<br />
*1<br />
DCIM���<br />
���XXXXX<br />
*2<br />
XXXX����.JPG<br />
*3<br />
DCIM<br />
���XXXXX *2<br />
Folder A<br />
XXXX����.JPG *3<br />
P0000001.jpg<br />
P0000002.jpg<br />
DCIM<br />
���XXXXX<br />
*2<br />
XXXX����.JPG*3<br />
Folder A<br />
P0000003.jpg<br />
P0000004.jpg<br />
e.g.,<br />
Getting started<br />
7<br />
RQT9243 or RQT9350
8<br />
RQT9243 or RQT9350<br />
Audio and video information<br />
About audio from audio output terminals<br />
Before connecting, read the table below, and confirm the desired audio type and necessary settings (“BD-Video Secondary Audio”, “Dolby D/Dolby<br />
D +/Dolby TrueHD” or “DTS/DTS-HD”). (� 9)<br />
≥The number of channels listed is the maximum possible number of output channels.<br />
HDMI AV OUT/DIGITAL AUDIO OUT (Coaxial [BD55]/Optical)<br />
Terminal HDMI AV OUT DIGITAL AUDIO OUT<br />
“Dolby D/Dolby D +/Dolby TrueHD”/<br />
“DTS/DTS-HD”<br />
“Bitstream”* 1 “PCM”* 3 “Bitstream” “PCM”<br />
“BD-Video Secondary Audio” “On”* 2 “Off” “On” “Off” “On”/“Off” “On”/“Off”<br />
Dolby Digital/<br />
Dolby Digital EX* 5<br />
AUDIO OUT (Analog)<br />
Dolby Digital/<br />
Dolby Digital<br />
EX* 6<br />
Dolby Digital/<br />
Dolby Digital EX<br />
≥Also, depending on the specifications or the settings of the amplifier/receiver, the results of the output may vary.<br />
*1 When the connected equipment is not supported with these audio formats, the audio is output as Dolby Digital bitstream, DTS Digital Surround<br />
bitstream or down-mixed 2ch PCM (e.g., TV).<br />
*2 [BD-V]: When playing BD-Video without secondary audio or clicking sound, the audio is output as the same format as if “BD-Video Secondary<br />
Audio” was set to “Off”.<br />
*3 When the connected equipment is not supported with multi channel surround, the audio is output as down-mixed 2ch PCM.<br />
*4 [BD-V]: When the connected equipment is supported with 7.1 channel surround, the audio output is amplified from 5.1ch or 6.1ch to 7.1ch<br />
depending on the DTS, Inc. specifications.<br />
*5 With PCM output, Dolby Digital EX becomes PCM audio decoded as Dolby Digital, DTS-ES recorded to DVD-Video becomes PCM audio<br />
decoded as DTS Digital Surround, and DTS-ES recorded to BD-Video becomes PCM audio decoded as DTS-ES.<br />
*6 [BD-V]: When “BD-Video Secondary Audio” is set to “On”, Dolby Digital EX is output as Dolby Digital and DTS-ES is output as DTS Digital<br />
Surround, however if playing BD-Video without secondary audio or clicking sound, the audio is output as the original format.<br />
Enjoying High Bit rate Audio of BD-Video [BD-V]<br />
5.1ch PCM<br />
This unit supports high bit rate audio (Dolby Digital Plus, Dolby TrueHD, DTS-HD High Resolution Audio and DTS-HD Master Audio) adopted in<br />
BD-Video.<br />
In order to enjoy these audio formats, the following conditions are necessary. (Part shown in the shaded area of table given above)<br />
NECESSARY CONNECTIONS<br />
≥HDMI AV OUT terminal: Connect this unit to your amplifier/receiver supporting HDMI (High Bit rate Audio) using a High Speed HDMI cable (� 11).<br />
≥7.1ch AUDIO OUT terminal [BD55]: Connect this unit to your amplifier/receiver supporting 7.1 channels using audio cables (� 12).<br />
NECESSARY SETTINGS (� 9)<br />
≥Set “BD-Video Secondary Audio” to “Off”.<br />
≥HDMI AV OUT terminal: Set “Dolby D/Dolby D +/Dolby TrueHD” or “DTS/DTS-HD” to “Bitstream” or “PCM” .<br />
≥7.1ch AUDIO OUT terminal [BD55]: Set “Analog Audio Output” to “7.1ch”.<br />
≥The clicking sound on the menu and audio with secondary video in picture-in-picture mode (� 21) is not output.<br />
Dolby Digital/<br />
Dolby Digital<br />
EX* 6<br />
Dolby Digital Plus<br />
Dolby Digital<br />
Dolby Digital<br />
Plus 5.1ch PCM* 2 7.1ch PCM Dolby Digital<br />
Dolby TrueHD Dolby TrueHD<br />
DTS Digital Surround/<br />
DTS-ES* 5<br />
DTS Digital<br />
Surround/<br />
DTS-ES* 6<br />
DTS Digital<br />
Surround/<br />
DTS-ES<br />
[DVD-V]: 5.1ch PCM DTS Digital<br />
Surround/<br />
DTS-ES* 6<br />
DTS-HD High<br />
[BD-V]: 7.1ch PCM*4<br />
DTS-HD High Resolution Audio<br />
DTS Digital<br />
Surround<br />
Resolution<br />
Audio 7.1ch PCM* 4 DTS-HD Master Audio<br />
DTS-HD Master<br />
Audio<br />
DTS Digital<br />
Surround<br />
7.1ch LPCM<br />
Down-mixed<br />
5.1ch PCM<br />
7.1ch PCM<br />
Down-mixed<br />
5.1ch PCM* 2 7.1ch PCM<br />
Down-mixed<br />
2ch PCM<br />
Terminal 7.1ch AUDIO OUT [BD55]<br />
5.1ch AUDIO<br />
OUT [BD55]<br />
2ch AUDIO<br />
OUT<br />
“BD-Video Secondary Audio” “On” “Off” “On”/“Off” “On”/“Off”<br />
Dolby Digital/<br />
Dolby Digital EX<br />
Dolby Digital Plus<br />
5.1ch<br />
5.1ch*<br />
5.1ch 2ch<br />
2 Dolby TrueHD<br />
7.1ch<br />
DTS Digital Surround/<br />
DTS-ES<br />
[DVD-V]: 5.1ch<br />
[BD-V]: 7.1ch* 4<br />
DTS-HD High Resolution Audio<br />
7.1ch* 4<br />
DTS-HD Master Audio<br />
7.1ch LPCM<br />
Down-mixed<br />
5.1ch* 2 7.1ch<br />
Down-mixed<br />
2ch PCM
Regarding 24p output [BD-V]<br />
Many BD-Video movie contents are recorded in 24 frames/second in accordance with the film materials. However, they will normally be output in<br />
60 frames/second in accordance with the display format.<br />
These can be output in 24p as the original. Therefore, high-quality video can be enjoyed, such as the improved clarity, enhanced perspective, etc.<br />
NECESSARY CONNECTIONS<br />
≥Connect to a TV supporting 1080/24p input via an HDMI cable.<br />
NECESSARY SETTINGS<br />
≥“24p Output”: “On” (� 32)<br />
Necessary settings<br />
After connecting to the terminals, perform necessary settings.<br />
“BD-Video<br />
Secondary Audio”<br />
“Dolby D/Dolby D +/<br />
Dolby TrueHD”<br />
“DTS/DTS-HD”<br />
“Analog Audio<br />
Output” [BD55]<br />
≥For more information about settings, refer to page 31, 32, 34.<br />
≥When using the different terminal at the same time, the sound may not be output with the desired audio if the setting is incorrect.<br />
In the following case, set “HDMI Audio Output” to “Off”. (� 32)<br />
– When connecting a compatible amplifier/receiver using 7.1ch AUDIO OUT/5.1ch AUDIO OUT terminals, and connecting a compatible television<br />
using HDMI AV OUT terminal<br />
– When connecting a compatible amplifier/receiver using both 7.1ch AUDIO OUT/5.1ch AUDIO OUT terminals and HDMI AV OUT terminal if<br />
outputting the audio from analog terminals<br />
– When connecting a compatible amplifier/receiver using DIGITAL AUDIO OUT terminals, and connecting a compatible television using HDMI AV<br />
OUT terminal<br />
To return to the previous screen<br />
Press [RETURN].<br />
To exit the screen<br />
Press [SETUP].<br />
1) While stopped<br />
Press [SETUP].<br />
2) Press [3, 4] to select “Audio” and press [OK].<br />
3) Press [3, 4] to select “Digital Audio Output” and press [OK].<br />
4) Press [3, 4] to select “Dolby D/Dolby D +/Dolby TrueHD”, “DTS/DTS-HD”,<br />
or “BD-Video Secondary Audio” and press [2, 1] to select the option.<br />
1) While stopped<br />
Press [SETUP].<br />
2) Press [3, 4] to select “TV / Device Connection” and press [OK].<br />
3) Press [3, 4] to select “Analog Audio Output” and press [OK].<br />
4) Press [3, 4] to select the option and press [OK].<br />
5) Press [OK].<br />
≥The channel setting screen is displayed. (� 34)<br />
Audio<br />
Dynamic Range Compression<br />
Digital Audio Output<br />
PCM Down Conversion<br />
Downmix<br />
OK<br />
RETURN<br />
Connection<br />
TV Aspect<br />
HDMI Connection<br />
Component Video Resolution<br />
Analog Audio Output<br />
OK<br />
RETURN<br />
Off<br />
Off<br />
Stereo<br />
16:9<br />
480i<br />
2ch + 5.1ch<br />
Getting started<br />
9<br />
RQT9243 or RQT9350
10<br />
RQT9243 or RQT9350<br />
Connections<br />
About terminal<br />
≥This unit offers several different types of audio and video connections.<br />
≥Your TV/receiver/amplifier may or may not support all the connections shown.<br />
≥If your system does not support HDMI, you will need to select one video connection and one audio connection.<br />
≥If your system supports HDMI, this one connection provides both the audio and video connection.<br />
Video Connections (TV)<br />
Highest<br />
Quality<br />
Digital Audio Connections (Receiver/Amplifier)<br />
Highest<br />
Quality<br />
Analog Audio Connections (Receiver/Amplifier)<br />
Highest<br />
Quality<br />
HDMI AV OUT<br />
480p, 720p, 1080i,<br />
1080p<br />
COMPONENT VIDEO OUT<br />
BD-Video: 480i, 480p, 720p,<br />
1080i<br />
DVD-Video: 480i, 480p<br />
HDMI AV OUT DIGITAL AUDIO OUT<br />
(COAXIAL [BD55]/OPTICAL)<br />
7.1ch AUDIO OUT [BD55]<br />
VIDEO OUT<br />
480i<br />
5.1ch AUDIO OUT [BD55] 2ch AUDIO OUT<br />
≥Do not place the unit on amplifiers or equipment that may become hot. The heat can damage the unit.<br />
≥Before making any connections we strongly suggest that all units be temporarily disconnected from AC power.<br />
≥Do not connect video signals through a video recorder. Due to copy guard protection the picture may not be displayed properly<br />
Standard<br />
Quality<br />
Standard<br />
Quality<br />
Standard<br />
Quality<br />
≥Non-HDMI-compliant cables cannot be utilized.<br />
≥Please use High Speed HDMI Cables that have the HDMI logo (as shown on the cover). It is recommended that you<br />
use <strong>Panasonic</strong>’s HDMI cable. When outputting 1080p signal, please use HDMI cables 5.0 meters (16.4 ft) or less.<br />
Recommended part number:<br />
RP-CDHG10 (1.0 m/3.3 ft), RP-CDHG15 (1.5 m/4.9 ft.), RP-CDHG20 (2.0 m/6.6 ft), RP-CDHG30 (3.0 m/9.8 ft.), RP-CDHG50<br />
(5.0 m/16.4 ft.), etc.<br />
≥This unit incorporates HDMI (Deep color, x.v.Color, High Bit rate Audio) technology. (� 46, 47)
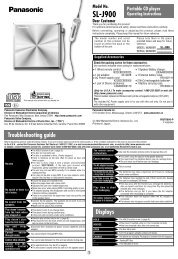
Connecting to a television<br />
A Connecting to your TV, via HDMI AV OUT<br />
HDMI cable<br />
HDMI AV OUT<br />
B Connecting to your TV, via COMPONENT VIDEO OUT<br />
Back of the unit<br />
C Connecting to your TV, via VIDEO OUT<br />
Back of the unit<br />
Television<br />
Component Video cable<br />
Television<br />
HDMI IN<br />
Audio/Video cable (included)<br />
VIDEO OUT<br />
Back of the unit<br />
COMPONENT<br />
VIDEO IN<br />
HDMI<br />
compatible<br />
television<br />
AUDIO IN<br />
R L<br />
AUDIO IN<br />
R L VIDEO IN<br />
2ch AUDIO OUT<br />
Audio/Video cable<br />
(included)<br />
AUDIO/VIDEO IN<br />
≥“HDMI Video Mode” and “HDMI Audio<br />
Output” should be set to “On”. (� 32)<br />
≥To experience better sound consider<br />
adding a surround sound receiver, using<br />
connections D, E, F or G. (� 12, 13)<br />
≥The HDMI connection supports VIERA<br />
Link “HDAVI Control” (� 26) when used<br />
with a compatible <strong>Panasonic</strong> TV.<br />
≥[BD55]: “Analog Audio Output” should be<br />
set to “2ch (Downmix) + 5.1ch”. (� 32)<br />
≥The Component Video cable does not<br />
carry audio, so you must also connect the<br />
L and R audio channels using the Audio/<br />
Video cable.<br />
≥To experience better sound consider<br />
adding a surround sound receiver, using<br />
connections D, E, F or G. (� 12, 13)<br />
(Unplug the red and white plugs.)<br />
≥Connect terminals of the same color.<br />
≥Set the “Black Level Control” to “Darker”.<br />
(� 31)<br />
≥Using the COMPONENT VIDEO OUT<br />
terminal, while playing DVD-Video, the<br />
video output resolution is limited to<br />
“480p”.<br />
≥Be sure your TV supports at least 480p.<br />
Set “Component Video Resolution” to<br />
“480p”, “720p” or “1080i”. (� 32)<br />
≥If this unit is connected to an amplifier/<br />
receiver, etc. via an HDMI cable with<br />
“HDMI Video Mode” set to “On” (� 32),<br />
the video will be fixed to 480i.<br />
≥[BD55]: “Analog Audio Output” should be<br />
set to “2ch (Downmix) + 5.1ch”. (� 32)<br />
≥Using the two analog audio channels this<br />
connection provides, you will not be able<br />
to use any surround sound audio modes.<br />
≥To experience better sound consider<br />
adding a surround sound receiver, using<br />
connections D, E, F or G. (� 12, 13)<br />
(Unplug the red and white plugs.)<br />
≥Connect terminals of the same color.<br />
≥High definition video cannot be viewed<br />
using this connection. To view high<br />
definition video, please use connection<br />
types A or B. (� above)<br />
Getting started<br />
11<br />
RQT9243 or RQT9350
12<br />
RQT9243 or RQT9350<br />
Connections<br />
Connections using a surround sound receiver/amplifier<br />
D Installation using the HDMI connection<br />
E Connecting to 7.1ch AUDIO OUT terminal [BD55]<br />
�<br />
HDMI IN<br />
Multi channel speakers<br />
�<br />
Back of the unit<br />
HDMI compatible<br />
amplifier/receiver<br />
�<br />
HDMI OUT<br />
Back of the unit<br />
HDMI<br />
compatible<br />
television<br />
HDMI cable<br />
�<br />
�<br />
HDMI IN<br />
Multi channel speakers<br />
Connect Audio<br />
cables to<br />
terminals<br />
corresponding to<br />
the speakers you<br />
have connected.<br />
Amplifier/receiver with<br />
7.1ch AUDIO IN<br />
≥“HDMI Video Mode” and “HDMI Audio Output”<br />
should be set to “On”. (� 32)<br />
≥“Digital Audio Output” : Depending on the<br />
connected amplifier/receiver. (� 31)<br />
≥The HDMI connection supports VIERA Link<br />
“HDAVI Control” (� 26) when used with a<br />
compatible <strong>Panasonic</strong> TV.<br />
≥This unit comes equipped with a Dolby Digital<br />
Plus, Dolby TrueHD and DTS-HD decoder.<br />
When an amplifier/receiver with 7.1ch<br />
speakers that supports HDMI (High Bit rate<br />
Audio) is connected using High Speed HDMI<br />
cable, you can enjoy surround sound<br />
recorded with Dolby Digital Plus, Dolby<br />
TrueHD or DTS-HD. (� 8)<br />
≥“Analog Audio Output” should be set to<br />
“7.1ch”. (� 32)<br />
≥This unit comes equipped with a Dolby Digital<br />
Plus, Dolby TrueHD and DTS-HD decoder.<br />
When connected to a compatible amplifier/<br />
receiver using the 7.1ch AUDIO OUT<br />
terminals, you can enjoy surround sound<br />
recorded with Dolby Digital Plus, Dolby<br />
TrueHD or DTS-HD.<br />
≥When connecting amplifier/receiver or other<br />
devices with HDMI AV OUT terminal, set<br />
“HDMI Audio Output” to “Off”. (� 32)<br />
(Otherwise, depending on the specifications<br />
of connected devices, the audio from AUDIO<br />
OUT terminal may be output as two channels<br />
only.)<br />
≥When connecting a TV (� 11, A) with HDMI<br />
AV OUT terminal, set “HDMI Audio Output” to<br />
“Off”. (� 32)<br />
(Otherwise, the sound may not be output with<br />
the desired audio.)<br />
≥Depending on how the disc was recorded, the<br />
audio may not be output properly on the<br />
number of channels desired.<br />
Cable connections<br />
a Surround back speaker (L/R)<br />
b Front speaker (L/R)<br />
c Surround speaker (L/R)<br />
d Center speaker<br />
e Subwoofer
F Connecting to 5.1ch AUDIO OUT terminal [BD55]<br />
�<br />
Back of the unit<br />
G Installation using Coaxial [BD55] /Optical Digital Audio connection<br />
With COAXIAL<br />
With OPTICAL<br />
Back of the unit<br />
Back of the unit<br />
AC power connection<br />
Back of the unit<br />
�<br />
�<br />
�<br />
Coaxial cable<br />
Optical digital audio cable<br />
Cooling fan<br />
Multi channel speakers<br />
Connect Audio<br />
cables to<br />
terminals<br />
corresponding to<br />
the speakers you<br />
have connected.<br />
Amplifier/receiver with<br />
5.1ch AUDIO IN<br />
COAXIAL IN<br />
Amplifier/receiver with a<br />
built-in decoder or a<br />
decoder-amplifier/<br />
receiver combination<br />
OPTICAL IN<br />
AC power supply cord (included)<br />
To a household AC outlet<br />
(AC 120 V, 60 Hz)<br />
Amplifier/receiver with a<br />
built-in decoder or a<br />
decoder-amplifier/<br />
receiver combination<br />
≥“Analog Audio Output” should be set to “2ch<br />
(Downmix) + 5.1ch”. (� 32)<br />
≥Using this connection, 7.1 channel surround<br />
is mixed down to 5.1 channel audio.<br />
≥When connecting amplifier/receiver or other<br />
devices with HDMI AV OUT terminal, set<br />
“HDMI Audio Output” to “Off”. (� 32)<br />
(Otherwise, depending on the specifications<br />
of connected devices, the audio from AUDIO<br />
OUT terminal may be output as two channels<br />
only.)<br />
≥When connecting a TV (� 11, A) with HDMI<br />
AV OUT terminal, set “HDMI Audio Output” to<br />
“Off”. (� 32)<br />
(Otherwise, the sound may not be output with<br />
the desired audio.)<br />
≥Depending on how the disc was recorded, the<br />
audio may not be output properly on the<br />
number of channels desired.<br />
Cable connections<br />
a Front speaker (L/R)<br />
b Surround speaker (L/R)<br />
c Center speaker<br />
d Subwoofer<br />
≥Please set “Digital Audio Output” to the<br />
connection you will use, coaxial or optical<br />
digital. (� 31)<br />
≥When connecting a TV (� 11, A) with HDMI<br />
AV OUT terminal, set “HDMI Audio Output” to<br />
“Off”. (� 32)<br />
(Otherwise, the sound may not be output with<br />
the desired audio.)<br />
≥For best results this unit should be connected<br />
directly to an AC outlet.<br />
≥This unit consumes a small amount of AC<br />
power (less than 0.6 W) even when turned off.<br />
In the interest of power conservation, if you<br />
will not be using this unit for an extended<br />
period of time, it can be disconnected.<br />
Getting started<br />
13<br />
RQT9243 or RQT9350
14<br />
RQT9243 or RQT9350<br />
Broadband network connection<br />
≥By connecting this unit to a broadband connection, this unit can<br />
support the BD-Live feature offered on some movie titles. BD-Live<br />
offers additional interactive media and games that are associated<br />
with the movie title. (� 21)<br />
≥Once connected to a broadband connection, this unit can also<br />
automatically check for firmware updates.<br />
Internet<br />
Straight LAN cable (not included)<br />
Telecommunications<br />
equipment (modem, etc.)<br />
Back of the unit<br />
Hub or broadband router<br />
(not included)<br />
≥After physically connecting this unit to your broadband connection,<br />
some configuration is required. (� 17)<br />
≥With installation where your broadband modem is connected<br />
directly to your PC, a router must be installed.<br />
≥In case all available connection on your router is being used, a hub<br />
or switch can be installed to provide additional connections.<br />
≥Use a router that supports 10BASE-T/100BASE-TX.<br />
≥Inserting any cable other than a LAN cable in the LAN terminal can<br />
damage the unit.<br />
≥Use only shielded LAN cables when connecting to peripheral<br />
devices.<br />
Firmware updates<br />
Occasionally, <strong>Panasonic</strong> releases firmware updates for this BD<br />
<strong>Player</strong>. Firmware is embedded software that controls this unit’s<br />
microprocessor. These updates may add or improve a feature of this<br />
unit. Firmware updates may also be released to correct operating<br />
irregularities that are discovered with certain movies. These updates<br />
are available at no charge.<br />
Automatically check the firmware<br />
This unit is capable of auto firmware check if it is connected to the<br />
Internet via a broadband connection.<br />
When latest firmware version is available, the following screen is<br />
displayed.<br />
Select “Yes” or “No”.<br />
Firmware Update<br />
The latest firmware is available.<br />
Latest Online Version: x.x<br />
Current Installed Version: x.x<br />
Do you want to start firmware update?<br />
For the update information, please visit the<br />
following website:<br />
http://panasonic.net/support/<br />
Yes No<br />
≥If “Yes” is selected, then follow the on-screen instructions.<br />
≥If “No” is selected, then manually update the firmware later.<br />
(� below)<br />
After the latest firmware is downloaded, the system will be restarted<br />
and the firmware will be updated.<br />
When the system is restarted, the screen<br />
display disappears and “START” is displayed<br />
on the unit’s display.<br />
After the firmware is updated and the system is restarted, the<br />
following screen indicates that the firmware update has been<br />
completed.<br />
The firmware was updated.<br />
Current Installed Version: x.x<br />
RETURN<br />
≥During the update process, no other operations can be performed.<br />
Serious damage may occur if you turn the power off and/or press<br />
any buttons.<br />
≥Downloading will require several minutes. It may take longer or the<br />
Internet may not be connected depending on the connection<br />
environment. It is required that you use a broadband connection.<br />
≥When the unit is connected to the Internet, communication charges<br />
may be generated.<br />
≥If you do not want to check for the latest firmware version when the<br />
unit is turned on, set “Automatic Update Check” to “Off”. (� 33)<br />
Manually updating the firmware<br />
If the firmware update is not carried out when the unit is turned on, a<br />
message is displayed when displaying the FUNCTIONS menu.<br />
You can manually update the firmware.<br />
1) Press [SETUP].<br />
2) Press [3, 4] to select “Others” and press [OK].<br />
3) Press [3, 4] to select “Firmware Update” and press [OK].<br />
4) Press [3, 4] to select “Update Now” and press [OK].<br />
5) Press [2, 1] to select “Yes” and press [OK].<br />
If downloading on this unit fails or this unit is not connected to<br />
the Internet, then you can download the latest firmware from<br />
the following website and burn it to a CD-R to update the<br />
firmware.<br />
http://panasonic.net/support/<br />
(This site is in English only.)<br />
OK<br />
The latest firmware is available.<br />
Please update firmware in Setup.
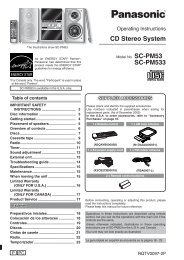
Remote control and unit reference guide<br />
�<br />
�<br />
�<br />
�<br />
�<br />
�<br />
�<br />
�<br />
�<br />
��<br />
��<br />
��<br />
��<br />
�<br />
DIRECT NAVIGATOR<br />
POWER<br />
OPEN/CLOSE<br />
VOL<br />
MUTING<br />
RE-MASTER<br />
CANCEL<br />
AUDIO<br />
SKIP SLOW/SEARCH<br />
STOP<br />
PAUSE<br />
STATUS FUNCTIONS<br />
TOP MENU<br />
POP-UP MENU<br />
PLAY<br />
SUB MENU<br />
S<br />
RETURN<br />
A B C D<br />
SETUP<br />
POWER<br />
TV/VIDEO<br />
�<br />
OK<br />
CH<br />
VOL<br />
RECEIVER<br />
DISPLAY<br />
PIP SECONDARY<br />
AUDIO BD/SD<br />
��<br />
��<br />
��<br />
��<br />
1 POWER button (POWER Í/I) (� 16)<br />
Press to switch the unit from on to standby mode or vice versa. In<br />
standby mode, the unit is still consuming a small amount of power.<br />
2 Display<br />
<strong>Disc</strong> indicator SD card indicator<br />
The indicator blinks when reading data from a disc or card, or<br />
writing data to a card.<br />
3 <strong>Disc</strong> t<strong>ray</strong> (� 19)<br />
4 [BD55]: SD Card LED<br />
≥It is possible to set the LED to turn on/off. (� 32, SD Card LED<br />
Control)<br />
5 Remote control signal sensor (� 5)<br />
6 SD card slot (� 22)<br />
��<br />
��<br />
��<br />
��<br />
��<br />
��<br />
! Turn the unit on and off (� 16)<br />
@ TV operation buttons (� 16)<br />
You can operate the TV through the unit’s remote control.<br />
[Í TV POWER] : Turn the television on and off<br />
[TV/VIDEO] : Switch the input channel<br />
[WXCH] : Channel select<br />
[ijVOL] : Adjust the volume<br />
# Open or close the disc t<strong>ray</strong> (� 19)<br />
$ Numbered buttons<br />
Select title numbers, etc./Enter numbers (� 19)<br />
% Cancel<br />
^ Basic playback control buttons (� 19)<br />
& Show status messages (� 20)<br />
* Show Pop-up menu (� 19)<br />
( Show Top menu/Direct Navigator (� 19)<br />
AJ Show sub menu (� 22)<br />
AA These buttons are used when operating a<br />
BD-Video disc that includes Java TM applications<br />
(BD-J). For more information about operating this<br />
kind of disc, please read the instructions that came<br />
with the disc.<br />
The [A] and [B] buttons are also used with the “Title View”,<br />
“Picture View” and “Album View” screens (� 22).<br />
AB Show Setup menu (� 30)<br />
AC Switch on/off Secondary Video (Picture-in-picture)<br />
(� 21)<br />
AD Transmit the remote control signal<br />
AE Receiver operation buttons (� 16)<br />
You can operate an amplifier/receiver through the unit’s<br />
remote control.<br />
[ijVOL] : Adjust the volume<br />
[MUTING] : Mute the sound<br />
AF Reproduce more natural audio (� 20)<br />
AG Select audio (� 20)<br />
AH Show FUNCTIONS menu (� 20)<br />
AI Selection/OK, Frame-by-frame (� 20)<br />
BJ Show on-screen menu (� 28)<br />
BA Return to previous screen<br />
BB Select disc drive or SD card drive (� 19)<br />
BC Switch on/off Secondary Audio (� 21)<br />
� �<br />
� � �<br />
��� �������<br />
7 Open or close the disc t<strong>ray</strong> (� 19)<br />
8 Stop (� 19)<br />
9 Pause (� 19)<br />
: Start play (� 19)<br />
Rear panel terminals (� 10–14)<br />
���������<br />
Pull to flip down the<br />
front panel.<br />
Getting started<br />
15<br />
RQT9243 or RQT9350
16<br />
RQT9243 or RQT9350<br />
Setting<br />
Easy Setting<br />
After connecting your new player and pressing the power button, a screen for the basic settings will appear.<br />
Preparation<br />
Turn on the television and select the appropriate video input on the television.<br />
1 Press [Í BD POWER].<br />
Setup screen appears.<br />
≥If this unit is connected to a <strong>Panasonic</strong> TV (VIERA)<br />
supporting HDAVI Control 2 or HDAVI Control 3 via an HDMI<br />
cable, then the “On-screen Language” and “TV Aspect”<br />
setting information on the TV are captured from the TV.<br />
2 Follow the on-screen instructions and<br />
make the settings with [3, 4] and [OK].<br />
“On-screen Language”, “TV Aspect” and “Analog Audio<br />
Output” [BD55] are set. (� 32)<br />
Reprogramming the remote control for TV/amplifier/receiver control<br />
You can operate the TV or amplifier/receiver using the unit’s remote control.<br />
Point the remote control at the television or amplifier/receiver.<br />
1 For televisions<br />
Input the 4-digit code with the numbered buttons while<br />
pressing [Í TV POWER].<br />
For amplifiers/receivers<br />
Input the 4-digit code with the numbered buttons while<br />
pressing [MUTING].<br />
e.g., 0001: [0] � [0] � [0] � [1]<br />
2 Test by turning on the television or adjusting the<br />
volume of the amplifier/receiver.<br />
Brand TV Code<br />
<strong>Panasonic</strong> 0051/0055/0250/0650<br />
ADVENT 0761/0783/0815/0817/0842<br />
AKAI 0030/0098/0672/0702/0812<br />
AMERICA ACTION 0180<br />
AOC 0003/0019/0030/0052/0137/0185<br />
APEX DIGITAL 0748/0765/0767/0879/0890<br />
AUDIOVOX<br />
0003/0092/0180/0451/0623/0802/0875/<br />
1937<br />
AXION 1937<br />
BANG & OLUFSEN 0620/1620<br />
BROKSONIC 0003/0236/0463<br />
CASIO 0611/1205<br />
DAEWOO<br />
0019/0039/0066/0067/0091/0092/0451/<br />
0623/0661/0672/1661<br />
0019/0038/0039/0154/0158/0171/0177/<br />
EMERSON 0178/0179/0180/0181/0182/0183/0185/<br />
0236/0270/0280/0282/0463/0623<br />
ENVISION 0030/0813<br />
EPSON 0833/0840<br />
FISHER 0154/0159<br />
FUJITSU 0179/0186/0683/0809/0853<br />
0021/0027/0029/0047/0051/0055/0135/<br />
GE<br />
0138/0174/0178/0251/0279/0282/0451/<br />
0747/1347/1447<br />
GOLDSTAR<br />
0019/0030/0032/0106/0178/0317/0409/<br />
0442/0457/0700/0856/1178/1265<br />
GO VIDEO 0886<br />
HAIER 0768/1034<br />
HANNSPREE 1348/1351/1352<br />
HEWLETT<br />
PACKARD<br />
1088/1089/1101/1494/1502<br />
HISENSE 0748<br />
HITACHI<br />
0016/0032/0038/0056/0095/0097/0145/<br />
0151/0173/0227/0279/0409/0413/1145<br />
INFOCUS 0736/0738/0741/0752/0781/1164/1516<br />
JVC<br />
0036/0053/0069/0160/0169/0182/0731/<br />
1253<br />
KLH 0765/0767<br />
LG<br />
0019/0030/0032/0106/0178/0317/0409/<br />
0442/0457/0700/0856/1178/1265<br />
LOEWE 0136<br />
0020/0024/0028/0030/0036/0054/0096/<br />
MAGNAVOX 0179/0186/0187/0230/0386/0706/0802/<br />
1254/1454<br />
MARANTZ 0030/0054/0444/0704/0854/0855/1154<br />
MEMOREX 0016/0106/0150/0154/0178/0179/0463<br />
Brand TV Code<br />
MITSUBISHI<br />
0014/0019/0093/0098/0150/0155/0178/<br />
0331/0358/0836/0868/1250<br />
NORCENT 0748/0824/1089<br />
OPTOMA 0887<br />
ORION 0179/0236/0463/1463<br />
PHILIPS 0054/0690/1154/1454<br />
PHILIPS<br />
MAGNAVOX<br />
0020/0024/0028/0030/0036/0054/0096/<br />
0179/0186/0187/0230/0386/0690/0706/<br />
0802/1154/1254/1454<br />
PIONEER 0038/0166/0172/0679/0866<br />
POLAROID<br />
0765/0865/1262/1276/1314/1316/1326/<br />
1327/1328/1341/1498/1523<br />
PROSCAN 0047/0747/1347/1447<br />
PROVIEW 0835/1401/1498<br />
0018/0019/0029/0038/0047/0090/0135/<br />
RCA<br />
0174/0278/0679/0747/1047/1147/1247/<br />
1347/1447/1547<br />
RUNCO 0017/0030/0251/0497/0603<br />
SAMPO 0030/0032/0039/0052/0100/0110/1755<br />
0019/0030/0032/0056/0060/0178/0329/<br />
SAMSUNG 0408/0427/0587/0702/0766/0812/0814/<br />
1060<br />
SANSUI 0463<br />
SANYO<br />
0088/0107/0146/0154/0159/0232/0484/<br />
0799/0893<br />
SHARP<br />
0039/0093/0153/0157/0165/0220/0281/<br />
0386/0398/0491/0688/0818/0851<br />
SONY<br />
0000/0011/0080/0111/0273/0353/0810/<br />
0834/0867/1100<br />
SVA 0587/0748/0768/0865/0870/0871/0872<br />
SYLVANIA<br />
0020/0028/0030/0054/0065/0096/0171/<br />
0381<br />
SYMPHONIC 0171/0180<br />
SYNTAX-BRILLIAN 1007/1144/1240/1255/1257/1258/1331<br />
TATUNG 0003/0049/0055/0396/1101/1756<br />
THOMSON 0209/0210/0047<br />
0036/0060/0149/0154/0156/0650/0832/<br />
TOSHIBA 0845/1156/1164/1256/1265/1356/1656/<br />
1704<br />
ULTRA 0391<br />
VIEWSONIC 0857/0864/0885/1755<br />
WESTINGHOUSE 0885/0889/0890/1282/1577<br />
YAMAHA 0019/0030/0769/0833/0839<br />
ZENITH 0016/0017/0092/0178/0463/1265<br />
OK<br />
POWER<br />
≥You can perform this setup anytime by<br />
selecting “Easy Setting” in the Setup<br />
menu. (� 33)<br />
≥You can also change these settings<br />
individually. (� 32)<br />
≥If your television or amplifier/receiver<br />
brand has more than one code listed,<br />
select the one that allows correct<br />
operation.<br />
≥If your television or amplifier/receiver<br />
brand is not listed or if the code listed<br />
for them does not allow control of your<br />
television or amplifier/receiver, this<br />
remote control is not compatible with<br />
them. Use their remote control.<br />
≥When audio is muted, press [MUTING]<br />
again.<br />
Brand<br />
Amplifier<br />
Code<br />
Receiver Code<br />
<strong>Panasonic</strong> 0308<br />
1308/0039/0367/1641/2001/<br />
2002<br />
TECHNICS 0308 1308/0039/0208<br />
BOSE 0674 1229/0639/1253/1933<br />
DENON<br />
1360/0004/0121/0273/1142/<br />
1306/1311<br />
HARMAN 0110/0189/1289/1306<br />
KARDON 0110/0189/1289/1306<br />
KENWOOD 1313/0027/0042/0077/0186<br />
KLH 1390/1412/1428<br />
LINN 0189<br />
MARANTZ<br />
1189/1269/0039/0189/0128/<br />
1120/1289<br />
MCINTOSH 0251 1289<br />
NAD 0320<br />
ONKYO 0135/0380/1298/1320<br />
PHILIPS<br />
1189/1269/0189/0391/1120/<br />
1266/1368<br />
PIONEER 0823<br />
1023/0150/0244/0531/0630/<br />
1343/1384<br />
QUASAR 0039<br />
RCA 0823<br />
1023/1609/1254/0054/0530/<br />
0531/1074/1390/1511<br />
SAMSUNG 1295<br />
SANYO 1251/1469/1801<br />
SHARP 0186/1361<br />
SHERWOOD<br />
0491/0502/1077/1423/1517/<br />
1653<br />
SONY<br />
0815/<br />
1126<br />
1622/0158/0168/0474/1367/<br />
1529/1658/1758<br />
TEAC 0463/1074/1390<br />
TOSHIBA 0135<br />
YAMAHA 0354 1023/0176/0186/1331
Network settings<br />
These settings are used if you will connect this unit to the Internet.<br />
≥The connection to the Internet may take time or the Internet may not<br />
be connected depending on the connection environment. (� 33)<br />
It is required that you use a broadband connection.<br />
Preparation<br />
≥Connect to a broadband network. (� 14)<br />
Testing the connection<br />
Always test the connection when a LAN cable is connected or when<br />
new “IP Address/DNS Settings” have been made.<br />
1 Press [SETUP].<br />
2 Press [3, 4] to select “Network”<br />
and press [OK].<br />
3 Press [3, 4] to select “IP Address/<br />
DNS Settings” and press [OK].<br />
4 Press [3, 4] to select “Connection<br />
Test” and press [OK].<br />
IP Address/DNS Settings<br />
Connection Test<br />
IP Address Auto Configuration (DHCP)<br />
IP Address<br />
Subnet Mask<br />
Default Gateway<br />
DNS Auto Configuration (DHCP)<br />
Primary DNS<br />
Secondary DNS<br />
Auto Detect Connection Speed<br />
Connection Speed Setting<br />
OK<br />
RETURN<br />
����<br />
On<br />
�������������������<br />
�������������������<br />
�������������������<br />
�������������������<br />
�������������������<br />
�������������������<br />
On<br />
�������������������<br />
�������������������<br />
�������������������<br />
�������������������<br />
On<br />
����<br />
“Testing”: The test is in progress.<br />
“Pass”: The connection is completed.<br />
Press [RETURN] to exit.<br />
“Fail”: Please check the connection and settings.<br />
(� 36)<br />
≥If the connection test fails, it may be necessary to set the MAC<br />
address of this unit at the router side. The MAC address can be<br />
displayed by pressing [SETUP] and selecting “Network”.<br />
Network<br />
IP Address/DNS Settings<br />
Proxy Server Settings<br />
MAC Address: xx-xx-xx-xx-xx-xx<br />
RETURN<br />
Setting the IP address<br />
In most cases, default settings can normally be used without making<br />
any changes.<br />
Set the IP address only when the router has no DHCP server<br />
functions or when the router’s DHCP server function is disabled.<br />
After performing steps 1–3 (� left)<br />
4 Press [3, 4] to select “IP Address<br />
Auto Configuration (DHCP)” and<br />
press [2, 1] to select “Off”.<br />
5 Press [3, 4] to select “IP Address”,<br />
“Subnet Mask” or “Default<br />
Gateway” and press [OK].<br />
6 Enter numbers with the numbered<br />
buttons and press [OK].<br />
7 Press [2, 1] to select “Yes” and<br />
press [OK].<br />
≥After checking the specifications for your broadband router, enter<br />
each number. If the number is unknown, then check the number of<br />
other devices such as personal computers connected via a LAN<br />
cable. Assign a different number from those of other devices for the<br />
“IP Address” and the same number for others.<br />
≥If a wrong number is entered, then press [CANCEL].<br />
≥The numeric input range is between 0 and 255.<br />
Setting the DNS-IP<br />
In most cases, default settings can normally be used without making<br />
any changes.<br />
When setting an assigned DNS server from your Internet service<br />
provider, perform the following settings.<br />
After performing steps 1–3 (� left)<br />
4 Press [3, 4] to select “DNS Auto<br />
Configuration (DHCP)” and press<br />
[2, 1] to select “Off”.<br />
5 Press [3, 4] to select “Primary<br />
DNS” or “Secondary DNS”and<br />
press [OK].<br />
6 Enter numbers with the numbered<br />
buttons and press [OK].<br />
Primary DNS<br />
Please input Primary DNS and press<br />
[OK]. Press [CANCEL] to delete the selected<br />
character. To clear this setting, delete all<br />
characters and press [OK].<br />
OK 192 . 1 . .<br />
0 - 9<br />
Number<br />
7 Press [2, 1] to select “Yes” and<br />
press [OK].<br />
≥Follow the instructions given by your Internet service provider and<br />
enter the numbers. If the number is unknown, then check the<br />
number of other devices such as personal computers connected via<br />
a LAN cable and assign the same number.<br />
≥If a wrong number is entered, then press [CANCEL].<br />
≥The numeric input range is between 0 and 255.<br />
Getting started<br />
17<br />
RQT9243 or RQT9350
18<br />
RQT9243 or RQT9350<br />
Network settings<br />
Setting the connection speed<br />
When the connection test results in “Fail” after the IP and DNS-IP<br />
addresses are assigned, perform the following settings.<br />
After performing steps 1–3 (� 17)<br />
4 Press [3, 4] to select “Auto Detect<br />
Connection Speed” and press<br />
[2, 1] to select “Off”.<br />
5 Press [3, 4] to select “Connection<br />
Speed Setting” and press [2, 1] to<br />
select a connection speed.<br />
≥Select a connection speed in accordance with the environment of<br />
the network connected.<br />
≥When the settings are changed, the network connection may be<br />
disabled depending on the device.<br />
Setting the proxy server<br />
In most cases, default settings can normally be used without making<br />
any changes.<br />
Please use this setting when instructed to by your Internet service<br />
provider.<br />
1 Press [SETUP].<br />
2 Press [3, 4] to select “Network”<br />
and press [OK].<br />
3 Press [3, 4] to select “Proxy<br />
Server Settings” and press [OK].<br />
4 Press [3, 4] to select “Proxy<br />
Address” and press [OK].<br />
Proxy Server Settings<br />
Reset to factory preset<br />
Proxy Address<br />
Proxy Port Number<br />
OK<br />
RETURN<br />
0<br />
5 Press [3, 4, 2, 1] to select a<br />
character and press [OK].<br />
Text field: shows the text you have entered<br />
Proxy Address<br />
_<br />
Delete<br />
Finish<br />
OK<br />
RETURN<br />
0 -- 9<br />
1 1 2 3 4 5 6 7 8 9 0<br />
2 A B C a b c + - *<br />
3 D E F d e f / = %<br />
4 G H I g h i # $ &<br />
5 J K L j k l < > @<br />
6 M N O m n o [ ] _<br />
7 P Q R S p q r s ( )<br />
8 T U V t u v { }<br />
~<br />
9 W X Y Z w x y z \ I<br />
0 . , ? ! “ ’ : ; ` ^<br />
Space<br />
Using the numbered buttons to enter characters<br />
e.g., entering the letter “F”<br />
�<br />
�<br />
�<br />
�<br />
� � � �<br />
� � �<br />
� � �<br />
� � �<br />
1) Press [3] to move to the 3rd row.<br />
2) Press [3] twice to highlight “F”.<br />
3) Press [OK].<br />
Repeat this step to enter other characters.<br />
≥Press [;] to delete.<br />
6 Press [∫] when you complete the<br />
entry.<br />
7 Press [3, 4] to select “Proxy Port<br />
Number” and press [OK].<br />
8 Enter numbers with the numbered<br />
buttons and press [OK].<br />
Proxy Port Number<br />
Please input Proxy Server Port Number and<br />
press [OK]. Press [CANCEL] to delete the<br />
selected character. The number will be set to<br />
"0" if all characters are deleted and [OK] is<br />
pressed.<br />
0 - 9<br />
0<br />
Number<br />
9 Press [2, 1] to select “Yes” and<br />
press [OK].<br />
≥The specified ports may be blocked and not be able to be used<br />
depending on the network environment.<br />
In order to restore the default settings<br />
After performing steps 1–3<br />
1) Press [3, 4] to select “Reset to factory preset” and press [OK].<br />
2) Press [2, 1] to select “Yes” and press [OK].
Playback<br />
Basic play (Playing video contents)<br />
<strong>Instructions</strong> for operations are generally described using the remote<br />
control in these operating instructions.<br />
[DivX]: [BD55] only<br />
Preparation<br />
Turn on the television and select the appropriate video input on the<br />
television.<br />
�<br />
DIRECT NAVIGATOR<br />
POWER<br />
OPEN/CLOSE<br />
TV/VIDEO CH<br />
1 Press [Í BD POWER] to turn on the<br />
unit.<br />
2 Press [< OPEN/CLOSE] to open the<br />
disc t<strong>ray</strong> and insert the disc.<br />
≥Insert double-sided discs so the label for e.g.,<br />
the side you want to play is facing up.<br />
≥DVD-RAM: Remove discs from their<br />
cartridges before use.<br />
≥Press the button again to close the t<strong>ray</strong>.<br />
Play starts.<br />
≥If the menu is displayed, press [3, 4, 2, 1] to select the item and<br />
press [OK].<br />
≥If the screen prompting you to use the color buttons appears,<br />
continue to operate with the color buttons on the remote control.<br />
≥DISCS CONTINUE TO ROTATE WHILE MENUS ARE DISPLAYED.<br />
Press [∫] when you have finished playback to protect the unit’s<br />
motor, your television screen and so on.<br />
≥The producers of the disc can control how discs are played. So you<br />
may not always be able to control play as described in these<br />
operating instructions. Read the disc’s instructions carefully.<br />
≥When playing a set of two or more BD-Video discs, the menu<br />
screen may continue to display even if the disc has been ejected.<br />
To switch drives<br />
Press [BD/SD] to select “BD” to play a disc.<br />
≥If a disc or an SD card is inserted while the unit is stopped, the drive<br />
switches automatically depending on the inserted media.<br />
To display menus<br />
[BD-V] [AVCHD] [DVD-VR] [DVD-V]<br />
Press [TOP MENU/DIRECT NAVIGATOR].<br />
VOL<br />
RE-MASTER<br />
CANCEL<br />
AUDIO<br />
SKIP SLOW/SEARCH<br />
STOP<br />
STATUS FUNCTIONS<br />
TOP MENU<br />
SUB MENU<br />
S<br />
RETURN<br />
A B C D<br />
SETUP<br />
POWER<br />
PAUSE<br />
POP-UP MENU<br />
OK<br />
VOL<br />
RECEIVER<br />
MUTING<br />
PLAY<br />
To show Pop-up menu [BD-V]<br />
DISPLAY<br />
PIP SECONDARY<br />
AUDIO BD/SD<br />
�<br />
The Pop-up menu is a special feature available with some BD-Video<br />
discs. This menu may vary with discs. For the operating method, refer<br />
to the instructions for the disc.<br />
1) Press [POP-UP MENU].<br />
2) Press [3, 4, 2, 1] to select the item and press [OK].<br />
≥Pop-up menu also appears by pressing [SUB MENU] and selecting<br />
“Pop-up Menu”.<br />
≥Press [POP-UP MENU] to exit the screen.<br />
�<br />
�<br />
�<br />
Other operations during play<br />
(These functions may not work depending on the disc.)<br />
STOP<br />
Stop<br />
The stopped position is memorized.<br />
Resume play function<br />
Press [1] (PLAY) to restart from this position.<br />
≥The position is cleared if the t<strong>ray</strong> is opened or you press [∫] several<br />
times to display “STOP” on unit’s display.<br />
≥[BD-V]: On BD-Video discs including BD-J (� 46), the resume<br />
play function does not work.<br />
≥[CD] [MP3] [DivX]: The position is cleared if the unit is turned off.<br />
PAUSE<br />
Pause<br />
≥Press [;] again or [1] (PLAY) to restart play.<br />
SLOW/SEARCH<br />
Search/Slow-motion<br />
The speed increases up to 5 steps.<br />
≥Press [1] (PLAY) to revert to normal playback speed.<br />
≥For some discs, the speed may not change.<br />
Search<br />
While playing, press [6] or [5].<br />
≥[BD-V] [AVCHD] [DVD-VR] [DVD-V]:<br />
Audio is heard during first level of forward search.<br />
≥[DivX]: Audio is not heard during all levels of search.<br />
≥[CD] [MP3]: The speed is fixed to a single step.<br />
Slow-motion<br />
While paused, press [6] or [5].<br />
≥[BD-V] [AVCHD]: Forward direction [5] only.<br />
≥[DVD-VR]: If continued for approx. 5 minutes, slow-motion play<br />
pauses automatically.<br />
SKIP<br />
Skip<br />
Skip to the title, chapter or track you want to play.<br />
≥Each press increases the number of skips.<br />
≥[DivX]: Backward direction [:] only.<br />
Direct Play<br />
During playback, you can access specific recordings or scenes<br />
through direct entry of the numbered buttons.<br />
Play starts from the selected title or chapter.<br />
[BD-V] [AVCHD]<br />
e.g., 5: [0] � [0] � [5]<br />
[DVD-V]<br />
e.g., 5: [0] � [5]<br />
15: [0] � [1] � [5]<br />
15: [1] � [5]<br />
≥While stopped (the image on the right is<br />
displayed on the screen), the title is designated.<br />
While playing, the chapter is designated.<br />
Playback Getting started<br />
19<br />
RQT9243 or RQT9350
20<br />
RQT9243 or RQT9350<br />
Basic play (Playing video contents)<br />
OK<br />
Frame-by-frame<br />
While paused, press [2] (2;) or [1] (;1).<br />
Each press shows the next frame.<br />
≥Press and hold to change in succession forward or backward.<br />
≥Press [1] (PLAY) to revert to normal playback speed.<br />
≥[BD-V] [AVCHD]: Forward direction [1] (;1) only.<br />
Screen Aspect<br />
When black bars are shown at the top, bottom, left, and right sides of<br />
the screen, you can enlarge the image to fill the screen.<br />
1 Press [SUB MENU].<br />
2 Press [3, 4] to select “Screen Aspect” and press [OK].<br />
3 Press [2, 1] to select “Side cut” or “Zoom”.<br />
Normal: Normal output<br />
Side cut: The black bars on the right and left sides of the 16:9<br />
image disappear and the image is enlarged. Please note<br />
that the right and left sides of the image are cut off when<br />
the black bar is not displayed.<br />
Zoom: The black bars on the top and bottom sides of the 4:3<br />
image disappear and the image is enlarged. Please note<br />
that the top and bottom sides of the image are cut off<br />
when the black bar is not displayed.<br />
≥[BD-V]: “Side cut” and “Zoom” do not have any effect.<br />
≥[DVD-V]: “Side cut” does not have any effect.<br />
≥When “TV Aspect” (� 32) is set to “4:3 Pan & Scan” or “4:3<br />
Letterbox”, the “Zoom” effect is disabled.<br />
STATUS<br />
Status messages<br />
The status messages give you information about what is currently<br />
being played. Each time you press [STATUS], the information<br />
displayed will change.<br />
e.g. [BD-V]<br />
No display<br />
Type of disc Play status<br />
T: Title<br />
C: Chapter<br />
PL: Playlist<br />
�<br />
BD-Video<br />
Play<br />
� T1 C1 0:05.14<br />
Current position<br />
�<br />
Items change<br />
depending on the<br />
disc played.<br />
Elapsed time in the title<br />
0:20.52<br />
Total time<br />
Depending on the kind of disc or the playback status, this<br />
display may not appear.<br />
AUDIO<br />
[BD-V] [AVCHD] [DVD-V]<br />
e.g. [DVD-V]<br />
Changing audio during play<br />
English is selected.<br />
You can change the audio channel number each time you press the<br />
button. This allows you to change the soundtrack language (� 28,<br />
Soundtrack), etc.<br />
[DVD-VR] [DivX]<br />
AudioLR>AudioL>Audio R<br />
^---------------------------------}<br />
RE-MASTER<br />
Reproducing more natural audio<br />
(<strong>Disc</strong>s recorded at 48 kHz or less)<br />
This feature gives you a more natural sound by adding higher<br />
frequency signals not recorded on the track.<br />
Press [RE-MASTER] to select “Re-master 1”, “Re-master 2” or<br />
“Re-master 3”.<br />
Select the one that you like best.<br />
Setting<br />
Soundtrack 1 ENG ��Digital 3/2.1ch<br />
“AudioLR” is<br />
selected<br />
When playing LPCM sound<br />
Type of music<br />
≥This function is effective for audio from the HDMI terminal or the<br />
DIGITAL AUDIO OUT terminal only when “Dolby D/Dolby D +/Dolby<br />
TrueHD” or “DTS/DTS-HD” is set to “PCM”. (However, in this case,<br />
audio is output as 2ch from the DIGITAL AUDIO OUT terminal.)<br />
Showing FUNCTIONS menu<br />
Other types of<br />
sound<br />
Effect level<br />
Light<br />
High tempo (e.g., pop and<br />
Re-master 1<br />
rock)<br />
Re-master 2 Various tempos (e.g., jazz) Medium<br />
Re-master 3 Low tempo (e.g., classical) Strong<br />
Off Off Off<br />
DVD-RAM(VR)<br />
Play<br />
AudioLR<br />
Some functions of this unit can be operated from the FUNCTIONS<br />
menu.<br />
1 Press [FUNCTIONS].<br />
≥ Items to be displayed may vary with the media.<br />
2 Press [3, 4] to select the item and<br />
press [OK].<br />
e.g.,<br />
BD <strong>Player</strong> FUNCTIONS<br />
DVD-Video<br />
Top Menu<br />
Menu<br />
SD card<br />
Other Functions<br />
≥Top Menu<br />
≥Menu<br />
≥Playback<br />
≥SD card Switches to the SD drive.<br />
≥BD/DVD/CD Switches to the disc drive.<br />
≥Other Functions “Playlists”:<br />
You can play playlists created on DVD-VR.<br />
Press [3, 4, 2, 1] to select the playlist and<br />
press [OK].<br />
“Setup” (� 30)<br />
“Card Management” (� 21)
Enjoying the advanced functions on BD-Video discs [BD-V]<br />
Some BD-Video discs are equipped with an advanced function added to the BD-Video standard to provide various interactive features.<br />
Feature Secondary video/audio (PIP) Virtual package Internet connectivity<br />
BD-Video<br />
BD-ROM version 2 Profile 1 version<br />
1.0<br />
— — —<br />
BONUSVIEW<br />
BD-ROM version 2 Profile 1 version<br />
1.1/ Final Standard Profile<br />
BD-Live<br />
BD-ROM version 2 Profile 2<br />
≥This unit supports through BD-ROM version 2 Profile 2.<br />
≥The usable functions and the operating method may vary with each disc. For details, refer to the instructions for the disc.<br />
≥These discs may not be on sale in certain regions.<br />
What is secondary video/audio?<br />
This is a function of BD-Video that plays the primary video and secondary video simultaneously. For instance, the function is capable of playing the<br />
original movie as the primary video while playing video commentary from the film director on a small screen as a secondary video.<br />
What is Virtual package?<br />
This is a function of BD-Video that plays discs and other media (� 46, Local storage) simultaneously. For instance, the function is capable of<br />
playing sub contents (secondary video, secondary audio, and subtitles) which are automatically recorded to other media from the Internet or disc.<br />
In order to use the Internet feature, you must have this unit connected to a broadband network. (� 14)<br />
What is Internet connectivity?<br />
BD-Live lets users connect this player to the Internet to download data such as images and subtitles, and to join in quizzes and multi-player<br />
interactive games that are linked to bonus movie content contained on BD-Video discs.<br />
In order to use the Internet feature, you must have this unit connected to a broadband network. (� 14)<br />
Playing secondary video (picture-in-picture) and secondary audio<br />
To turn on/off secondary video<br />
Press [PIP].<br />
To turn on/off audio with the secondary video<br />
Press [SECONDARY AUDIO].<br />
Virtual package<br />
For this unit, data is copied to an SD card.<br />
The required available capacity on the card may vary with the disc. For details, refer to the instructions for the disc.<br />
Formatting SD cards/Deleting data<br />
1) Insert an SD card (� 22).<br />
2) Press [FUNCTIONS].<br />
3) Press [3, 4] to select “Other Functions” and press<br />
[OK].<br />
4) Press [3, 4] to select “Card Management” and press<br />
[OK].<br />
5) Press [3, 4] to select “BD-Video Data Erase” or<br />
“Format SD Card” and press [OK].<br />
6) Press [2, 1] to select “Yes” and press [OK].<br />
7) Press [2, 1] to select “Start” and press [OK].<br />
Internet connectivity<br />
≤ ≤ —<br />
≤ ≤ ≤<br />
Secondary video<br />
Primary video<br />
Card Management No. of Files 6<br />
Free space 300 MB<br />
SD card<br />
≥During search/slow-motion or frame-by-frame, only<br />
the primary video is displayed.<br />
≥When the “BD-Video Secondary Audio” setting in the<br />
“Digital Audio Output” menu is set to “Off”,<br />
secondary audio will not be played, even when the<br />
[SECONDARY AUDIO] button is pressed. Please be<br />
sure “BD-Video Secondary Audio” is set to “On”.<br />
(� 31)<br />
When discs supporting BD-Live are played back, the player or disc IDs may be sent to the content provider via the Internet.<br />
≥You can restrict Internet access. (� 30)<br />
OK<br />
RETURN<br />
BD-Video Data Erase<br />
Format SD Card<br />
Format this SD Card.<br />
≥Data cannot be copied in the following cases.<br />
– The card is protected.<br />
– Available capacity on the card is too small.<br />
Delete unnecessary data or use a new card.<br />
≥If you are using an SD card that was just purchased,<br />
it is a good idea to format the card in this unit before<br />
using it.<br />
≥If the SD card you use is formatted, all data on the<br />
card will be erased. It cannot be recovered.<br />
≥While using this feature, do not remove the SD card.<br />
Doing so will cause playback to stop.<br />
≥If you experience any problems, first, try formatting<br />
the SD card in this unit.<br />
Playback<br />
21<br />
RQT9243 or RQT9350
22<br />
RQT9243 or RQT9350<br />
Chapter playback [DVD-VR]<br />
1 Insert a disc (� 19).<br />
≥ “Title View” screen is displayed.<br />
e.g.,<br />
DIRECT NAVIGATOR Title View<br />
DVD-RAM(VR)<br />
Video Picture<br />
No. Date Day Channel Start Title Name<br />
01 9/ 5 Wed 10:00AM<br />
02 9/ 5 Wed IN 2 �11:30AM<br />
Rec. Length 03 9/ 5 Wed IN 2 11:59PM<br />
0:15 (SP) 04 9/ 6 Thu VHS 10:00AM<br />
05 9/ 6 Thu VHS 11:30AM<br />
06 9/ 6 Thu 11:59PM<br />
07 9/ 7 Fri 10:00AM<br />
08 9/ 7 Fri 10:30AM<br />
09 9/ 7 Fri IN 2 11:30AM<br />
10 9/ 7 Fri IN 2 11:59PM<br />
Page 01/02<br />
SUB<br />
MENU<br />
�� Previous �� Next<br />
Play<br />
RETURN � Video � Picture<br />
e.g.,<br />
2 Press [3, 4] to select the title and<br />
press [SUB MENU].<br />
3 Press [3, 4] to select “View<br />
Chapters” and press [OK].<br />
Properties<br />
View Chapters<br />
To picture<br />
To display the title properties (recording<br />
date, etc.)<br />
To select the chapter<br />
Playing still pictures (� right)<br />
4 Press [2, 1] to select the chapter<br />
and press [OK].<br />
e.g.,<br />
DIRECT NAVIGATOR Chapter View<br />
DVD-RAM(VR) Video Picture<br />
01<br />
Play<br />
You are now in ‘‘Chapter View.’’<br />
Please select the chapter you<br />
would like to start playback.<br />
Press [RETURN] for ‘‘Title View.’’<br />
001<br />
002 003<br />
0:00.00<br />
Play<br />
RETURN<br />
---<br />
0:00.20<br />
---<br />
---<br />
Page 001/001<br />
Playing still pictures [JPEG]<br />
This feature allows you to play still pictures that were recorded to<br />
BD-RE, DVD-RAM, CD-R/RW media as well as to an SD card.<br />
1 Insert a disc (� 19) or an SD card<br />
(� below).<br />
≥ If a disc or an SD card<br />
e.g.,<br />
containing data in different file<br />
formats is inserted, the file<br />
selection menu may be<br />
displayed.<br />
SD card:<br />
Press [3, 4] to select “Picture (JPEG) Navigator” and<br />
press [OK].<br />
CD-R/RW:<br />
Press [3, 4] to select “Pictures” and press [OK].<br />
BD-RE, DVD-RAM<br />
“Album View” screen is<br />
displayed.<br />
e.g.,<br />
DIRECT NAVIGATOR Album View<br />
DVD-RAM(VR) Video Picture<br />
SUB<br />
MENU<br />
106_DVD<br />
Total 8<br />
12/9/2006<br />
Total 13<br />
��<br />
OK<br />
�� Previous �� Next<br />
Page 02/02<br />
�� Slideshow<br />
RETURN � Video � Picture Press [OK] to go to Picture View.<br />
≥When the “Title View”<br />
screen is displayed, press<br />
the [B] button to switch to<br />
the “Album View” screen.<br />
CD-R/RW, SD card<br />
“Picture View” screen is<br />
displayed.<br />
� Go to step 3<br />
Pictures<br />
CD(JPEG)<br />
Picture View<br />
penguin_jpg<br />
001<br />
002 003 004<br />
2 Press [3, 4, 2, 1] to select the<br />
album and press [OK].<br />
3 Press [3, 4, 2, 1] to select the<br />
still picture and press [OK].<br />
e.g.,<br />
DIRECT NAVIGATOR Picture View<br />
DVD-RAM(VR) Video Picture<br />
SUB<br />
MENU<br />
0001<br />
0005<br />
0009<br />
Play<br />
RETURN<br />
2006 9 12<br />
0002 0003 0004<br />
0006 0007 0008<br />
Page 001/001<br />
e.g.,<br />
≥Press [2, 1] to display the previous or next still picture.<br />
≥Press [:, 9] to show other pages.<br />
To return to the previous screen<br />
Press [RETURN].<br />
To exit the screen<br />
Press [DIRECT NAVIGATOR].<br />
CD-R/RW, SD card<br />
To switch from other menus to JPEG menu<br />
(If the media contains data in different file formats)<br />
1) Press [FUNCTIONS].<br />
2) Press [3, 4] to select “Menu” and press [OK].<br />
3) Press [3, 4] to select “Pictures”/“Picture (JPEG) Navigator” and<br />
press [OK].<br />
Inserting a card<br />
�<br />
1 Pull to flip down the front panel.<br />
2 Insert the SD card into the SD card slot.<br />
≥Press on the center of the card until it clicks into place.<br />
Removing the card<br />
Press on the center of the card and pull it straight out.<br />
�������<br />
SUB<br />
MENU<br />
005<br />
009<br />
From SUB MENU you can select a folder.<br />
Play<br />
RETURN<br />
006 007 008<br />
�<br />
Page 01/01<br />
Insert the card’s label up, positioning the cut off corner to the right.
Useful functions during still picture play<br />
Start Slideshow<br />
You can display still pictures one by one at a constant interval.<br />
BD-RE, DVD-RAM<br />
1 While the “Album View” screen is displayed<br />
Press [3, 4, 2, 1] to select the<br />
album and press [SUB MENU].<br />
2 Press [3, 4] to select “Start<br />
Slideshow” and press [OK].<br />
≥You can also start slideshow by pressing [1] (PLAY) after selecting<br />
the album.<br />
CD-R/RW, SD card<br />
1 While the “Picture View” screen is displayed<br />
Press [SUB MENU].<br />
2 Press [3, 4] to select “Start<br />
Slideshow” and press [OK].<br />
To stop slideshow<br />
Press [∫].<br />
Slideshow with music<br />
SD card only<br />
If a music CD is inserted in the disc t<strong>ray</strong> while playing slideshows, the<br />
music CD starts playing automatically as background music.<br />
≥You cannot search or skip on a music CD.<br />
≥When the slideshow stops, playback of the music CD also stops.<br />
≥[MP3]: This function will not operate.<br />
Slideshow settings<br />
In step 2 in “Start Slideshow” above,<br />
1 Press [3, 4] to select “Slideshow<br />
Settings” and press [OK].<br />
2 To change the display interval<br />
Press [3, 4] to select “Display Interval” and press [2, 1] to<br />
select the interval (“Long”, “Normal” or “Short”).<br />
≥When a still picture with large number of pixels is played, the<br />
display interval may become longer. Even if the setting is<br />
changed, the display interval may not become shorter.<br />
To set display method<br />
Press [3, 4] to select “Transition Effect” and press [2, 1] to<br />
select “Random” or “Fade”.<br />
“Random”: The transition effects are changed in a random<br />
sequence.<br />
“Fade”: The image is displayed while fading in and switches<br />
to next image after fading out.<br />
To repeat slideshow<br />
Press [3, 4] to select “Repeat Play” and press [2, 1] to<br />
select “On” or “Off”.<br />
3 Press [3, 4, 2, 1] to select “Set”<br />
and press [OK].<br />
Rotate<br />
1 While playing (except for slideshows)<br />
Press [SUB MENU].<br />
2 Press [3, 4] to select “Rotate<br />
Right” or “Rotate Left” and press<br />
[OK].<br />
≥The rotation information will be stored until the unit is turned off or<br />
the media is removed.<br />
Zoom out<br />
This function is only available for small-sized still pictures.<br />
1 While playing (except for slideshows)<br />
Press [SUB MENU].<br />
2 Press [3, 4] to select “Zoom out”<br />
and press [OK].<br />
≥To cancel “Zoom out”, press [3, 4] to select “Zoom in” in step 2<br />
and press [OK].<br />
≥The zoom-out information will not be stored.<br />
To select the still pictures in another folder<br />
BD-RE, DVD-RAM<br />
To switch to another higher folder<br />
(Only if there is a multiple number of higher folders recognizable)<br />
1 While the “Album View” screen is displayed<br />
Press [SUB MENU].<br />
2 Press [3, 4] to select “Select Root<br />
folder” and press [OK].<br />
3 Press [2, 1] to select the higher<br />
folder and press [OK].<br />
Select Root folder<br />
Change the Album folder to be accessed.<br />
\DCIM<br />
Press [OK] to confirm<br />
OK<br />
CD-R/RW<br />
1 While the “Picture View” screen is displayed<br />
Press [SUB MENU].<br />
2 Press [3, 4] to select “Select<br />
Folder” and press [OK].<br />
3 Press [3, 4] to select a folder and<br />
press [OK].<br />
Pictures Folder selection<br />
CD(JPEG)<br />
021216_0026<br />
001<br />
002<br />
003<br />
004<br />
005<br />
006<br />
007<br />
008<br />
009<br />
010<br />
103<br />
104<br />
105<br />
OK<br />
RETURN<br />
To show the picture properties<br />
While playing<br />
Press [STATUS] twice.<br />
e.g. JPEG on DVD-RAM<br />
Shooting date<br />
Photo 11/12/2007 Total 3/9<br />
To exit, press [STATUS].<br />
F 2/25<br />
Playback<br />
23<br />
RQT9243 or RQT9350
24<br />
RQT9243 or RQT9350<br />
Playing DivX videos [DivX] [BD55]<br />
You can play DVD-R, DVD-R DL and CD-R/CD-RW discs which<br />
contain DivX video contents that have been recorded on a personal<br />
computer.<br />
≥Because DivX format can use many different codecs, there is<br />
no guarantee that all DivX files will play. (� 35, “About MP3/<br />
JPEG/DivX files”)<br />
1 Insert a disc. (� 19)<br />
≥If a disc containing data in different file formats is<br />
inserted, the file selection menu may be<br />
displayed. Press [3, 4] to select “DivX” and<br />
press [OK].<br />
CD<br />
DivX<br />
Pictures<br />
MP3 Music<br />
Select an action or press [RETURN].<br />
OK<br />
SUB<br />
RETURN<br />
MENU<br />
2 Press [3, 4] to select the title<br />
and press [OK].<br />
Play starts on the selected title.<br />
DIRECT NAVIGATOR<br />
CD (DivX)<br />
DivX<br />
No Name of Title<br />
001 ABC.divx<br />
SUB<br />
MENU<br />
Play<br />
RETURN<br />
From SUB MENU you can select a folder. Page 01/01<br />
≥The picture sizes set for recording may prevent the unit from<br />
showing pictures in the proper aspect. You may be able to adjust<br />
the aspect through the TV.<br />
≥Successive play is not possible.<br />
≥You can use search and skip functions. (� 19)<br />
≥Press [:, 9] to show other pages.<br />
CD-R/RW<br />
To switch from other menus to DivX menu<br />
(If a disc contains data in different file formats)<br />
1) Press [FUNCTIONS].<br />
2) Press [3, 4] to select “Menu” and press [OK].<br />
3) Press [3, 4] to select “DivX” and press [OK].<br />
Playing a title in another folder<br />
1 While the “DIRECT NAVIGATOR” is displayed<br />
Press [SUB MENU].<br />
2 Press [3, 4] to select “Select<br />
Folder” and press [OK].<br />
3 Press [3, 4] to select a folder and<br />
press [OK].<br />
DIRECT NAVIGATOR Folder selection<br />
CD (DivX)<br />
OK<br />
RETURN<br />
12_02_2004<br />
Image001<br />
Image002<br />
Image003<br />
Image004<br />
Image005<br />
Image006<br />
Image007<br />
Image008<br />
Image009<br />
Image010<br />
≥You cannot select folders that contain no compatible files.<br />
To return to the previous screen<br />
Press [RETURN].<br />
F 1/21<br />
Page 01/01<br />
Selected folder No. /<br />
Total folders<br />
If the folder has no title,<br />
“– –” is displayed as folder<br />
number.<br />
Regarding DivX VOD content<br />
DivX Video-on-Demand (VOD) content is encrypted for copyright<br />
protection. In order to play DivX VOD content on this unit, you first<br />
need to register the unit.<br />
Follow the on line instructions for purchasing DivX VOD content to<br />
enter the unit’s registration code and register the unit. For more<br />
information about DivX VOD, visit www.divx.com/vod<br />
Display the unit’s registration code.<br />
(� 33, “DivX Registration” in “Others”)<br />
DivX Registration<br />
DivX® Video On Demand<br />
Your registration code is : XXXXXXXX<br />
To learn more visit www.divx.com/vod<br />
8 alphanumeric characters<br />
≥After playing DivX VOD content for the first time, another<br />
registration code is then displayed in “DivX Registration”. Do not<br />
use this registration code to purchase DivX VOD content. If you use<br />
this code to purchase DivX VOD content, and then play the content<br />
on this unit, you will no longer be able to play any content that you<br />
purchased using the previous code.<br />
≥If you purchase DivX VOD content using a registration code<br />
different from this unit’s code, you will not be able to play this<br />
content. (“Authorization Error” is displayed.)<br />
Regarding DivX VOD content that can only be played a<br />
set number of times<br />
Some DivX VOD content can only be played a set number of times.<br />
When you play this content, the remaining number of plays is<br />
displayed. You cannot play this content when the number of<br />
remaining plays is zero. (“Rental Expired.” is displayed.)<br />
When playing this content<br />
≥The number of remaining plays is reduced by one if<br />
– you press [Í BD POWER].<br />
– you press [∫].<br />
– you press [DIRECT NAVIGATOR].<br />
– you press [:] or [6, 5] etc. and arrive at another content<br />
or the start of the content being played.<br />
– you press [BD/SD] to change the drive.<br />
≥Resume functions do not work.
Displaying subtitles text<br />
You can display subtitles text onto the DivX video disc on this unit.<br />
This function has no relation to the subtitles specified in DivX<br />
standard specifications and has no clear standard. Depending on the<br />
methods used to create the file, the following functions may not work.<br />
1 While playing<br />
Press [DISPLAY].<br />
2 Press [3, 4] to select “<strong>Disc</strong>” and<br />
press [1].<br />
3 Press [3, 4] to select “Subtitle”<br />
and press [1].<br />
4 Press [3, 4] to select “On” and<br />
press [1].<br />
5 Press [3, 4] to select “Text”.<br />
≥DivX video files that do not display “Text” do not contain subtitles<br />
text.<br />
Subtitles text cannot be displayed.<br />
≥If the subtitles text are not displayed correctly, try changing the<br />
language settings. (� 30)<br />
To exit the screen<br />
Press [DISPLAY].<br />
Playing music [CD] [MP3]<br />
You can play generally available music CD or MP3 files recorded onto<br />
a CD-R/RW.<br />
1 Insert a disc. (� 19)<br />
≥If a disc containing data in different file formats is<br />
inserted, the file selection menu may be displayed.<br />
Press [3, 4] to select “MP3 Music” and press [OK].<br />
CD<br />
DivX<br />
Pictures<br />
MP3 Music<br />
Select an action or press [RETURN].<br />
OK<br />
SUB<br />
RETURN<br />
MENU<br />
2 Press [3, 4] to select the track and<br />
press [OK].<br />
Play starts on the selected track.<br />
≥[CD] “TR” and the number of that track are displayed on<br />
the unit as it plays.<br />
e.g. [CD]<br />
DIRECT NAVIGATOR Music list<br />
0.09 4.30<br />
CD<br />
Track1<br />
5 Tracks / Total Play Time 20min54sec<br />
No Track Name Play Time<br />
�� Track1 4min30sec<br />
��<br />
��<br />
Track2<br />
Track3<br />
3min41sec<br />
4min30sec<br />
�� Track4<br />
3min11sec<br />
�� Track5<br />
5min 2sec<br />
Play<br />
RETURN<br />
“ ” indicates the track currently playing.<br />
To switch from other menus to MP3 menu<br />
(If a disc contains data in different file formats)<br />
1) Press [FUNCTIONS].<br />
2) Press [3, 4] to select “Menu” and press [OK].<br />
3) Press [3, 4] to select “MP3 Music” and press [OK].<br />
≥You can use search and skip functions. (� 19)<br />
≥When the “Screen Saver Function” is set to “On” (� 32), the screen<br />
switches to Screen Saver mode if there is no operation for 10<br />
minutes after starting playback. (Playback continues.)<br />
Playing a track in another folder [MP3]<br />
1 While the “Music list” is displayed<br />
Press [SUB MENU].<br />
2 Press [3, 4] to select “Select<br />
Folder” and press [OK].<br />
3 Press [3, 4] to select a folder and<br />
press [OK].<br />
DIRECT NAVIGATOR Select Folder<br />
CD(MP3)<br />
MP3 music<br />
001 My favorite<br />
002 Brazilian pops<br />
003 Chinese pops<br />
004 Czech pops<br />
005 Hungarian pops<br />
006 Liner notes<br />
007 Japanese pops<br />
008 Mexican pops<br />
009 Philippine pops<br />
010 Swedish pops<br />
011 Momoko<br />
012 Standard number<br />
013 Piano solo<br />
014Vocal<br />
OK<br />
RETURN<br />
≥You cannot select folders that contain no compatible tracks.<br />
To return to the previous screen<br />
Press [RETURN].<br />
F 6/25<br />
Selected folder No. /<br />
Total folders<br />
If the folder has no<br />
track, “– –” is displayed<br />
as folder number.<br />
Playback<br />
25<br />
RQT9243 or RQT9350
26<br />
RQT9243 or RQT9350<br />
Linked operations with the TV (VIERA Link TM “HDAVI Control TM ”)<br />
What is VIERA Link “HDAVI Control”?<br />
VIERA Link TM is a new name for EZ Sync TM .<br />
VIERA Link “HDAVI Control” is a convenient function that offers linked operations of this unit, and a <strong>Panasonic</strong> TV (VIERA) or<br />
amplifier/receiver under “HDAVI Control”.<br />
You can use this function by connecting the equipment with an HDMI cable. See the operating instructions for connected equipment<br />
for operational details.<br />
≥VIERA Link “HDAVI Control”, based on the control functions provided by HDMI which is an industry standard known as HDMI CEC (Consumer<br />
Electronics Control), is a unique function that we have developed and added. As such, its operation with other manufacturers’ equipment that<br />
supports HDMI CEC cannot be guaranteed.<br />
≥This unit supports “HDAVI Control 3” function.<br />
“HDAVI Control 3” is the newest standard (current as of December, 2007) for <strong>Panasonic</strong>’s HDAVI Control compatible equipment. This standard<br />
is compatible with <strong>Panasonic</strong>’s conventional HDAVI equipment.<br />
≥Please refer to individual manuals for other manufacturers’ equipment supporting VIERA Link function.<br />
Preparation<br />
1) Connect this unit to your TV or amplifier/receiver with an HDMI cable (� 11–12).<br />
2) Set “VIERA Link” to “On” (� 32). (The default setting is “On”.)<br />
3) Set the “HDAVI Control” operations on the connected equipment (e.g., TV).<br />
≥When using HDMI2 terminal of VIERA as “HDAVI Control”, set the input channel to HDMI2 on VIERA.<br />
4) Turn on all “HDAVI Control” compatible equipment and select this unit’s input channel on the connected TV so that the “HDAVI Control”<br />
function works properly.<br />
Also when the connection or settings are changed, repeat this procedure.<br />
Automatic input<br />
switching<br />
Power on link<br />
Power off link<br />
When the following operations are performed, the television will automatically switch the input channel and display<br />
the corresponding action.<br />
– When play starts on the unit<br />
– When an action that uses the display screen is performed<br />
(e.g., Direct Navigator screen)<br />
When the television is off and the following operations are performed, the television will automatically turn on and<br />
display the corresponding action.<br />
– When play starts on the unit<br />
– When an action that uses the display screen is performed (e.g., Direct Navigator screen)<br />
All connected equipment compatible with “HDAVI Control”, including this unit, automatically turns off when you<br />
switch the television off.<br />
≥This unit automatically turns off even during playback or any other operation.<br />
≥When [1] (PLAY) is pressed on this unit for “Automatic input switching” or “Power on link”, the playback image is not immediately displayed on the<br />
screen and it may not be possible to watch the contents from where playback started.<br />
In this case, press [:] or [6] to go back to where playback started.<br />
Playing music continuously even after turning off power to the television<br />
When the unit is connected to a <strong>Panasonic</strong> TV (VIERA) that supports HDAVI Control 2 or HDAVI Control 3 and an amplifier/receiver supports<br />
VIERA Link, the unit is turned off if the power to the television is turned off, since “Power off link” (� above) operates.<br />
The following operations make it possible to keep the power of the unit on and to play music continuously.<br />
1While playing music<br />
Press [SUB MENU].<br />
2Press [3, 4] to select “TV Power” and press [OK].<br />
≥Sound may be discontinued for several seconds when the power to the television is turned off.<br />
≥If the operation mentioned above is executed while audio is output from the television, the sound may not be output from the amplifier/receiver.<br />
It is recommended to set the amplifier/receiver beforehand so that audio will be output from the amplifier/receiver.
Easy control only with VIERA remote control<br />
If you connect this unit to a TV that has “HDAVI Control 2” or “HDAVI Control 3” function with an HDMI cable, you can operate this unit using the<br />
following buttons on the TV remote control.<br />
[3, 4, 2, 1], [OK], [RETURN], [EXIT], [SUB MENU] and colored buttons ([EXIT]: Exit the screen)<br />
Use the remote control for this unit to operate any other buttons (numbered buttons, etc.) that are not listed above.<br />
≥Refer to the TV operating instructions for operating TV.<br />
Using the<br />
FUNCTIONS<br />
menu to<br />
operate this<br />
unit<br />
Using the sub<br />
menu to<br />
operate this<br />
unit<br />
When you want to leave the TV on and set only this unit to standby mode<br />
Press [Í BD POWER] on this unit’s remote control and set to standby mode.<br />
When not using “HDAVI Control”<br />
Set “VIERA Link” in the Setup menu to “Off”. (� 32)<br />
By using the TV remote control, you can play media using the FUNCTIONS menu.<br />
1 Press the button for VIERA Link on the remote control.<br />
2 Select the player.<br />
≥The FUNCTIONS menu is displayed.<br />
By using the TV remote control, you can play discs using the “Control Panel” and display the Top Menu (for BD-Video<br />
and DVD-Video) or Pop-up Menu (for BD-Video).<br />
1 Press [SUB MENU].<br />
≥This can also be displayed by using the VIERA menu screen.<br />
≥You cannot use the sub menu while the Top Menu for BD-Video or<br />
DVD-Video is displayed.<br />
2 Select an item, then press [OK].<br />
e.g.,<br />
BD <strong>Player</strong> FUNCTIONS<br />
DVD-Video<br />
Top Menu<br />
Menu<br />
SD card<br />
Other Functions<br />
SUB<br />
MENU S<br />
SUB<br />
MENU<br />
OK<br />
RETURN<br />
Control Panel<br />
Screen Aspect<br />
Top Menu<br />
Pop-up Menu<br />
Control Panel Control Panel is displayed. Follow the indications on the screen.<br />
Screen Aspect (� 20)<br />
Top Menu [BD-V] [AVCHD] [DVD-V] Top menu is displayed.<br />
Menu [DVD-V] Menu is displayed.<br />
Pop-up Menu [BD-V] [AVCHD] Pop-up menu is displayed.<br />
Rotate Right [JPEG] Rotate the still picture.<br />
Rotate Left [JPEG]<br />
Zoom in [JPEG] Enlarge or reduce the still picture.<br />
Zoom out [JPEG]<br />
e.g.,<br />
OK<br />
RETURN<br />
Playback<br />
27<br />
RQT9243 or RQT9350
28<br />
RQT9243 or RQT9350<br />
Settings<br />
Changing settings with the on-screen menu<br />
On-screen menu operations<br />
1 Press [DISPLAY].<br />
2 Press [3, 4] to select<br />
the menu and press [1].<br />
3 Press [3, 4] to select<br />
the item and press [1].<br />
4 Press [3, 4] to select<br />
the setting.<br />
e.g., BD-Video<br />
<strong>Disc</strong><br />
Signal Type<br />
Play<br />
Subtitle<br />
Video<br />
Subtitle Style<br />
Audio<br />
What you can change with the on-screen menu<br />
Some items may be changed only on the disc specific menu. (� 19)<br />
Off PIP 1ENG<br />
- Angle -<br />
Menus Items Settings<br />
≥Depending on the condition of the unit<br />
(playing, stopped, etc.) and disc<br />
contents, there may be some items<br />
that you cannot select or change.<br />
≥Some items can be changed by<br />
pressing [OK].<br />
To exit the on-screen menu<br />
Press [DISPLAY].<br />
Menus Items Settings and details<br />
<strong>Disc</strong> Signal Type [BD-V]<br />
≥Primary Video<br />
Video: The original video recording method appears. (� below, Video recording<br />
method)<br />
Soundtrack: Select the type of audio or language. (� below, Language, Audio attribute)<br />
≥Secondary Video<br />
Video: Select on/off of images.<br />
The original video recording method appears. (� below, Video recording<br />
method)<br />
Soundtrack: Select on/off of audio and the language. (� below, Language, Audio attribute)<br />
Video [AVCHD]<br />
The original video recording method appears. (� below, Video recording method)<br />
Soundtrack [AVCHD] [DVD-V]<br />
Select the type of audio or language. (� below, Language, Audio attribute)<br />
[DVD-VR]<br />
The audio attributes appear. (� below, Audio attribute)<br />
[DivX]<br />
Select the soundtrack number.<br />
≥Soundtrack numbers are displayed even when there is only one audio type.<br />
Subtitle [BD-V] [AVCHD] [DVD-V]<br />
Turn the subtitle on/off and select the language. (� below, Language)<br />
[DVD-VR] (Only discs that contain subtitle on/off information)<br />
Turn the subtitle on/off.<br />
[DivX]<br />
Turn the subtitle on/off and select “Text” or the subtitle number.<br />
≥Subtitle number is displayed even if there are not multiple subtitles.<br />
Subtitle Style [BD-V]<br />
Select the subtitle style.<br />
Audio channel [DVD-VR] [DivX]<br />
(� 20, Changing audio during play)<br />
Angle [BD-V] [DVD-V]<br />
Select the number of the angle.<br />
Language Audio attribute<br />
ENG: English<br />
FRA: French<br />
DEU: German<br />
ITA: Italian<br />
ESP: Spanish<br />
NLD: Dutch<br />
SVE: Swedish<br />
NOR: Norwegian<br />
Video recording method<br />
DAN: Danish<br />
POR: Portuguese<br />
RUS: Russian<br />
JPN: Japanese<br />
CHI: Chinese<br />
KOR: Korean<br />
MAL: Malay<br />
VIE: Vietnamese<br />
THA: Thai<br />
POL: Polish<br />
CES: Czech<br />
SLK: Slovak<br />
HUN: Hungarian<br />
FIN: Finnish<br />
¢: Others<br />
LPCM/ÎDigital/ÎDigital+/<br />
ÎTrueHD/DTS/DTS 96/DTS-HD HI<br />
RES/DTS-HD MSTR/DTS-HD LBR<br />
Signal type<br />
ch (channel) Number of channels<br />
k (kHz) Sampling frequency<br />
b (bit) Number of bits<br />
MPEG-2 This is a standard for compressing and decompressing color motion pictures efficiently. This compression method is used<br />
for DVDs, etc.<br />
MPEG-4 AVC These are standards for compressing and decompressing color motion pictures more efficiently than MPEG-2 and used<br />
VC-1<br />
for <strong>Blu</strong>-<strong>ray</strong> <strong>Disc</strong>s, etc.
Menus Items Settings and details<br />
Play Repeat Play (Only when the elapsed time is being displayed on the unit’s display.)<br />
Selects the item which you want to repeat. The items displayed differ depending on the type of<br />
disc.<br />
≥All tracks All tracks<br />
≥Chapter Chapter<br />
≥Playlists Playlist<br />
≥Title Title<br />
≥One track<br />
≥Off<br />
Track<br />
Random<br />
Select “Off” to cancel.<br />
[CD] [MP3]<br />
While playing, press [3, 4] to select “On”.<br />
Random playback starts from the next track.<br />
≥On ≥Off<br />
Video Picture [BD-V] [AVCHD] [DVD-VR] [DVD-V] [DivX]<br />
Select the picture quality mode during play.<br />
≥Normal: Default setting<br />
≥Soft: Soft picture with smoother video<br />
≥Fine: Details are sharper<br />
≥Cinema: Mellows movies, enhances detail in dark scenes.<br />
≥User: You can make further adjustments. (� below)<br />
1 Press [1] to select “Picture Adjustment” and press [OK].<br />
2 Select the item using [3, 4] and adjust it with [2, 1].<br />
Contrast: Increases the contrast between light and dark parts of the picture<br />
(j7 to i7).<br />
Brightness: Brightens the picture (0 to i15).<br />
Sharpness: Adjusts the sharpness of the edges of the horizontal lines (j6<br />
to i6).<br />
Color: Adjusts the shade of the picture’s color (j7 to i7).<br />
Gamma: Adjusts the brightness of dark portions of the screen (0 to i5).<br />
3D NR: Reduces the rough noise in the background to give a greater<br />
feeling of depth (0 to i4).<br />
When “24p Output” is set to “On”, this function may not operate.<br />
(� 32)<br />
Integrated NR: Smooths block noise and reduces the smudging that appears<br />
around contrasting sections of the picture (0 to i3).<br />
Progressive Select the method of conversion for progressive output to suit the type of material being played<br />
(� 46, Film and video).<br />
≥Auto: Automatically detects the film and video content, and appropriately converts it.<br />
≥Video: Select when using “Auto”, and the content is distorted.<br />
24p [DVD-V] ≥On ≥Off<br />
Audio Sound Effects*<br />
Only when you have selected “On” in “24p Output” (� 32)<br />
1, 2 ≥Off<br />
Re-master (� 20)<br />
≥Re-master 1<br />
≥Re-master 2<br />
≥Re-master 3<br />
V. Surround<br />
[BD-V] [AVCHD] [DVD-VR] [DVD-V] [DivX] (2 channels or more only)<br />
Enjoy a surround-like effect if you are using two front speakers only.<br />
– Turn V. Surround off if it causes distortion.<br />
– Do not use in combination with surround effects on other equipment.<br />
– V. Surround does not work for bilingual recordings.<br />
≥V. Surround 1<br />
≥V. Surround 2<br />
Night Surround<br />
To enjoy a movie with powerful sound even when the volume is kept low at night, the audio is set<br />
in such a way that it can be heard easily.<br />
≥Night Surround<br />
Dialog Enhancer* 1 [BD-V] [AVCHD] [DVD-VR] [DVD-V] (3 channels or more only, including a center channel)<br />
The volume of the center channel is raised to make dialog easier to hear.<br />
≥On ≥Off<br />
*1 This function is effective for audio from the HDMI terminal or the DIGITAL AUDIO OUT terminal only when “Dolby D/Dolby D +/Dolby TrueHD”<br />
or “DTS/DTS-HD” is set to “PCM”. (However, in this case, audio is output as 2ch from the DIGITAL AUDIO OUT terminal.)<br />
*2 Not every function can be set individually.<br />
Settings<br />
29<br />
RQT9243 or RQT9350
30<br />
RQT9243 or RQT9350<br />
Settings<br />
Changing the unit’s settings<br />
Change the unit’s settings if necessary. The settings remain intact even if you switch the unit to standby.<br />
Setup menu operations<br />
1 While stopped<br />
Press [SETUP].<br />
2 Press [3, 4] to select the menu<br />
and press [OK].<br />
3 Press [3, 4] to select the item<br />
and press [OK].<br />
If there are any other items, repeat these steps.<br />
4 Press [3, 4, 2, 1] to select the<br />
option and press [OK].<br />
Summary of settings<br />
Underlined items are the factory presets.<br />
“<strong>Disc</strong>”<br />
DVD-Video Ratings<br />
Set a ratings level to<br />
limit DVD-Video play. Follow the on-screen instructions. Enter a<br />
4-digit password with the numbered buttons<br />
when the password screen is shown. It will be<br />
BD-Video Ratings<br />
Set an age limit of<br />
BD-Video play.<br />
the common password for both “DVD-Video<br />
Ratings” and “BD-Video Ratings”.<br />
≥Do not forget your password.<br />
Audio Language Choose the language for audio, subtitle and disc<br />
menus.<br />
[BD-V] [DVD-V]<br />
Language code list Enter the code with the numbered buttons.<br />
Setup<br />
<strong>Disc</strong><br />
Video<br />
Audio<br />
Display<br />
TV / Device Connection<br />
Network<br />
Others<br />
OK<br />
RETURN<br />
≥There may be differences in operation<br />
methods. If this happens, follow the<br />
on-screen instructions for the<br />
operation.<br />
To return to the previous<br />
screen<br />
Press [RETURN].<br />
To exit the screen<br />
Press [SETUP].<br />
≥8 No Limit: All DVD-Video can be played.<br />
≥1 to 7: Prohibits play of DVD-Video with corresponding<br />
ratings recorded on them.<br />
≥0 Lock All: Prohibits play of all DVD-Video.<br />
≥Unlock <strong>Player</strong> ≥Change Password<br />
≥Change Level ≥Temporary Unlock<br />
≥No Limit:<br />
≥0 to 254 year(s):<br />
All BD-Video can be played.<br />
Prohibits play of BD-Video with corresponding<br />
ratings recorded on them.<br />
≥Unlock <strong>Player</strong><br />
≥Change Level<br />
≥Change Password<br />
≥Temporary Unlock<br />
≥English ≥French ≥Spanish<br />
≥Original: The original language of each disc will be selected.<br />
≥Other ¢¢¢¢<br />
Subtitle<br />
Language<br />
≥Some discs start in a certain language despite<br />
any changes you make here.<br />
≥When the selected language is not available<br />
on the disc, the default language is played.<br />
There are discs where you can only switch the<br />
≥Automatic:<br />
If the language selected for “Audio Language” is not available,<br />
subtitles of that language will automatically appear if available on that<br />
disc.<br />
≥English ≥French ≥Spanish ≥Other ¢¢¢¢<br />
Menu Language<br />
language from the menu screen. (� 19)<br />
≥Enter a code (� below) with the numbered<br />
buttons when you select “Other ¢¢¢¢”.<br />
≥English ≥French ≥Spanish ≥Other ¢¢¢¢<br />
BD-Live Internet Access [BD-V] (� 21)<br />
≥Allow (ALL): Internet access is permitted for all BD-Live<br />
You can restrict Internet access when BD-Live functions are used.<br />
contents.<br />
≥Allow (Limited): Internet access is permitted only for BD-Live<br />
contents which have content owner certificates.<br />
Internet access is prohibited for all BD-Live<br />
contents without a certificate.<br />
≥Prohibit: Internet access is prohibited for all BD-Live<br />
contents.<br />
DivX Subtitle Text [DivX]<br />
≥Latin1 English, German, Spanish, etc.<br />
Select a suitable item according to the language used for DivX subtitles<br />
text (� 25).<br />
≥This item is displayed only when pressing [SETUP] after playing back a file.<br />
≥Latin2<br />
≥Cyrillic<br />
Polish, Czech, Hungarian, etc.<br />
Russian, etc.<br />
Abkhazian: 6566<br />
Afar: 6565<br />
Afrikaans: 6570<br />
Albanian: 8381<br />
Amharic: 6577<br />
Arabic: 6582<br />
Armenian: 7289<br />
Assamese: 6583<br />
Aymara: 6589<br />
Azerbaijani: 6590<br />
Bashkir: 6665<br />
Basque: 6985<br />
Bengali; Bangla:<br />
6678<br />
Bhutani: 6890<br />
Bihari: 6672<br />
Breton: 6682<br />
Bulgarian: 6671<br />
Burmese: 7789<br />
Byelorussian: 6669<br />
Cambodian: 7577<br />
Catalan: 6765<br />
Chinese: 9072<br />
Corsican: 6779<br />
Croatian: 7282<br />
Czech: 6783<br />
Danish: 6865<br />
Dutch: 7876<br />
English: 6978<br />
Esperanto: 6979<br />
Estonian: 6984<br />
Faroese: 7079<br />
Fiji: 7074<br />
Finnish: 7073<br />
French: 7082<br />
Frisian: 7089<br />
Galician: 7176<br />
Georgian: 7565<br />
German: 6869<br />
Greek: 6976<br />
Greenlandic: 7576<br />
Guarani: 7178<br />
Gujarati: 7185<br />
Hausa: 7265<br />
Hebrew: 7387<br />
Hindi: 7273<br />
Hungarian: 7285<br />
Icelandic: 7383<br />
Indonesian: 7378<br />
Interlingua: 7365<br />
Irish: 7165<br />
Italian: 7384<br />
Japanese: 7465<br />
Javanese: 7487<br />
Kannada: 7578<br />
Kashmiri: 7583<br />
Kazakh: 7575<br />
Kirghiz: 7589<br />
Korean: 7579<br />
Kurdish: 7585<br />
Laotian: 7679<br />
Latin: 7665<br />
Latvian, Lettish: 7686<br />
Lingala: 7678<br />
Lithuanian: 7684<br />
Macedonian: 7775<br />
Malagasy: 7771<br />
Malay: 7783<br />
Malayalam: 7776<br />
Maltese: 7784<br />
Maori: 7773<br />
Marathi: 7782<br />
Moldavian: 7779<br />
Mongolian: 7778<br />
Nauru: 7865<br />
Nepali: 7869<br />
Norwegian: 7879<br />
Oriya: 7982<br />
Pashto, Pushto: 8083<br />
Persian: 7065<br />
Polish: 8076<br />
Portuguese: 8084<br />
Punjabi: 8065<br />
Quechua: 8185<br />
Rhaeto-Romance:<br />
8277<br />
Romanian: 8279<br />
Russian: 8285<br />
Samoan: 8377<br />
Sanskrit: 8365<br />
Scots Gaelic: 7168<br />
Serbian: 8382<br />
Serbo-Croatian: 8372<br />
Shona: 8378<br />
Sindhi: 8368<br />
Singhalese: 8373<br />
Slovak: 8375<br />
Slovenian: 8376<br />
Somali: 8379<br />
Spanish: 6983<br />
Sundanese: 8385<br />
Swahili: 8387<br />
Swedish: 8386<br />
Tagalog: 8476<br />
Tajik: 8471<br />
Tamil: 8465<br />
Tatar: 8484<br />
Telugu: 8469<br />
Thai: 8472<br />
Tibetan: 6679<br />
Tigrinya: 8473<br />
Tonga: 8479<br />
Turkish: 8482<br />
Turkmen: 8475<br />
Twi: 8487<br />
Ukrainian: 8575<br />
Urdu: 8582<br />
Uzbek: 8590<br />
Vietnamese: 8673<br />
Volapük: 8679<br />
Welsh: 6789<br />
Wolof: 8779<br />
Xhosa: 8872<br />
Yiddish: 7473<br />
Yoruba: 8979<br />
Zulu: 9085
To select these options, perform steps 1–4 (� 30)<br />
“Video”<br />
Still Mode (paused video) [BD-V] [AVCHD] [DVD-V]<br />
Select the type of picture shown when you pause playback<br />
(� 46, Frames and fields).<br />
Seamless Play [DVD-VR]<br />
Select the play mode between playlist chapter segments and partially<br />
deleted titles.<br />
Black Level Control<br />
Select lighter or darker for adjusting the black level control to the<br />
desired setting for picture enhancement.<br />
“Audio”<br />
Dynamic Range Compression [BD-V] [AVCHD] [DVD-V] [DivX]<br />
(Dolby Digital, Dolby Digital Plus and Dolby TrueHD only)<br />
Change the dynamic range (� 46) for late night viewing.<br />
Digital Audio Output (� 8)<br />
≥Press [OK] to show the following settings.<br />
Dolby D/Dolby D +/ Select whether Dolby Digital, Dolby<br />
Dolby TrueHD Digital Plus, Dolby TrueHD, DTS<br />
DTS/DTS-HD<br />
Digital Surround, DTS-HD High<br />
Resolution Audio or DTS-HD Master<br />
Audio is output in “Bitstream” or<br />
“PCM” format.<br />
≥Not making the proper settings may<br />
result in noise.<br />
≥If the unit is connected with the<br />
HDMI AV OUT terminal, the<br />
specifications of the connected<br />
equipment take preference over this<br />
unit and audio selected in these<br />
items may not be output (e.g., when<br />
a television is connected, the HDMI<br />
audio output of this unit is limited to<br />
down-mixed 2ch.)<br />
BD-Video Secondary Audio [BD-V]<br />
Turn on/off the clicking sound on the menu and audio with<br />
secondary video in picture-in-picture mode. (� 21)<br />
PCM Down Conversion<br />
Select how to output audio with a sampling frequency of 96 kHz or<br />
more.<br />
≥Signals are converted to 48 kHz despite the settings across in<br />
the following cases:<br />
– when the signals have a sampling frequency of over 96 kHz<br />
– when the disc has copy protection<br />
– when “BD-Video Secondary Audio” is set to “On”<br />
Downmix<br />
Switch the downmix system for playing back multi-channel<br />
surround sound.<br />
≥When “Dolby D/Dolby D +/Dolby TrueHD” or “DTS/DTS-HD” is<br />
set to “Bitstream”, there are no downmix effects for the outputted<br />
audio.<br />
≥The audio will be outputted in “Stereo” in the following cases.<br />
– AVCHD playback<br />
– Playback of clicking sound on the menu and audio with<br />
secondary video in picture-in-picture mode<br />
≥Auto<br />
≥Field: Select if jittering occurs when “Auto” is selected. (The picture<br />
is coarser.)<br />
≥Frame: Select if small text or fine patterns cannot be seen clearly<br />
when “Auto” is selected. (The picture is clearer and finer.)<br />
≥On: The chapters in playlists are played seamlessly. This does<br />
not work while searching or when there are several audio<br />
types included on the playlist. Additionally, the positioning of<br />
chapter segments may change slightly.<br />
≥Off: The points where chapters in playlists change are played<br />
accurately, but the picture may freeze for a moment.<br />
≥Lighter: When video is output from VIDEO OUT terminal.<br />
≥Darker: When video is output from COMPONENT VIDEO OUT<br />
terminal.<br />
≥On ≥Off<br />
≥Auto: Effective only when Dolby TrueHD is played.<br />
≥Bitstream:<br />
Select “Bitstream” when the connected equipment can decode the<br />
respective audio format.<br />
– Connect equipment supporting HDMI (High Bit rate Audio) and use a<br />
High Speed HDMI Cable in order to output high bit rate audio such as<br />
Dolby Digital Plus, Dolby TrueHD, DTS-HD High Resolution Audio or<br />
DTS-HD Master Audio.<br />
≥PCM:<br />
Select “PCM” when the connected equipment cannot decode the<br />
respective audio format.<br />
Refer to the operating instructions for connected devices to verify whether or<br />
not they can decode each of the audio formats.<br />
≥On: The primary audio and secondary audio are mixed and output. The<br />
sampling frequency is converted to 48 kHz.<br />
≥Off: The clicking sound on the menu and secondary audio are not<br />
output.<br />
≥On: Signals are converted to 48 kHz. (Choose when the connected<br />
equipment cannot process signals with sampling frequency of<br />
96 kHz.)<br />
≥Off: Signals are output as 96 kHz. (Choose when the connected<br />
equipment can process signals with sampling frequency of<br />
96 kHz.)<br />
≥Stereo: When connected to equipment that does not support<br />
the virtual surround function.<br />
≥Surround encoded: When connected to equipment that supports the<br />
virtual surround function (Dolby Pro Logic, DTS<br />
Neo: 6, etc.).<br />
Settings<br />
31<br />
RQT9243 or RQT9350
32<br />
RQT9243 or RQT9350<br />
Changing the unit’s settings<br />
To select these options, perform steps 1–4 (� 30)<br />
Underlined items are the factory presets.<br />
“Display”<br />
Status Messages<br />
Choose whether to show status messages automatically.<br />
On-screen Language<br />
Choose the language for these menus and on-screen messages.<br />
Screen Saver Function<br />
This is to prevent burn-in on the screen.<br />
≥When this is set to “On”, the masked-off area on the screen<br />
becomes g<strong>ray</strong>.<br />
[Only when connecting with an HDMI cable or a component video<br />
cable and “HDMI Resolution” (� below) is set to any other mode<br />
than “480p”, or “Component Video Resolution” (� below) is set to<br />
“720p” or “1080i”]<br />
FL Display<br />
Changes the brightness of the unit’s display.<br />
SD Card LED Control [BD55]<br />
Set the lighting method for the lamp on the SD card slot.<br />
≥Automatic ≥Off<br />
≥English ≥Français ≥Español<br />
≥On:<br />
If there is no operation for 10 minutes or more, the displayed screen switches<br />
to the other states automatically.<br />
– When the Direct Navigator or FUNCTIONS menu is displayed, the display<br />
returns to the screen saver mode.<br />
– When CD or MP3 is played, the display returns to the screen saver mode.<br />
(Playback continues.)<br />
– When still pictures are shown (except for slideshows), the display returns<br />
to the Direct Navigator screen.<br />
≥Off<br />
≥Bright<br />
≥Dim: The display is dimmed.<br />
≥Auto: The display is dimmed during playback and bright except<br />
playback.<br />
≥On ≥Off<br />
≥SD inserted: When this unit is turned on and SD card is inserted, the<br />
lamp is lighted.<br />
License Information about the software used by this unit is displayed.<br />
“TV / Device Connection”<br />
TV Aspect<br />
Set to match the type of television connected.<br />
HDMI Connection<br />
≥Press [OK] to show the following settings.<br />
HDMI Video Mode<br />
Select “On” when video is output from HDMI AV OUT<br />
terminal.<br />
HDMI Resolution*<br />
The items supported by the connected devices are<br />
indicated on the screen as “¢”. When any item without “¢”<br />
is selected, the images may be distorted.<br />
24p Output [BD-V] [DVD-V]<br />
When this unit is connected to a TV supporting 1080/24p<br />
output via an HDMI cable, this unit displays each frame at<br />
1/24 second intervals – the same interval originally shot<br />
with the film camera.<br />
≥When playing DVD-Video, set to “On” and then set “24p”<br />
in “Video” (� 29) to “On”<br />
HDMI RGB Output Range<br />
Effective when connected to a device that only supports<br />
RGB output.<br />
HDMI Audio Output<br />
This setting selects whether or not to output audio from<br />
HDMI.<br />
VIERA Link<br />
Set to use “HDAVI Control” function when connected with<br />
an HDMI cable to a device that supports “HDAVI Control”.<br />
When connected to a 4:3 aspect television:<br />
≥4:3 Pan & Scan: Video recorded for a widescreen is played as Pan & Scan<br />
(unless prohibited by the producer of the disc). When playing<br />
BD-Video, video is output as “4:3 Letterbox”.<br />
≥4:3 Letterbox: Video recorded for a widescreen is played in the letterbox style.<br />
When connected to a 16:9 widescreen television:<br />
≥16:9: Video recorded for 4:3 aspect screen is displayed as a 4:3 ratio<br />
image in the center of the screen.<br />
≥16:9 Full: Video recorded for 4:3 aspect screen is displayed as a<br />
horizontally stretched 16:9 image.<br />
≥On: Images are output from the HDMI terminal in the resolution set in “HDMI<br />
Resolution”. Video from COMPONENT VIDEO OUT terminal is output as<br />
“480i”.<br />
≥Off Images are output in the resolution set in “Component Video Resolution”.<br />
≥Auto: Automatically selects the output resolution best suited to the<br />
connected television (1080p, 1080i, 720p or 480p).<br />
≥480p ≥720p<br />
≥1080i ≥1080p<br />
– When the unit is connected to an amplifier/receiver that does not support the<br />
resolution set on the unit, the video cannot be output properly. In this case, use<br />
the HDMI cable to connect the unit to the TV and then connect the unit to the<br />
amplifier/receiver using a cable other than HDMI.<br />
– To enjoy high definition video up-converted to 1080p, you need to connect the unit<br />
directly to 1080p compatible HDTV (High Definition Television). If this unit is<br />
connected to an HDTV through other equipment, it must also be 1080p<br />
compatible.<br />
≥On: Images in 24p are output in 24p as they are.<br />
However,<br />
– when video is being output at 24 frames, images from any other terminal<br />
than the HDMI terminal may not be output properly.<br />
– [BD-V]: when images other than 24p are played, images are output at<br />
60p.<br />
≥Off<br />
≥Standard: The video is output as it is.<br />
≥Enhanced: When the black and white contrast of a video is low, the signal<br />
is enhanced to reproduce clear video.<br />
≥On:<br />
≥Off: When the TV is connected to this unit using an HDMI cable, and this unit<br />
is also connected to other devices, such as an amplifier/receiver using an<br />
optical digital audio cable or a coaxial cable [BD55].<br />
≥On:<br />
≥Off: Select when you do not want to use “HDAVI Control”.<br />
Component Video Resolution*<br />
≥480i ≥480p ≥720p ≥1080i<br />
This sets the video output resolution when using the Even if you select “720p” or “1080i”, the video output resolution is restricted to<br />
component video terminal.<br />
“480p” when images of DVD-Video discs are output from the COMPONENT VIDEO<br />
OUT terminals.<br />
Analog Audio Output [BD55]<br />
When connected with AUDIO OUT terminals, you can set<br />
the unit to output the best possible sound for your speakers.<br />
≥2ch (Downmix) + 5.1ch: When connecting to 2ch AUDIO OUT or 5.1ch AUDIO<br />
OUT. (� 34)<br />
≥7.1ch: When connecting to 7.1ch AUDIO OUT. (� 34)<br />
* In this unit, a P4HD (� 47) video processor is used to provide video of optimal resolution to the connected TV.
To select these options, perform steps 1–4 (� 30)<br />
“Network”<br />
IP Address/DNS Settings (� 17)<br />
≥Press [OK] to show the following settings.<br />
Connection Test — — — —<br />
IP Address Auto Configuration (DHCP) ≥On ≥Off<br />
IP Address — — —. — — —. — — —. — — —<br />
Subnet Mask — — —. — — —. — — —. — — —<br />
Default Gateway — — —. — — —. — — —. — — —<br />
DNS Auto Configuration (DHCP) ≥On ≥Off<br />
Primary DNS — — —. — — —. — — —. — — —<br />
Secondary DNS — — —. — — —. — — —. — — —<br />
Auto Detect Connection Speed ≥On ≥Off<br />
Connection Speed Setting<br />
This is enabled only when “Auto Detect Connection Speed” is<br />
turned “Off”.<br />
Proxy Server Settings (� 18)<br />
≥Press [OK] to show the following settings.<br />
≥10BASE Half Duplex ≥10BASE Full Duplex<br />
≥100BASE Half Duplex ≥100BASE Full Duplex<br />
Reset to factory preset ≥Yes ≥No<br />
Proxy Address (The initial setting is blank.)<br />
Proxy Port Number (The initial setting is “0”.)<br />
“Others”<br />
Off Timer<br />
Select how long the unit remains on when it is not being<br />
used.<br />
≥2 Hours ≥6 Hours ≥Off<br />
Remote Control Code ≥Set Code 1 ≥Set Code 2 ≥Set Code 3<br />
Easy Setting<br />
You can execute basic settings (“On-screen Language”, “TV<br />
Aspect”, “Analog Audio Output” [BD55]).<br />
≥Yes ≥No<br />
Restore Default Settings<br />
This returns all values in the Setup menu and the on-screen<br />
menu, except for “Remote Control Code”, “On-screen<br />
Language”, “IP Address/DNS Settings”, “Proxy Server<br />
Settings”, “DVD-Video Ratings” and “BD-Video Ratings” to<br />
the default settings.<br />
DivX Registration [DivX] (� 24)<br />
≥Yes ≥No<br />
You need this registration code to purchase and play DivX Video-on-Demand (VOD) content.<br />
Firmware Update (� 14)<br />
≥Press [OK] to show the following settings.<br />
Automatic Update Check<br />
When this equipment remains connected to the Internet,<br />
it will check for the latest firmware version when it is<br />
turned on and you can update it if necessary.<br />
≥On ≥Off<br />
Update Now You can update the firmware manually.<br />
When other <strong>Panasonic</strong> products respond to this remote control<br />
Change the remote control code on the main unit and the remote control (the two must match) if you place other <strong>Panasonic</strong> products close together.<br />
1 Press [SETUP].<br />
2 Press [3, 4] to select “Others” and press [OK].<br />
3 Press [3, 4] to select “Remote Control<br />
Code” and press [OK].<br />
4 Press [3, 4] to select the code (1, 2, or 3) and<br />
press [OK].<br />
5 To change the code on the remote control<br />
While pressing [OK], press and hold the<br />
Remote Control Code<br />
Set Code 1<br />
Set Code 2<br />
Set Code 3<br />
Press [�] and[OK]together<br />
for more than 5 seconds on<br />
the remote.<br />
numbered button ([1], [2] or [3]) for more than 5 seconds.<br />
6 Press [OK].<br />
When the following indicator<br />
appears on the unit’s display and<br />
you are unable to operate the unit<br />
The unit’s remote control code<br />
Press and hold [OK] and the<br />
indicated number button at the<br />
same time for more than 5 seconds.<br />
Settings<br />
33<br />
RQT9243 or RQT9350
34<br />
RQT9243 or RQT9350<br />
Changing the unit’s settings<br />
Changing the speaker setting to suit your speakers [BD55]<br />
When connecting to an amplifier/receiver to enjoy multi-channel surround sound, use the following settings on this unit if they cannot be set on the<br />
amplifier/receiver.<br />
The settings are effective when connecting to analog 7.1 ch/5.1ch AUDIO OUT terminal.<br />
Preparation<br />
1 Set “Analog Audio Output” to “2ch (Downmix) + 5.1ch” or “7.1ch”.<br />
(� 32)<br />
A message is displayed.<br />
2 Press [OK].<br />
Front (L)<br />
Complete<br />
Test<br />
L<br />
dB<br />
0.0<br />
Complete<br />
Test<br />
LS<br />
ms<br />
0.0<br />
dB<br />
0.0<br />
Center<br />
ms dB<br />
0.0 0.0<br />
* Surround back channel is enabled only when setting “Analog Audio<br />
Output” to “7.1ch”.<br />
Speaker presence and size ( L C<br />
)<br />
Set all the connected speakers individually.<br />
1 Press [3, 4, 2, 1] to select the speaker icon and press [OK].<br />
2 Press [3, 4] to select the setting and press [OK].<br />
Icon examples:<br />
Surround speaker (LS)<br />
≥Large: Select when the speaker supports low-frequency<br />
(under 100 Hz) reproduction.<br />
≥Small: Select when the speaker does not support<br />
low-frequency reproduction.<br />
In order to make an ideal listening environment, settings of speaker<br />
sizes may be automatically adjusted.<br />
For example, if the subwoofer is set to “No”, the front speakers will<br />
automatically be set to “Large”. (In this case, we recommend<br />
connecting a speaker that can reproduce bass below 100 Hz.)<br />
C<br />
dB<br />
0.0<br />
dB<br />
0.0<br />
R<br />
dB<br />
0.0<br />
SW<br />
RS<br />
dB ms dB<br />
LB 0.0 0.0 0.0 RB<br />
Front (R)<br />
Subwoofer<br />
(LS) Surround (RS) (LB) Surround back (RB)*<br />
LS LS<br />
Large Small<br />
No<br />
R SW LS RS LB RB<br />
Delay time ( ms )<br />
For optimum listening with 7.1/5.1-channel sound, all the speakers,<br />
except for the subwoofer, should be the same distance from the<br />
seating position.<br />
If you have to place the center, surround and surround back speakers<br />
closer to the seating position, adjust the delay time to make up for the<br />
difference.<br />
If either distance A or C is less than B (� below), find the<br />
difference in the relevant table and change to the recommended<br />
setting.<br />
ms<br />
1 Press [3, 4, 2, 1] to select the delay time box ( ) and press<br />
0.0<br />
[OK].<br />
2 Press [3, 4] to select the setting and press [OK].<br />
5.1ch speaker connection 7.1ch speaker connection<br />
Approximate room dimensions<br />
L<br />
LS<br />
LS<br />
C<br />
C<br />
A B<br />
C<br />
: Actual speaker position<br />
: Ideal speaker position<br />
A B C : Primary listening distance<br />
A Center speaker<br />
Difference Setting<br />
Approx. 34 cm (1 ft. 1 in.) 1.0 ms<br />
Approx. 68 cm (2 ft. 2 in.) 2.0 ms<br />
Approx. 102 cm (3 ft. 4 in.) 3.0 ms<br />
Approx. 136 cm (4 ft. 5 in.) 4.0 ms<br />
Approx. 170 cm (5 ft. 6 in.) 5.0 ms<br />
C Surround/Surround back speakers<br />
Difference Setting<br />
Approx. 170 cm (5 ft. 6 in.) 5.0 ms<br />
Approx. 340 cm (11 ft. 1 in.) 10.0 ms<br />
Approx. 510 cm (16 ft. 8 in.) 15.0 ms<br />
dB<br />
Channel balance ( )<br />
0.0<br />
RS<br />
R<br />
SW<br />
RS<br />
1 Select “Test” and press [OK].<br />
A test signal is output.<br />
Front (L)_—)Center_—)Front (R)_—)Surround (RS)<br />
: ;<br />
Surround (LS)(— Surround Back (LB) (— Surround Back (RB)<br />
2 While listening to the test signal, press [3, 4] to adjust the<br />
volume of each speaker<br />
Front speakers: 0.0 to s6.0 dB<br />
Center and surround speakers: 0.0 to s12.0 dB<br />
≥You cannot adjust the volume of surround back speakers.<br />
3 Press [OK].<br />
The test signal stops.<br />
≥No signal is output for the subwoofer. To adjust its volume, play<br />
something, then return to this screen to adjust to suit your taste.<br />
4 Press [OK].<br />
L<br />
LS LS<br />
Circle of constant primary listening distance<br />
0.0<br />
LB<br />
LB<br />
C<br />
C<br />
A B<br />
C<br />
C<br />
RB<br />
R<br />
RS RS<br />
RB<br />
SW
Reference<br />
About MP3/JPEG/DivX files<br />
MP3<br />
File format MP3<br />
Playable<br />
media<br />
CD-R* 1 , CD-RW* 1<br />
Extension Files must have the extension “.mp3” or “.MP3”.<br />
Compression<br />
rate<br />
Sampling<br />
rate<br />
JPEG<br />
DivX [BD55]<br />
32 kbps to 320 kbps<br />
44.1 kHz/48 kHz<br />
Reference ID3 tags: version 1, 2.2, 2.3, 2.4<br />
ID3 is a tag embedded in MP3 track to provide<br />
information about the track.<br />
This unit supports the versions listed above but only<br />
titles and the names of artists can be displayed.<br />
≥If there is a large amount of still picture data etc.<br />
within a MP3 file, play may not be possible.<br />
File format JPEG<br />
Playable<br />
media<br />
CD-R* 1 , CD-RW* 1 , DVD-RAM* 2 , BD-RE* 3 ,<br />
SD card<br />
Extension Files must have the extension “.jpg” or “.JPG”.<br />
Picture<br />
resolution<br />
between 34k34 and 8192k8192 pixels<br />
(sub sampling is 4:2:2 or 4:2:0)<br />
Reference JPEG conforming DCF* 4 is supported.<br />
Thawing Time: approx. 2 sec. (7M pixels)<br />
≥MOTION JPEG and Progressive JPEG is not<br />
supported<br />
File format DivX<br />
Playable<br />
media<br />
CD-R* 1 , CD-RW* 1 , DVD-R* 1, * 5 , DVD-R DL* 1, * 5<br />
Extension Files must have the extension “.DIVX”, “.divx”,<br />
“.AVI” or “.avi”.<br />
Picture<br />
resolution<br />
between 32k32 and 720k576 pixels<br />
Reference ≥Plays all versions of DivX video (including<br />
DivX 6) with standard playback of DivX media<br />
files.<br />
Certified to the DivX Home Theater Profile.<br />
Video<br />
– Number of stream: Up to 1<br />
– Codec: DIV3, DIV4, DIVX, DV50, DIV6<br />
– FPS (Frame Per Second): Up to 30 fps<br />
Audio<br />
– Number of stream: Up to 8<br />
– Format: MP3, MPEG, AC3<br />
– Multi channel: AC3 is possible. MPEG multi is<br />
2 ch conversion.<br />
≥GMC (Global Motion Compensation) is not<br />
supported.<br />
≥Picture may stop if the DivX files are greater<br />
than 2 GB.<br />
Subtitles text file of DivX [BD55]<br />
File format Subtitles text file of DivX<br />
Playable<br />
media<br />
CD-R* 1 , CD-RW* 1 , DVD-R* 1, * 5 , DVD-R DL* 1, * 5<br />
File format MicroDVD, SubRip, or TM<strong>Player</strong><br />
Extension Files must have the extension “.SRT”, “.srt”,<br />
“.SUB”, “.sub”, “.TXT”, or “.txt”<br />
Reference ≥The DivX video file and subtitles text file are<br />
inside the same folder, and the file names are<br />
the same except for the file extensions.<br />
≥If there are more than one subtitles text files<br />
inside the same folder, they are displayed in the<br />
following order of priority: “.srt”, “.sub”, “.txt”.<br />
≥In the following situations, the subtitles cannot<br />
be displayed as recorded. Furthermore,<br />
depending on the methods used to create the<br />
file or the state of the recording, only parts of the<br />
subtitles may be displayed, or the subtitles may<br />
not be displayed at all.<br />
– When special text or characters are included<br />
in the subtitles text.<br />
– When the file size is larger than 256 KB.<br />
– When characters with specified styling are<br />
included in the subtitle data.<br />
– Codes that specify the character style within<br />
files are displayed as subtitle characters.<br />
– When data with a different format exists within<br />
the subtitle data.<br />
≥If the file name of the DivX video file is not<br />
displayed correctly on the menu screen (the file<br />
name is displayed as “_”), the subtitles text may<br />
not be displayed correctly.<br />
≥Depending on the disc, the subtitles text cannot<br />
be displayed when search and other such<br />
operations are being performed.<br />
≥English alphabet and Arabic numerals are displayed correctly. Other<br />
characters may not be displayed correctly.<br />
≥The display order on this unit may differ from how the order is<br />
displayed on a computer.<br />
≥Depending on how you create the media (writing software), files<br />
and folders may not play in the order you numbered them.<br />
≥This unit is not compatible with packet-write format.<br />
≥Depending on the recording conditions, the media may not play.<br />
≥Operation may take time to complete when there are many files<br />
and/or folders and some files may not display or be playable.<br />
*1 ISO9660 level 1 or 2 (except for extended formats), Joliet<br />
This unit is compatible with multi-session.<br />
This unit is not compatible with packet writing.<br />
*2 <strong>Disc</strong>s must conform to UDF 2.0.<br />
*3 <strong>Disc</strong>s must conform to UDF 2.5.<br />
*4 Design rule for Camera File system: unified standard established<br />
by Japan Electronics and Information Technology Industries<br />
Association (JEITA).<br />
*5 <strong>Disc</strong>s must conform to UDF bridge (UDF 1.02/ISO9660).<br />
This unit is not compatible with multi-session.<br />
The default session only is played.<br />
Reference Settings<br />
35<br />
RQT9243 or RQT9350
36<br />
RQT9243 or RQT9350<br />
Messages<br />
The following messages or service numbers appear on the television or unit’s display when something unusual is detected during startup and use.<br />
On the television Page<br />
Authorization Error<br />
This unit is not authorized<br />
to play this title.<br />
≥ [DivX]: You are trying to play the DivX VOD content that was purchased with a<br />
different registration code. You cannot play the content on this unit.<br />
Cannot play. ≥ You inserted an incompatible disc (<strong>Disc</strong>s recorded in PAL video, etc.). 6, 7<br />
Cannot display on this unit. ≥ You tried to play a non-compatible image.<br />
≥ Confirm “SD” on the unit’s display is not blinking and re-insert the card.<br />
No disc is inserted. ≥ The disc may be upside down. —<br />
Rental Expired. ≥ [DivX]: The DivX VOD content has zero remaining plays. You cannot play it. 24<br />
$ This operation is<br />
currently disabled.<br />
Cannot connect.<br />
Please check the<br />
connection of the LAN<br />
cable.<br />
≥ Some operations are prohibited by the unit or disc. For example;<br />
– [BD-V]: During play back, reverse slow-motion or reverse frame-by-frame is not<br />
possible.<br />
– Depending on the disc, you may not be able to perform search or skip when<br />
film previews and warning screens are being played back.<br />
≥ When a hub is used but its Link lamp does not light up, check the cable<br />
connection, LAN terminal connection, cable itself (a cross over cable may be<br />
used by mistake), etc.<br />
IP address is not set. ≥ The “IP Address” in “IP Address/DNS Settings” is “---. ---. ---. ---”. Set the “IP<br />
Address”, “Subnet Mask”, and “Default Gateway”. (Select the automatic address<br />
acquisition if necessary.)<br />
Cannot obtain IP address<br />
using DHCP.<br />
Please check the<br />
connection or router<br />
settings.<br />
This IP address is already in<br />
use.<br />
Please check the IP address<br />
setting.<br />
Unable to perform<br />
Connection Test.<br />
Please try again.<br />
IP address not set correctly.<br />
Connection Test was<br />
unsuccessful. No reply<br />
from host.<br />
Please check the<br />
connection or router<br />
settings.<br />
Network connection<br />
refused.<br />
Please confirm Setup<br />
“BD-Live Internet Access.”<br />
≥ If you use a hub, then check the connection between the hub and the router.<br />
– Use the UPLINK port of the hub to connect to a router.<br />
– Check whether or not the hub’s Link lamp lights up. If it does not light up, then<br />
check the cable connection, LAN terminal connection, cable itself (a cross over<br />
cable may be used by mistake), etc.<br />
≥ If the above conditions are OK, then the router may not operate in DHCP mode.<br />
Check the router settings and operation. You may reset the router to restore it to<br />
normal.<br />
≥ This unit’s IP address is used by another device. Check the IP addresses of this<br />
unit, personal computers, and routers, etc. If necessary, reconfigure them to<br />
avoid IP addresses from being duplicated.<br />
≥ Turn the unit off. Remove the power cord and reconnect it and try again. If the<br />
same symptom persists, then consult your dealer.<br />
≥ If you use a hub, then check the connection between the hub and the router.<br />
– Use the UPLINK port of the hub to connect to a router.<br />
– If the hub’s Link lamp does not light up, then check the cable connection, LAN<br />
terminal connection, cable itself (a cross over cable may have been used by<br />
mistake), etc.<br />
≥ Check the “IP Address”, “Subnet Mask”, and “Default Gateway” in the “IP<br />
Address/DNS Settings”.<br />
≥ If the MAC address information is required, then press [SETUP] to display the<br />
“Network” menu.<br />
≥ When you set “BD-Live Internet Access” to “Allow (Limited)” and play BD-Live<br />
contents which do not have a content owner certificate, the Internet access of<br />
the content is not allowed. If you allow the content to connect to Internet, set<br />
“BD-Live Internet Access” to “Allow (ALL)”.<br />
24<br />
7, 35<br />
—<br />
19, 20<br />
—<br />
14<br />
17<br />
14<br />
—<br />
—<br />
14<br />
17<br />
17<br />
30
On the unit’s display Page<br />
F99 ≥ The unit fails to operate properly. Press [POWER Í/I] on the main unit to switch<br />
the unit to standby for 3 seconds. Now press [POWER Í/I] on the main unit<br />
again to turn the unit on.<br />
HDMI ONLY ≥ Some BD-Video discs can only be output with HDMI. —<br />
No PLAY ≥ There is a viewing restriction on a BD-Video or DVD-Video. 30<br />
No READ ≥ The disc is dirty or badly scratched. The unit cannot play. —<br />
PLEASE WAIT ≥ The unit is carrying out internal process.This is not a malfunction. You cannot<br />
operate the unit while “PLEASE WAIT” is displayed.<br />
SET �<br />
(“ � ” stands for a number.)<br />
≥ The remote control and main unit are using different codes. Change the code on<br />
the remote control.<br />
Press and hold [OK] and the indicated number button at the<br />
same time for more than 5 seconds.<br />
UNFORMAT ≥ You inserted an unformatted DVD-RAM, DVD-RW, +RW, an unused +R, +R DL<br />
or DVD-RW (DVD-Video format).<br />
UNSUPPORT ≥ You have inserted a disc the unit cannot play. 6, 7<br />
U59 ≥ The unit is hot.<br />
The unit switches to standby for safety reasons. Wait for about 30 minutes until<br />
the message disappears.<br />
Select a position with good ventilation when installing the unit. Do not block the<br />
cooling fan on the rear of the unit.<br />
U72<br />
U73<br />
≥ The HDMI connection acts unusually.<br />
– The connected equipment is not HDMI compatible.<br />
– Please use HDMI cables that have the HDMI logo (as shown on the cover).<br />
– The HDMI cable is damaged.<br />
H�� or F�� ≥ There is something unusual. (The service number displayed after H and F<br />
depends on the unit’s condition.)<br />
≥ Check the unit using the troubleshooting guide. If the service number does not<br />
disappear, do the following.<br />
1)<strong>Disc</strong>onnect the plug from the AC outlet, wait a few seconds, then reconnect it.<br />
2)Press [POWER Í/I] to turn the power on. (The unit may be fixed.)<br />
If the service number does not disappear despite doing the above, request<br />
service from the dealer. Inform the dealer of the service number when requesting<br />
service.<br />
START ≥ The system is being restarted during the firmware update. Please do not turn off<br />
power.<br />
UPD�/� ≥ The firmware is being updated. 14<br />
FINISH ≥ The firmware update is complete. 14<br />
—<br />
—<br />
33<br />
—<br />
—<br />
—<br />
—<br />
38–40<br />
14<br />
Reference<br />
37<br />
RQT9243 or RQT9350
38<br />
RQT9243 or RQT9350<br />
Troubleshooting guide<br />
Before requesting service, make the following checks. If you are in doubt about some of the check points, or if the solutions indicated in the chart<br />
do not solve the problem, refer to “Customer Services Directory” on page 42 if you reside in the U.S.A., or refer to “Product information” on page 44<br />
if you reside in Canada.<br />
The following do not indicate a problem with this unit:<br />
≥Regular disc rotating sounds.<br />
≥Image disturbance during search.<br />
To reset this unit Page<br />
To restore the unit if it ≥ Press and hold [POWER Í/I] on the main unit for 3 seconds. (The settings<br />
—<br />
freezes due to one of the<br />
safety devices being<br />
activated<br />
remain unchanged.)<br />
To return all settings to the<br />
factory preset<br />
To return to the factory<br />
preset<br />
(No setting)<br />
Operation<br />
Cannot operate the<br />
television or amplifier/<br />
receiver.<br />
The remote control doesn’t<br />
work properly.<br />
The unit is on but cannot be<br />
operated.<br />
Play fails to start even when<br />
[1] (PLAY) is pressed.<br />
Play starts but then stops<br />
immediately.<br />
≥ Select “Yes” in “Restore Default Settings” in the Setup menu.<br />
This returns all values in the Setup menu and the on-screen menu, except for<br />
“Remote Control Code”, “On-screen Language”, “IP Address/DNS Settings”,<br />
“Proxy Server Settings”, “DVD-Video Ratings” and “BD-Video Ratings” to the<br />
default settings.<br />
≥ Reset the unit as follows:<br />
1Press [POWER Í/I] on the unit to turn off the unit.<br />
2 Press and hold [;], [POWER Í/I] and [< OPEN/CLOSE] on the unit at the<br />
same time for more than 5 seconds until “HELLO” is displayed on the unit.<br />
3 The power will turn on and then turn off.<br />
≥ Change the manufacturer code of the remote control. In some cases, even if you<br />
change the code, the remote control may not be operated depending on the type<br />
of the televisions or receivers.<br />
≥ It may be necessary to set the manufacturer code or the remote control code<br />
again after changing the batteries for remote control.<br />
≥ The remote control and main unit are using different codes. Change the code on<br />
the remote control.<br />
≥ The batteries are depleted. Replace them with new ones.<br />
≥ Confirm the correct drive is selected.<br />
≥ One of the unit’s safety devices may have been activated.<br />
Reset the unit as follows:<br />
1Press [POWER Í/I] on the main unit to switch the unit to standby.<br />
If the unit doesn’t switch to standby, press and hold [POWER Í/I] on the main<br />
unit for about 3 seconds. The unit is forcibly switched to standby.<br />
Alternatively, disconnect the AC power supply cord, wait one minute, then<br />
reconnect it.<br />
2Press [POWER Í/I] on the main unit to switch it on. If the unit still cannot be<br />
operated, consult the dealer.<br />
≥ Condensation has formed. Wait 1 to 2 hours for it to evaporate.<br />
≥ Insert the disc correctly with the label facing up.<br />
≥ The disc is dirty.<br />
≥ You tried to play a blank disc or unplayable disc on this unit.<br />
≥ [DivX]: If playing DivX VOD content, refer to the homepage where you purchased<br />
it.<br />
Cannot eject disc. ≥ The unit may have a problem. While the unit is off, press and hold [;] and<br />
[< OPEN/CLOSE] on the main unit at the same time for about 5 seconds to force<br />
the t<strong>ray</strong> to eject. Remove the disc and consult the dealer.<br />
Start up is slow.<br />
It takes time before play<br />
starts.<br />
Cannot set “On” in “24p<br />
Output”.<br />
≥ Start up takes time in the following situations.<br />
– Immediately after a power failure or the AC power supply cord is connected.<br />
– When the unit is connected with an HDMI cable.<br />
≥ [DivX]: This is normal on DivX video.<br />
≥ Only when the unit is connected to the HDMI terminal of a TV supporting 24p you<br />
can select “On”. In some cases where the unit is connected to a TV via an<br />
amplifier/receiver through the HDMI terminals, you may not be able to select<br />
“On”. In this case, connect the unit to a TV through the HDMI terminal and<br />
connect it to the amplifier/receiver through any terminal other than HDMI.<br />
33<br />
—<br />
16<br />
16, 33<br />
33<br />
5<br />
19<br />
—<br />
—<br />
19<br />
3<br />
6, 7<br />
24<br />
—<br />
—<br />
—<br />
32
TV screen and video Page<br />
The images from this unit ≥ Make sure that the television is connected to either the VIDEO OUT terminal, 11<br />
do not appear on the<br />
COMPONENT VIDEO OUT terminals or HDMI AV OUT terminal on this unit.<br />
television.<br />
≥ Make sure that the television’s input setting (e.g., VIDEO 1) is correct.<br />
—<br />
≥ An incorrect resolution is selected in “Component Video Resolution”, when the 32<br />
Picture is distorted.<br />
television is connected to COMPONENT VIDEO OUT terminals. While stopped,<br />
press and hold [∫] and [1] (PLAY) on the main unit at the same time for more<br />
Jittering occurs.<br />
than 5 seconds to cancel this setting. Set the item again.<br />
≥ If “24p Output” is set to “On” when the unit is connected to a TV through any<br />
terminal other than HDMI, images may not display properly. In this case, set “24p<br />
Output” to “Off”.<br />
32<br />
≥ When “24p Output” is set to “On”, HDMI authentication takes place where 24p<br />
images switch to other images, and a black screen is displayed.<br />
32<br />
≥ When “24p Output” is set to “On”, jittering may occur while playing DVD-Video<br />
other than 24p images. In this case, turn “24p Output” to “Off”.<br />
32<br />
≥ [DivX]: Images may not be output due to how files were created.<br />
—<br />
≥ Press [∫] and [1] (PLAY) simultaneously on the unit for more than 5 seconds to<br />
shift to more compatible mode with HDMI equipment. However, Dolby Digital<br />
Plus, Dolby TrueHD, and DTS-HD audio are not output in bitstream. To output the<br />
bitstream, select “Restore Default Settings” to restore the factory presets and<br />
make proper settings.<br />
33<br />
≥ Picture may not be seen when more than 4 devices are connected with HDMI<br />
cables. Reduce the number of connected devices.<br />
—<br />
The screen changes ≥ When the “Screen Saver Function” in the Setup menu is set to “On”, the display 32<br />
automatically.<br />
may return to the screen saver mode automatically if there is no operation for<br />
10 minutes or more.<br />
Video is not output in high<br />
definition.<br />
The 4:3 aspect ratio picture<br />
expands left and right.<br />
Screen size is wrong.<br />
There is a lot of after-image<br />
when playing video.<br />
When playing DVD-Video<br />
using progressive output,<br />
one part of the picture<br />
momentarily appears to be<br />
doubled up.<br />
Still pictures (JPEG) do not<br />
playback normally.<br />
Sound<br />
No sound.<br />
Low volume.<br />
Distorted sound.<br />
Cannot hear the desired<br />
audio type.<br />
≥ High definition video cannot be output through the VIDEO OUT terminals.<br />
≥ Confirm that the “HDMI Video Mode”, “HDMI Resolution”, and “Component Video<br />
Resolution” in the Setup menu are set properly.<br />
≥ Use the television to change the aspect. Refer to your television’s operating<br />
instructions.<br />
≥ When using a component video cable, set “Progressive” to “Video”. If the situation<br />
is not restored after that, set “TV Aspect” to “4:3 Pan & Scan”.<br />
≥ When using an HDMI cable, change “TV Aspect” type to “16:9”.<br />
≥ Turn “3D NR” or “Integrated NR” off if it is on. 29<br />
≥ When you use the HDMI AV OUT terminal for video output, follow the steps below<br />
for setting.<br />
1 Connect this unit to the TV with any cable except the HDMI cable.<br />
2 When you connect with the Component Video cable, set “HDMI Video Mode” to<br />
“Off” and “Component Video Resolution” to “480i” in the Setup menu.<br />
≥ The images that were edited on the PC, such as Progressive JPEG, etc., may not<br />
playback.<br />
≥ Check the connections and the “Digital Audio Output” settings. Check the input<br />
mode on the amplifier/receiver if you have connected one.<br />
≥ Press [AUDIO] to select the audio.<br />
≥ [BD55]: When the unit is connected to an amplifier/receiver with the AUDIO OUT<br />
terminal, set “Analog Audio Output” and match multi channel speaker settings. If<br />
these are not set properly, the audio is not output correctly.<br />
≥ [BD55]: When connected to an amplifier/receiver or any other devices using both<br />
AUDIO OUT terminal and HDMI AV OUT terminal, the audio from AUDIO OUT<br />
terminal may not be output with the desired audio depending on the specifications<br />
of the connected devices, etc. Set “HDMI Audio Output” to “Off”, when you output<br />
multi-channel surround sound from AUDIO OUT terminal.<br />
≥ The sound effects (Re-master, V. Surround, etc.) will not work when the bitstream<br />
signal is output from the HDMI AV OUT terminal or the DIGITAL AUDIO OUT<br />
terminal.<br />
≥ [DivX]: Audio may not be output depending on how files were created.<br />
≥ Audio may not be heard when more than 4 devices are connected with HDMI<br />
cables. Reduce the number of connected devices.<br />
≥ To output audio from a device connected with an HDMI cable, set “HDMI Audio<br />
Output” to “On” in the Setup menu.<br />
Cannot switch audio. ≥ There are discs for which audio cannot be changed because of how the disc was<br />
created.<br />
≥ When connecting an amplifier/receiver using a coaxial cable ([BD55]), optical<br />
digital audio cable or an HDMI cable, you cannot switch the audio if “Dolby D/<br />
Dolby D +/Dolby TrueHD” or “DTS/DTS-HD” is set to “Bitstream”. Set “Dolby D/<br />
Dolby D +/Dolby TrueHD” or “DTS/DTS-HD” to “PCM” or connect using AUDIO<br />
OUT terminal.<br />
—<br />
32<br />
—<br />
29, 32<br />
32<br />
32<br />
35<br />
11–13, 31<br />
20<br />
32, 34<br />
32<br />
—<br />
—<br />
—<br />
32<br />
—<br />
12, 13, 31<br />
Reference<br />
39<br />
RQT9243 or RQT9350
40<br />
RQT9243 or RQT9350<br />
Troubleshooting guide<br />
Card Page<br />
The capacity of the SD card ≥ When a BD-Video that supports the virtual package is used, and an SD card is in 21<br />
decreased.<br />
the slot, data may be written to the SD card. Erase the data by using “BD-Video<br />
Data Erase”, format the card or use a new card.<br />
MPEG-2 motion pictures<br />
and music on an SD card<br />
cannot be played.<br />
The contents of the card<br />
cannot be read.<br />
Network<br />
I can’t connect to the<br />
network.<br />
Other difficulties with playback<br />
Audio and video<br />
momentarily pause.<br />
Picture-in-picture is not<br />
played with BD-Video.<br />
The virtual package is not<br />
played with BD-Video.<br />
Alternative soundtrack and<br />
subtitles cannot be<br />
selected.<br />
≥ Data that can be played from an SD card are AVCHD and JPEG data. 7<br />
≥ The card is not compatible or the contents on the card may be damaged.<br />
≥ Turn off and then turn on the unit again.<br />
≥ Are you subscribed to high speed internet connection? Check that the LAN cable<br />
is properly connected.<br />
≥ Have you plugged a telephone cord into the LAN terminal on this unit? Connect<br />
with a straight LAN cable.<br />
≥ Confirm the power for the modem or broadband router is turned on.<br />
≥ Confirm the network settings. Follow any instructions you may have received from<br />
your ISP (Internet Service Provider) and make changes to the settings.<br />
≥ Are the broadband router settings correct? Read the operating instructions for the<br />
broadband router.<br />
≥ Is the broadband router and/or modem connected correctly ? Check the operating<br />
instructions for each device and connect accordingly.<br />
≥ Check the “Network” and “BD-Live Internet Access” settings.<br />
≥ This occurs between playlist chapters or scenes ([AVCHD]).<br />
≥ When playing a title recorded on both layers, the unit automatically switches<br />
between layers and plays the title in the same way as a normal program.<br />
However, video and audio may momentarily cut out when the unit is switching<br />
layers.<br />
≥ Confirm whether the disc supports picture-in-picture. —<br />
≥ Confirm whether the disc supports the virtual package.<br />
≥ The inserted SD card does not have sufficient available capacity.<br />
≥ The SD card is write-protected.<br />
≥ Sub contents copied to an SD card are provided by the disc producer as a part of<br />
the BD-Video content. Even if you record images and audio onto an SD card, it<br />
cannot be played as a virtual package.<br />
≥ The languages are not recorded on the disc.<br />
≥ You may not be able to use the on-screen menu to change the soundtrack and<br />
subtitles on some discs. Use the disc’s menus to make changes.<br />
No subtitles. ≥ Subtitles are not recorded on the disc.<br />
≥ Turn the subtitles on. Set “Subtitle” on the on-screen menu to “On”.<br />
≥ When progressive output is on, closed captions cannot be displayed.<br />
The subtitles overlap closed<br />
captions recorded on discs.<br />
The resume play function<br />
does not work.<br />
≥ Turn off the subtitles or turn off the closed caption setting on the TV. 28<br />
≥ Memorized positions are canceled when<br />
–pressing [∫] several times.<br />
– opening the disc t<strong>ray</strong>.<br />
≥ The resume play function may not work depending on the disc.<br />
≥ [BD-V]: On BD-Video discs including BD-J, the resume play function does not work.<br />
7<br />
—<br />
14<br />
14<br />
—<br />
—<br />
—<br />
—<br />
30, 33<br />
—<br />
—<br />
21<br />
—<br />
7<br />
21<br />
—<br />
19<br />
—<br />
28<br />
—<br />
—<br />
—<br />
—
Specifications<br />
Signal system:<br />
NTSC<br />
<strong>Operating</strong> temperature range:<br />
i5 oC to i35 oC (i41 oF to i95 oF)<br />
<strong>Operating</strong> humidity range:<br />
10 % to 80 % RH (no condensation)<br />
Playable disc:<br />
BD-Video<br />
BD-ROM: Version 2<br />
BD-RE: Version 3 (Single Layer, Dual Layer), JPEG* 6<br />
BD-R Version 2 (Single Layer, Dual Layer)<br />
DVD-RAM: DVD Video Recording format, AVCHD format* 8 ,<br />
JPEG* 4<br />
DVD-R/DVD-R DL:<br />
DVD-Video format* 1 , DVD-Video Recording<br />
format* 1 , AVCHD format* 1, 8 , DivX* 7<br />
DVD-RW: DVD-Video format* 1 , DVD-Video Recording<br />
format* 1 1, 8<br />
, AVCHD format*<br />
+R/+RW/+R DL:<br />
Video* 1 , AVCHD format*<br />
1, 8<br />
DVD-VIDEO:<br />
DVD-Video format<br />
CD-Audio: CD-DA<br />
CD-R/CD-RW:CD-DA, JPEG* 5 , MP3, DivX* 7<br />
SD card:<br />
SD Memory Card* 2 formatted FAT12, FAT16, FAT32* 3 :<br />
JPEG* 4 , AVCHD format* 8<br />
Video output:<br />
Output level: 1.0 Vp-p (75 ≠)<br />
Output connector: Pin jack (1 system)<br />
Component video output: (1080i/720p/480p/480i)<br />
Y output level: 1.0 Vp-p (75 ≠)<br />
PB output level: 0.7 Vp-p (75 ≠)<br />
PR output level: 0.7 Vp-p (75 ≠)<br />
Output connector: Pin jack (Y: green, PB: blue, PR: red)<br />
(1 system)<br />
Audio output:<br />
Output level: 2 Vrms (1 kHz, 0 dB)<br />
Output connector: Pin jack<br />
Number of connectors :<br />
[BD55]: 7.1 channel discrete output: 1 system<br />
(2 channel + 5.1 channel discrete output)<br />
[<strong>BD35</strong>]: 2 channel: 1 system<br />
Audio performance:<br />
Frequency response:<br />
≥DVD (linear audio): 4 Hz to 22 kHz (48 kHz sampling)<br />
4 Hz to 44 kHz (96 kHz sampling)<br />
≥CD-Audio: 4 Hz to 20 kHz<br />
S/N ratio: 115 dB<br />
Dynamic range: 100 dB<br />
Total harmonic distortion: 0.003 %<br />
Digital audio output:<br />
Optical digital output: Optical terminal<br />
Coaxial digital output [BD55]: Pin jack<br />
HDMI AV output<br />
Output format:<br />
480p (525p)/1080i (1125i)/720p (750p)/1080p<br />
(1125p)<br />
Output Connector: Type A (19 pin)<br />
HDMITM (Deep color, x.v.ColorTM , High Bit rate Audio)<br />
≥This unit supports “HDAVI Control 3” function.<br />
SD card slot:<br />
Output connector: 1 system<br />
Ethernet:<br />
10BASE-T/100BASE-TX: 1 system<br />
Optical pick-up: System with 2 lenses<br />
Wave length:<br />
(RQT9243) 782 nm (CDs)/662 nm (DVDs)/405 nm (BDs)<br />
(RQT9350) 790 nm (CDs)/650 nm (DVDs)/405 nm (BDs)<br />
LASER Specification<br />
Class I LASER Product:<br />
Wave length:<br />
(RQT9243) 782 nm (CDs)/662 nm (DVDs)/405 nm (BDs)<br />
(RQT9350) 790 nm (CDs)/650 nm (DVDs)/405 nm (BDs)<br />
Laser power:<br />
No hazardous radiation is emitted with the safety<br />
protection<br />
Power supply: AC 120 V, 60 Hz<br />
Power consumption:<br />
[BD55]: Approx. 21 W<br />
[<strong>BD35</strong>]: Approx. 20 W<br />
Power consumption in standby mode: less than 0.6 W<br />
Dimensions (WkDkH)<br />
[BD55]:<br />
Excluding the projecting parts:<br />
430 mmk242 mmk55 mm<br />
(Approx. 16 15/16zk9 9/16zk2 3/16z)<br />
Including the projecting parts:<br />
430 mmk249 mmk55 mm<br />
(Approx. 16 15/16zk9 13/16zk2 3/16z)<br />
[<strong>BD35</strong>]:<br />
Excluding the projecting parts:<br />
430 mmk242 mmk49 mm<br />
(Approx. 16 15/16zk9 9/16zk1 15/16z)<br />
Including the projecting parts:<br />
430 mmk249 mmk49 mm<br />
(Approx. 16 15/16zk9 13/16zk1 15/16z)<br />
Mass (Weight): Approx. 2.6 kg (5.7 lbs)<br />
Specifications are subject to change without notice.<br />
*1 Finalizing is necessary.<br />
*2 Includes SDHC card<br />
Includes miniSD Cards (need a miniSD Adaptor)<br />
Includes microSD Cards (need a microSD Adaptor)<br />
*3 Does not support long file name<br />
*4 The total combined maximum number of recognizable picture<br />
contents and folders: 3000 picture contents and 300 folders.<br />
*5 The total combined maximum number of recognizable picture<br />
contents and folders: 999 picture contents and 99 folders.<br />
*6 The total combined maximum number of recognizable picture<br />
contents and folders: 9999 picture contents and 300 folders.<br />
*7 [BD55]: The total combined maximum number of recognizable<br />
picture contents and folders: 200 file contents and 300 folders.<br />
*8 AVCHD format V1.0<br />
≥Useable capacity will be less. (SD Card)<br />
Reference<br />
41<br />
RQT9243 or RQT9350
42<br />
RQT9243 or RQT9350<br />
Limited Warranty (ONLY FOR U.S.A. )<br />
<strong>Panasonic</strong> Consumer Electronics Company,<br />
Division of <strong>Panasonic</strong> Corporation of North America<br />
One <strong>Panasonic</strong> Way Secaucus, New Jersey 07094<br />
Limited Warranty Coverage<br />
If your product does not work properly because of a defect in<br />
materials or workmanship, <strong>Panasonic</strong> Consumer Electronics<br />
Company or <strong>Panasonic</strong> Puerto Rico, Inc. (collectively referred to as<br />
“the warrantor”) will, for the length of the period indicated on the chart<br />
below, which starts with the date of original purchase (“Limited<br />
Warranty period”), at its option either (a) repair your product with new<br />
or refurbished parts, or (b) replace it with a new or a refurbished<br />
product. The decision to repair or replace will be made by the<br />
warrantor.<br />
Product or Part Name Parts Labor<br />
<strong>Blu</strong>-<strong>ray</strong> <strong>Disc</strong> <strong>Player</strong> One (1) Year One (1) Year<br />
During the “Labor” Limited Warranty period there will be no charge for<br />
labor. During the “Parts” warranty period, there will be no charge for<br />
parts. You must mail-in your product during the warranty period. If<br />
non-rechargeable batteries are included, they are not warranted. This<br />
Limited Warranty only applies to products purchased and serviced in<br />
the United States or Puerto Rico. This Limited Warranty is extended<br />
only to the original purchaser and only covers product purchased as<br />
new. A purchase receipt or other proof of original purchase date is<br />
required for Limited Warranty service.<br />
For assistance in Puerto Rico call <strong>Panasonic</strong> Puerto Rico, Inc.<br />
(787)-750-4300 or fax (787)-768-2910.<br />
When shipping the unit carefully pack and send it prepaid,<br />
adequately insured and preferably in the original carton. Include a<br />
letter detailing the complaint and provide a day time phone and/or<br />
email address where you can be reached.<br />
IF REPAIR IS NEEDED DURING THE LIMITED WARRANTY<br />
PERIOD THE PURCHASER WILL BE REQUIRED TO FURNISH A<br />
SALES RECEIPT/PROOF OF PURCHASE INDICATING DATE OF<br />
PURCHASE, AMOUNT PAID AND PLACE OF PURCHASE.<br />
CUSTOMER WILL BE CHARGED FOR THE REPAIR OF ANY UNIT<br />
RECEIVED WITHOUT SUCH PROOF OF PURCHASE.<br />
Customer Services Directory<br />
<strong>Panasonic</strong> Puerto Rico, Inc.<br />
Ave. 65 de Infantería, Km. 9.5<br />
San Gabriel Industrial Park, Carolina, Puerto Rico 00985<br />
<strong>Panasonic</strong> <strong>Blu</strong>-<strong>ray</strong> <strong>Disc</strong> <strong>Player</strong> Limited Warranty<br />
Limited Warranty Limits And Exclusions<br />
This Limited Warranty ONLY COVERS failures due to defects in<br />
materials or workmanship, and DOES NOT COVER normal wear and<br />
tear or cosmetic damage. The Limited Warranty ALSO DOES NOT<br />
COVER damages which occurred in shipment, or failures which are<br />
caused by products not supplied by the warrantor, or failures which<br />
result from accidents, misuse, abuse, neglect, mishandling,<br />
misapplication, alteration, faulty installation, set-up adjustments,<br />
misadjustment of consumer controls, improper maintenance, power<br />
line surge, lightning damage, modification, or commercial use (such<br />
as hotel, office, restaurant, or other business), rental use of the<br />
product, or service by anyone other than a Factory Servicenter or<br />
other Authorized Servicer, or damage that is attributable to acts of<br />
God.<br />
THERE ARE NO EXPRESS WARRANTIES EXCEPT AS LISTED<br />
UNDER “LIMITED WARRANTY COVERAGE”. THE WARRANTOR<br />
IS NOT LIABLE FOR INCIDENTAL OR CONSEQUENTIAL<br />
DAMAGES RESULTING FROM THE USE OF THIS PRODUCT, OR<br />
ARISING OUT OF ANY BREACH OF THIS WARRANTY. (As<br />
examples, this excludes damages for lost time, cost of having<br />
someone remove or re-install an installed unit if applicable, travel to<br />
and from the servicer, loss of or damage to media or images, data or<br />
other recorded content. The items listed are not exclusive, but are for<br />
illustration only.)<br />
ALL EXPRESS AND IMPLIED WARRANTIES, INCLUDING THE<br />
WARRANTY OF MERCHANTABILITY, ARE LIMITED TO THE<br />
PERIOD OF THE LIMITED WARRANTY.<br />
Some states do not allow the exclusion or limitation of incidental or<br />
consequential damages, or limitations on how long an implied Limited<br />
Warranty lasts, so the exclusions may not apply to you.<br />
This Limited Warranty gives you specific legal rights and you may<br />
also have other rights which vary from state to state. If a problem with<br />
this product develops during or after the Limited Warranty period, you<br />
may contact your dealer or Servicenter. If the problem is not handled<br />
to your satisfaction, then write to the warrantor’s Consumer Affairs<br />
Department at the addresses listed for the warrantor.<br />
PARTS AND SERVICE, WHICH ARE NOT COVERED BY THIS<br />
LIMITED WARRANTY, ARE YOUR RESPONSIBILITY.<br />
Obtain Product Information and <strong>Operating</strong> Assistance; purchase Parts, Accessories, or obtain Literature by visiting our Web Site at:<br />
http://www.panasonic.com/consumersupport<br />
or, contact us via the web at:<br />
http://www.panasonic.com/contactinfo<br />
You may also contact us directly at:<br />
1-800-211-PANA (7262),<br />
Monday-Friday 9 am-9 pm; Saturday-Sunday 10 am-7 pm, EST.<br />
For hearing or speech impaired TTY users, TTY: 1-877-833-8855<br />
Accessory Purchases<br />
Purchase Parts, Accessories and Instruction Books online for all <strong>Panasonic</strong> Products by visiting our Web Site at:<br />
http://www.pstc.panasonic.com<br />
or, send your request by E-mail to:<br />
npcparts@us.panasonic.com<br />
You may also contact us directly at:<br />
1-800-332-5368 (Phone) 1-800-237-9080 (Fax Only) (Monday – Friday 9 am to 9 pm, EST.)<br />
<strong>Panasonic</strong> Service and Technology Company<br />
20421 84th Avenue South, Kent, WA 98032<br />
(We Accept Visa, MasterCard, <strong>Disc</strong>over Card, American Express, and Personal Checks)<br />
For hearing or speech impaired TTY users, TTY : 1-866-605-1277<br />
Product Repairs Centralized Factory Servicenter<br />
MAIL TO:<br />
<strong>Panasonic</strong> Service and Technology Company<br />
410B Airport Road<br />
Elgin, IL 60123-9333<br />
Attention: BD/DVD Repair<br />
Please carefully pack and ship, prepaid and insured, to the Elgin Centralized Factory Servicenter. Customers in Puerto Rico, please ship or<br />
carry in to location below (“Service in Puerto Rico”).<br />
Service in Puerto Rico<br />
<strong>Panasonic</strong> Puerto Rico, Inc.<br />
Ave. 65 de Infantería, Km. 9.5, San Gabriel Industrial Park, Carolina, Puerto Rico 00985<br />
Phone (787)750-4300, Fax (787)768-2910<br />
As of January 2007
Limited Warranty (ONLY FOR CANADA)<br />
<strong>Panasonic</strong> Canada Inc.<br />
PANASONIC PRODUCT—LIMITED WARRANTY<br />
<strong>Panasonic</strong> Canada Inc. warrants this product to be free from defects in material and workmanship and agrees to remedy any such defect for a<br />
period as stated below from the date of original purchase.<br />
Technics Audio Product One (1) year, parts and labour<br />
<strong>Panasonic</strong> Portable/Clock Radio (without Tape, CD, MD) One (1) year, parts and labour<br />
<strong>Panasonic</strong> Audio/SD Audio Product One (1) year, parts and labour<br />
<strong>Panasonic</strong> BD/DVD Product One (1) year, parts and labour<br />
<strong>Panasonic</strong> Combination DVD <strong>Player</strong>/VCR One (1) year, parts and labour<br />
<strong>Panasonic</strong> Combination DVD Recorder/VCR One (1) year, parts and labour<br />
Accessories including rechargeable batteries Ninety (90) days<br />
LIMITATIONS AND EXCLUSIONS<br />
This warranty does not apply to products purchased outside Canada or to any product which has been improperly installed, subjected to usage for<br />
which the product was not designed, misused or abused, damaged during shipping, or which has been altered or repaired in any way that affects<br />
the reliability or detracts from the performance, nor does it cover any product which is used commercially. Dry cell batteries are also excluded from<br />
coverage under this warranty.<br />
This warranty is extended to the original end user purchaser only. A purchase receipt or other proof of date of original purchase is required before<br />
warranty service is performed.<br />
THIS EXPRESS, LIMITED WARRANTY IS IN LIEU OF ALL OTHER WARRANTIES, EXPRESS OR IMPLIED, INCLUDING ANY IMPLIED<br />
WARRANTIES OF MERCHANTABILITY AND FITNESS FOR A PARTICULAR PURPOSE.<br />
IN NO EVENT WILL PANASONIC CANADA INC. BE LIABLE FOR ANY SPECIAL, INDIRECT OR CONSEQUENTIAL DAMAGES.<br />
In certain instances, some jurisdictions do not allow the exclusion or limitation of incidental or consequential damages, or the exclusion of implied<br />
warranties, so the above limitations and exclusions may not be applicable.<br />
WARRANTY SERVICE<br />
FOR PRODUCT OPERATION ASSISTANCE, please contact:<br />
Our Customer Care Centre: Telephone #: (905) 624-5505<br />
1-800 #: 1-800-561-5505<br />
Fax #: (905) 238-2360<br />
Email link: “Customer support” on www.panasonic.ca<br />
FOR PRODUCT REPAIRS, please locate your nearest Authorized Servicentre at www.panasonic.ca :<br />
Link : “Servicentres TM locator” under “Customer support”<br />
IF YOU SHIP THE PRODUCT TO A SERVICENTRE<br />
Carefully pack and send prepaid, adequately insured and preferably in the original carton.<br />
Include details of the defect claimed, and proof of date of original purchase.<br />
Reference<br />
43<br />
RQT9243 or RQT9350
44<br />
RQT9243 or RQT9350<br />
Product Service<br />
1. Damage requiring service—The unit should be serviced by<br />
qualified service personnel if:<br />
(a) The AC power supply cord or AC adaptor has been damaged;<br />
or<br />
(b) Objects or liquids have gotten into the unit; or<br />
(c) The unit has been exposed to rain; or<br />
(d) The unit does not operate normally or exhibits a marked<br />
change in performance; or<br />
(e) The unit has been dropped or the cabinet damaged.<br />
2. Servicing—Do not attempt to service the unit beyond that<br />
described in these operating instructions. Refer all other<br />
servicing to authorized servicing personnel.<br />
3. Replacement parts—When parts need replacing ensure the<br />
servicer uses parts specified by the manufacturer or parts that<br />
have the same characteristics as the original parts. Unauthorized<br />
substitutes may result in fire, electric shock, or other hazards.<br />
4. Safety check—After repairs or service, ask the servicer to<br />
perform safety checks to confirm that the unit is in proper working<br />
condition.<br />
Product information<br />
For product information or assistance with product operation:<br />
In the U.S.A., refer to “Customer Services Directory” on page 42.<br />
In Canada, contact the <strong>Panasonic</strong> Canada Inc. Customer Care<br />
Centre at 1-800-561-5505, or visit the website (www.panasonic.ca),<br />
or an authorized Servicentre closest to you.<br />
The model number and serial number of this product can be<br />
found on either the back or the bottom of the unit.<br />
Please note them in the space provided below and keep for<br />
future reference.<br />
MODEL NUMBER<br />
SERIAL NUMBER<br />
User memo:<br />
DATE OF PURCHASE<br />
DEALER NAME<br />
DEALER ADDRESS<br />
TELEPHONE NUMBER<br />
Licenses<br />
Java and all Java-based trademarks and logos are trademarks or<br />
registered trademarks of Sun Microsystems, Inc. in the United<br />
States and other countries.<br />
Manufactured under license from Dolby Laboratories. Dolby and<br />
the double-D symbol are trademarks of Dolby Laboratories.<br />
Manufactured under license under U.S. Patent #’s: 5,451,942;<br />
5,956,674; 5,974,380; 5,978,762; 6,226,616; 6,487,535 & other<br />
U.S. and worldwide patents issued & pending.<br />
DTS is a registered trademark and the DTS logos, Symbol,<br />
DTS-HD and DTS-HD Master Audio Essential are trademarks of<br />
DTS, Inc.<br />
© 1996-2008 DTS, Inc. All Rights Reserved.<br />
U.S. Patent Nos. 6,836,549; 6,381,747; 7,050,698; 6,516,132; and<br />
5,583,936.<br />
This product incorporates copyright protection technology that is<br />
protected by U.S. patents and other intellectual property rights.<br />
Use of this copyright protection technology must be authorized by<br />
Macrovision, and is intended for home and other limited viewing<br />
uses only unless otherwise authorized by Macrovision. Reverse<br />
engineering or disassembly is prohibited.<br />
HDMI, the HDMI logo and High-Definition Multimedia Interface are<br />
trademarks or registered trademarks of HDMI Licensing LLC.<br />
This product is licensed under the AVC patent portfolio license and<br />
VC-1 patent portfolio license for the personal and non-commercial<br />
use of a consumer to (i) encode video in compliance with the AVC<br />
Standard and VC-1 Standard (“AVC/VC-1 Video”) and/or (ii)<br />
decode AVC/VC-1 Video that was encoded by a consumer<br />
engaged in a personal and non-commercial activity and/or was<br />
obtained from a video provider licensed to provide AVC/VC-1<br />
Video. No license is granted or shall be implied for any other use.<br />
Additional information may be obtained from MPEG LA, LLC. See<br />
http://www.mpegla.com.<br />
HDAVI Control is a trademark of <strong>Panasonic</strong> Corporation.<br />
“x.v.Color” is trademark.<br />
VIERA LinkTM is a trademark of <strong>Panasonic</strong> Corporation.<br />
EZ Sync is a trademark of <strong>Panasonic</strong> Corporation.<br />
“AVCHD” and the “AVCHD” logo are trademarks of <strong>Panasonic</strong><br />
Corporation and Sony Corporation.<br />
SDHC Logo is a trademark.<br />
Portions of this product are protected under copyright law and are<br />
provided under license by ARIS/SOLANA/4C.<br />
Official DivX ® Certified product.<br />
Plays all versions of DivX ® video (including<br />
DivX ® 6) with standard playback of DivX ®<br />
media files.<br />
DivX, DivX Certified, and associated logos<br />
are trademarks of DivX, Inc. and are used under license.<br />
“<strong>Blu</strong>-<strong>ray</strong> <strong>Disc</strong>” is trademark.<br />
“BD-LIVE” logo is trademark of <strong>Blu</strong>-<strong>ray</strong> <strong>Disc</strong> Association.<br />
“BONUSVIEW” is trademark of <strong>Blu</strong>-<strong>ray</strong> <strong>Disc</strong> Association.
Referencia rápida en español (Spanish Quick Reference)<br />
Conexiones básicas<br />
AConexión a un televisor compatible con<br />
HDMI<br />
HDMI AV OUT HDMI IN<br />
Cable HDMI<br />
Parte posterior de la unidad<br />
BConexión a un televisor con un cable para<br />
audio/vídeo<br />
Parte posterior de la unidad<br />
≥Esta conexión no permite la salida de vídeo de alta definición.<br />
Utilice la conexión A o C para obtener vídeo de alta definición.<br />
C Conexión a un televisor compatible con HDMI y a un amplificador/receptor compatible con HDMI<br />
HDMI AV OUT<br />
Cable HDMI<br />
Parte posterior de la unidad<br />
Conecte el cable de alimentación de CA por último<br />
A una toma de corriente doméstica<br />
(CA 120 V, 60 Hz)<br />
Reproducción básica<br />
Preparación<br />
Encienda el televisor y seleccione la entrada de vídeo adecuada en<br />
el televisor.<br />
1 Pulse [Í BD POWER] para encender la unidad.<br />
Después de conectar su nuevo reprodutor y pulsar el botón de<br />
encendido, aparecerá la pantalla de la configuración básica.<br />
2 Pulse [< OPEN/CLOSE] para abirir la bandeja<br />
del disco, cargue el disco.<br />
Inicia la reproducción<br />
Parada<br />
La posición de detención se memoriza.<br />
Función de reanudación de la reproducción<br />
Pulse [1] (PLAY) para reiniciar la reproducción desde esta posición.<br />
≥La posición se borra si se abre la bandeja o se pulsa [∫] varias<br />
veces para visualizar “STOP” en el visor de la unidad.<br />
≥[BD-V]: En los discos BD-Video incluidos los BD-J, la función de<br />
reanudación de la reproducción no funciona.<br />
≥[CD] [MP3] [DivX] ([BD55]): La posición se borra si apaga la unidad.<br />
Pausa<br />
Televisor<br />
compatible<br />
con HDMI<br />
HDMI IN<br />
HDMI OUT<br />
Altavoces multicanal<br />
Cable de alimentación de CA (incluido)<br />
Conéctelo cuando haya realizado el resto de conexiones.<br />
PLAY<br />
STOP<br />
PAUSE<br />
≥Pulse [;] otra vez o [1] (PLAY) para reiniciar la reproducción.<br />
Cable HDMI<br />
Amplificador/Receptor compatible con HDMI<br />
AC IN<br />
HDMI IN<br />
Ahorro de energía<br />
Esta unidad consume una pequeña cantidad de energía aunque esté<br />
ajustada en el modo de espera (aprox. 0.6 W). Para ahorrar energía<br />
cuando no vaya a utilizar la unidad durante mucho tiempo,<br />
desenchúfela de la toma de corriente.<br />
SLOW/SEARCH<br />
Búsqueda/Cámara lenta<br />
La velocidad aumenta hasta 5 pasos.<br />
≥Pulse [1] (PLAY) para recuperar la velocidad de reproducción<br />
normal.<br />
≥Para algunos discos, la velocidad podría no cambiar.<br />
Búsqueda<br />
Durante la reproducción, pulse [6] o [5].<br />
≥[BD-V] [AVCHD] [DVD-VR] [DVD-V]: El audio se oye durante la<br />
búsqueda en avance de primer nivel.<br />
≥[DivX] [BD55]: El sonid no se oye durante todos los niveles de<br />
búsqueda.<br />
≥[CD] [MP3]: La velocidad está fija en un paso.<br />
Cámara lenta<br />
Durante la pausa, pulse [6] o [5].<br />
≥[BD-V] [AVCHD]: Sólo dirección en avance [5].<br />
≥[DVD-VR]:Si continua durante aprox. 5 minutos, la reproducción en<br />
cámara lenta se para automáticamente.<br />
SKIP<br />
Salto<br />
AUDIO IN<br />
R L VIDEO IN<br />
AUDIO/VIDEO IN<br />
Televisor<br />
compatible<br />
con HDMI<br />
Cable de audio/<br />
vídeo (incluido)<br />
Televisor<br />
≥Salta hasta el título, capítulo o pista que desee reproducir.<br />
≥Cada pulsación aumenta el número de saltos.<br />
≥[DivX] [BD55]: Solo dirección hacia atrás [:].<br />
Reference<br />
45<br />
RQT9243 or RQT9350
46<br />
RQT9243 or RQT9350<br />
Glossary<br />
AVCHD<br />
AVCHD is a new format (standard) for high definition video cameras<br />
that can be used to record and play high-resolution HD images.<br />
BD-J<br />
Some BD-Video discs contain Java applications, and these<br />
applications are called BD-J. You can enjoy various interactive<br />
features in addition to playing normal video.<br />
BD-Live<br />
This is a BD-Video (BD-ROM version 2 Profile 2) that supports the<br />
new functions such as Internet connection, etc. in addition to the<br />
BONUSVIEW function.<br />
Bitstream<br />
This is the digital form of multi-channel audio data (e.g., 5.1 channel)<br />
before it is decoded into its various channels.<br />
BONUSVIEW (Final Standard Profile)<br />
This is a BD-Video (BD-ROM version 2 Profile 1 version 1.1) that<br />
supports the new functions such as Picture-in-picture, Secondary<br />
Audio, and Virtual Package, etc.<br />
Deep Color<br />
Deep Color is a name for device that can reproduce greater color<br />
gradation (4096 steps) when connected to a TV that supports the<br />
deep color with HDMI cable. You can enjoy exceptionally rich,<br />
natural-looking colors, with smooth, detailed gradation and minimal<br />
color banding. [A lower color gradation (256 steps), without deep<br />
color, will be reproduced if connected to a TV which does not support<br />
deep color. The unit will automatically set appropriate output to suit<br />
the connected TV.]<br />
DivX [BD55]<br />
DivX is a popular media technology created by DivX, Inc. DivX media<br />
files contain highly compressed video with high visual quality that<br />
maintains a relatively small file size.<br />
DNS Server<br />
A server which acts like a telephone directory and translates Internet<br />
domain names into IP addresses.<br />
Dolby Digital<br />
This is a method of coding digital signals developed by Dolby<br />
Laboratories. Apart from stereo (2-channel) audio, these signals can<br />
also be multi-channel audio.<br />
Dolby Digital Plus<br />
Multi-channel audio and higher audio quality is made possible using<br />
Dolby Digital Plus. BD-Video supports up to 7.1 channel output.<br />
Dolby TrueHD<br />
Dolby TrueHD is a very high quality audio format that reproduces the<br />
studio master audio. BD-Video supports up to 7.1 channel output.<br />
Down-mixing<br />
This is the process of remixing the multi-channel audio found on<br />
some discs into fewer channels.<br />
DTS (Digital Theater Systems)<br />
This surround system is used in many movie theaters. There is good<br />
separation between the channels, so realistic sound effects are<br />
possible.<br />
DTS-HD<br />
DTS-HD is a high-quality, sophisticated audio format used in movie<br />
theaters. Previous DTS Digital Surround-compatible equipment can<br />
play DTS-HD as DTS Digital Surround audio. BD-Video supports up<br />
to 7.1 channel output.<br />
DTS-HD High Resolution Audio<br />
This is a signal format achieved by improving the previous DTS,<br />
DTS-ES and DTS96/24 formats. It is compatible with sampling<br />
frequency 96 kHz/48 kHz. BD-Video supports up to 7.1 channel<br />
output.<br />
DTS-HD Master Audio<br />
This is a lossless audio format and compatible with 96 kHz/7.1ch or<br />
less. In addition, faithful reproduction of the master audio is enabled<br />
using lossless audio encoding technology. BD-Video supports up to<br />
7.1 channel output.<br />
Dynamic range<br />
Dynamic range is the difference between the lowest level of sound<br />
that can be heard above the noise of the equipment and the highest<br />
level of sound before distortion occurs.<br />
Dynamic range compression means reducing the gap between the<br />
loudest and softest sounds. This means you can listen at low<br />
volumes but still hear dialog clearly.<br />
Film and video<br />
DVD-Video are recorded using either film or video. This unit can<br />
determine which type has been used, then uses the most suitable<br />
method of progressive output.<br />
Film: Recorded at 24 frames per second. (Recorded at 30<br />
frames per second as well). Generally appropriate for<br />
motion picture films.<br />
Video: Recorded at 30 frames/60 fields per second. Generally<br />
appropriate for TV drama programs or animation.<br />
Frames and fields<br />
Frames refer to the single images that constitute the video you see on<br />
your television. Each frame consists of two fields.<br />
u r<br />
Frame Field Field<br />
≥A frame still shows two fields, so there may be some blurring, but<br />
picture quality is generally better.<br />
≥A field still shows less picture information so it may be rougher, but<br />
there is no blurring.<br />
Gateway<br />
IP address of the electronic device providing Internet access.<br />
Usually called a router IP address. (e.g., 192.168.0.1)<br />
HDMI (High-Definition Multimedia Interface)<br />
HDMI is a digital interface for consumer electronic products. Unlike<br />
conventional connections, it transmits uncompressed digital video<br />
and audio signals on a single cable.<br />
Hub<br />
Used for connecting more than one device to the network.<br />
IP address<br />
A set of numbers which distinguish each device on the network when,<br />
for example, connected to the Internet. When using a PC in a LAN to<br />
access a PC or device that is not included in the LAN, the IP address<br />
is called the local IP address. (e.g., 192.168.0.10)<br />
JPEG (Joint Photographic Experts Group)<br />
This is a system used for compressing/decoding color still pictures. If<br />
you select JPEG as the storage system on digital cameras, etc., the<br />
data will be compressed to 1/10–1/100 of its original size. The benefit<br />
of JPEG is less deterioration in picture quality considering the degree<br />
of compression.<br />
LAN (Local Area Network)<br />
A group of linked devices in a company, school or home.<br />
Indicates the boundaries of a particular network.<br />
Local storage<br />
This storage area is used as a destination for sub contents for playing<br />
virtual packages on BD-Video.<br />
LPCM (Linear PCM)<br />
These are a kind of PCM format.<br />
These are uncompressed digital signals, similar to those found on<br />
CDs.<br />
MP3 (MPEG Audio Layer 3)<br />
An audio compression method that compresses audio to<br />
approximately one tenth of its size without any significant loss of<br />
audio quality.
P4HD (Pixel Precision Progressive Processing for HD)<br />
This is a processor which makes use of an exclusive <strong>Panasonic</strong><br />
algorithm. Various processing is supported, including a high-level<br />
conversion of the TV scanning format from interlace to progressive<br />
and a high-level conversion of standard resolution (480i or 576i)<br />
video signal to a 1080 High Definition video signal.<br />
Consequently, this unit is able to provide video of optimal resolution<br />
to the connected TV.<br />
Pan&Scan/Letterbox<br />
In general, DVD-Video are produced with the intention that they be<br />
viewed on a widescreen television (16:9 aspect ratio), so images<br />
often don’t fit regular (4:3 aspect ratio) televisions. Two styles of<br />
picture, “Pan & Scan” and “Letterbox”, deal with this problem.<br />
Pan&Scan:The sides are cut off so the picture fills<br />
the screen.<br />
Letterbox: Black bands appear at the top and bottom<br />
of the picture so the picture itself appears<br />
in an aspect ratio of 16:9.<br />
PCM (Pulse Code Modulation)<br />
This is one format for converting analog audio into digital audio,<br />
enabling you to enjoy digital audio with no hassle.<br />
Progressive/Interlace<br />
The video signal standard of NTSC has 480 interlaced (i) scan lines,<br />
whereas progressive (p) scanning uses twice the number of scan<br />
lines, and this is referred to as 480p. Using progressive output, you<br />
can enjoy watching high resolution video.<br />
Router<br />
Distinguishes the IP address assigned to each device, such as the<br />
PC, and relays the flow of data within the network.<br />
Sampling frequency<br />
Sampling is the process of converting the heights of sound wave<br />
(analog signal) samples taken at set periods into digits (digital<br />
encoding). Sampling frequency is the number of samples taken per<br />
second, so larger numbers mean more faithful reproduction of the<br />
original sound.<br />
Subnet mask<br />
Enables efficient network use. A set of numbers which identify which<br />
part of the IP address allocated to every device connected to the<br />
router is the network portion.<br />
x.v.Color<br />
x.v.Color is a name for devices that are compatible with the xvYCC<br />
format, an international standard for expanded color in motion<br />
pictures, and that follow the rules for signal transmission.<br />
You can enjoy vivid colors of wider color ranges for a more realistic<br />
picture when connected to a TV that supports the x.v.Color with<br />
HDMI cable.<br />
1080i (1125i)<br />
In one high definition image, 1080 (1125) alternating scan lines pass<br />
to create an interlaced image. Because 1080i (1125i) more than<br />
doubles current television broadcasts of 480i, the detail is much<br />
clearer and creates a more realistic and rich image.<br />
1080p (1125p)<br />
In one high definition image, 1080 (1125) scan lines pass at the same<br />
time to create a progressive image. Since progressive video does not<br />
alternate scan lines like interlace, there is a minimal amount of<br />
screen flicker.<br />
24p<br />
This is a progressive image recorded at a rate of 24 frames per<br />
second.<br />
720p (750p)<br />
In one high definition image, 720 (750) scan lines pass at the same<br />
time to create a progressive image. Since progressive video does not<br />
alternate scan lines like interlace, there is a minimal amount of<br />
screen flicker.<br />
Reference<br />
47<br />
RQT9243 or RQT9350
Index<br />
A AC Power Connection . . . . . . . . . . . . 13<br />
Angle . . . . . . . . . . . . . . . . . . . . . . . . . . 28<br />
Audio<br />
Attribute . . . . . . . . . . . . . . . . . . . . . . 28<br />
Changing audio . . . . . . . . . . . . . . . . 20<br />
Channel . . . . . . . . . . . . . . . . . . . . . . 28<br />
Language . . . . . . . . . . . . . . . . . . 28, 30<br />
AVCHD. . . . . . . . . . . . . . . . . . . . . . . . . 46<br />
B BD-J . . . . . . . . . . . . . . . . . . . . . . . . . . . 46<br />
BD-Live . . . . . . . . . . . . . . . . . . . . . 21, 46<br />
BD-Video Ratings . . . . . . . . . . . . . . . . 30<br />
BONUSVIEW (Final Standard Profile)<br />
. . . . . . . . . . . . . . . . . . . . . . . . . . . . 21, 46<br />
C Chapter . . . . . . . . . . . . . . . . . . . . . . . . 22<br />
Cleaning<br />
<strong>Disc</strong>. . . . . . . . . . . . . . . . . . . . . . . . . . . 3<br />
Lens . . . . . . . . . . . . . . . . . . . . . . . . . . 3<br />
Main unit . . . . . . . . . . . . . . . . . . . . . . . 3<br />
Connections<br />
Amplifier/Receiver . . . . . . . . . . . 12, 13<br />
HDMI . . . . . . . . . . . . . . . . . . . . . 11, 12<br />
D Deep Color . . . . . . . . . . . . . . . . . . . . . 46<br />
Dialog Enhancer . . . . . . . . . . . . . . . . . 29<br />
Direct Navigator . . . . . . . . . . . . . . . . . 19<br />
<strong>Disc</strong> and card handling . . . . . . . . . . . . 3<br />
<strong>Disc</strong>s that cannot be played . . . . . . . . 7<br />
DivX . . . . . . . . . . . . . . . . . . . . 24, 35, 46<br />
DNS Server . . . . . . . . . . . . . . . . . . 17, 46<br />
Dolby Digital . . . . . . . . . . . . . . . . . 31, 46<br />
Dolby Digital Plus. . . . . . . . . . . 8, 31, 46<br />
Dolby TrueHD . . . . . . . . . . . . . . 8, 31, 46<br />
DTS . . . . . . . . . . . . . . . . . . . . . . . . 31, 46<br />
DTS-HD . . . . . . . . . . . . . . . . . . . 8, 31, 46<br />
F Finalize . . . . . . . . . . . . . . . . . . . . . . . . . 6<br />
Firmware . . . . . . . . . . . . . . . . . . . . . . . 14<br />
<strong>Panasonic</strong> Consumer Electronics<br />
Company, Division of <strong>Panasonic</strong><br />
Corporation of North America<br />
One <strong>Panasonic</strong> Way Secaucus,<br />
New Jersey 07094<br />
http://www.panasonic.com<br />
C <strong>Panasonic</strong> Corporation 2008<br />
Printed in China<br />
Format . . . . . . . . . . . . . . . . . . . . . . . . . 21<br />
Frame-by-frame. . . . . . . . . . . . . . . . . . 20<br />
H HDMI . . . . . . . . . . . . . . . . . . . . . 11, 12, 46<br />
I IP address . . . . . . . . . . . . . . . . . . . 17, 46<br />
J JPEG. . . . . . . . . . . . . . . . . . . . . 22, 35, 46<br />
L LAN. . . . . . . . . . . . . . . . . . . . . . . . . 14, 46<br />
Language<br />
Audio . . . . . . . . . . . . . . . . . . . . . . 28, 30<br />
Code list . . . . . . . . . . . . . . . . . . . . . . 30<br />
On-screen . . . . . . . . . . . . . . . . . . . . . 32<br />
Soundtrack . . . . . . . . . . . . . . . . . . . . 28<br />
Subtitle . . . . . . . . . . . . . . . . . . . . 28, 30<br />
Local storage. . . . . . . . . . . . . . . . . . . . 46<br />
LPCM . . . . . . . . . . . . . . . . . . . . . . . . . . 46<br />
M Maintenance . . . . . . . . . . . . . . . . . . . . . 3<br />
Menu<br />
On-screen . . . . . . . . . . . . . . . . . . . . . 28<br />
Pop-up. . . . . . . . . . . . . . . . . . . . . . . . 19<br />
Setup. . . . . . . . . . . . . . . . . . . . . . . . . 30<br />
MP3. . . . . . . . . . . . . . . . . . . . . . 25, 35, 46<br />
N Noise reduction (NR)<br />
Integrated NR . . . . . . . . . . . . . . . . . . 29<br />
3D NR . . . . . . . . . . . . . . . . . . . . . . . . 29<br />
O Off Timer . . . . . . . . . . . . . . . . . . . . . . . 33<br />
On-screen<br />
Language . . . . . . . . . . . . . . . . . . . . . 32<br />
Menu . . . . . . . . . . . . . . . . . . . . . . . . . 28<br />
Status messages. . . . . . . . . . . . . . . . 20<br />
P PCM Down Conversion. . . . . . . . . . . . 31<br />
Picture-in-picture . . . . . . . . . . . . . . . 21<br />
Playlist . . . . . . . . . . . . . . . . . . . . . . . . . 20<br />
Pop-up Menu . . . . . . . . . . . . . . . . . . . . 19<br />
Product Disposal. . . . . . . . . . . . . . . . . . 3<br />
Progressive . . . . . . . . . . . . . . . . . . 29, 47<br />
[For\U.S.A.] [For\Canada]<br />
<strong>Panasonic</strong> Puerto Rico, Inc.<br />
Ave. 65 de Infantería, Km. 9.5<br />
San Gabriel Industrial Park, Carolina,<br />
Puerto Rico 00985<br />
Properties<br />
Chapter . . . . . . . . . . . . . . . . . . . . . . 22<br />
Still picture . . . . . . . . . . . . . . . . . . . . 23<br />
Proxy Server . . . . . . . . . . . . . . . . . . . . 18<br />
P4HD . . . . . . . . . . . . . . . . . . . . . . . . . . 47<br />
R Ratings level . . . . . . . . . . . . . . . . . . . . 30<br />
Re-master . . . . . . . . . . . . . . . . . . . 20, 29<br />
Remote control<br />
Remote control code . . . . . . . . . . . . 33<br />
Reprogramming the<br />
remote control . . . . . . . . . . . . . . . . . 16<br />
Using the remote control . . . . . . . . . . 5<br />
Repeat play. . . . . . . . . . . . . . . . . . . . . 29<br />
Restore Default Settings . . . . . . . . . . 33<br />
Resume play function . . . . . . . . . . . . 19<br />
S SD card . . . . . . . . . . . . . . . . . . . . . . 7, 21<br />
Search . . . . . . . . . . . . . . . . . . . . . . . . . 19<br />
Selected playback . . . . . . . . . . . . . . . 19<br />
Setup menu. . . . . . . . . . . . . . . . . . . . . 30<br />
Skip . . . . . . . . . . . . . . . . . . . . . . . . . . . 19<br />
Slideshow . . . . . . . . . . . . . . . . . . . . . . 23<br />
Slow-motion . . . . . . . . . . . . . . . . . . . . 19<br />
Soundtrack . . . . . . . . . . . . . . . . . . . . . 28<br />
Status Message . . . . . . . . . . . . . . . . . 20<br />
Still pictures . . . . . . . . . . . . . . . . . . . . 22<br />
Subtitle . . . . . . . . . . . . . . . . . . . . . . . . 28<br />
Switch drives . . . . . . . . . . . . . . . . . . . 19<br />
V V. Surround. . . . . . . . . . . . . . . . . . . . . 29<br />
VIERA Link TM “HDAVI Control TM ” . . . 26<br />
Virtual package. . . . . . . . . . . . . . . . . . 21<br />
X x.v.Color . . . . . . . . . . . . . . . . . . . . . . . 47<br />
24p . . . . . . . . . . . . . . . . . . . . . . . . . . . 29, 32<br />
-If you see this symbol-<br />
Information on Disposal in other Countries outside the<br />
European Union<br />
This symbol is only valid in the European Union.<br />
If you wish to discard this product, please contact<br />
your local authorities or dealer and ask for the correct<br />
method of disposal.<br />
<strong>Panasonic</strong> Canada Inc.<br />
5770 Ambler Drive<br />
Mississauga, Ontario<br />
L4W 2T3<br />
www.panasonic.ca<br />
pr<br />
RQT9243-1P or RQT9350-P<br />
F0808KE1088